Show your Mule

A place to share your experience with our Mule Team knives.
User avatar
phillipsted
Member
Posts: 3674
Joined: Tue Oct 05, 2010 11:30 am
Location: North Virginia

#581

Post by phillipsted »

I put the last coat of Tru-Oil on my PurpleHeart Swick2 scales last evening and buffed it out this morning. PurpleHeart is interesting material - a little too porous and splintery for my taste, but it looks beautiful with a high gloss finish. The tiny Swick2 handle was fun to work on - its about a third the size of a regular Mule scale and has lots of interesting curves. The end result feels really nice in-hand.

TedP

Image
Image
Image
Image
Image
Image
Image
Image
Image
Image
dfriedl
Member
Posts: 4
Joined: Thu Feb 02, 2012 5:09 pm

#582

Post by dfriedl »

Just finished my Cruwear Mule. Walnut scales and chainring bolts for mounting hardwear.
Image
Image
User avatar
xceptnl
Member
Posts: 9009
Joined: Mon Feb 21, 2011 6:48 pm
Location: Tobacco Country, Virginia
Contact:

#583

Post by xceptnl »

dfriedl wrote:...chainring bolts for mounting hardwear.
Those are some serious fasteners. They look like Torx T-50 or T-65 at first glance. They probably significantly change the balance.
Image
sal wrote: .... even today, we design a knife from the edge out!
*Landon*
User avatar
phillipsted
Member
Posts: 3674
Joined: Tue Oct 05, 2010 11:30 am
Location: North Virginia

#584

Post by phillipsted »

I like the walnut dfriedl! It looks like it is stablized - did you need to add a finish to it to get that smooth silky texture?

TedP
dfriedl
Member
Posts: 4
Joined: Thu Feb 02, 2012 5:09 pm

#585

Post by dfriedl »

xceptnl wrote:Those are some serious fasteners. They look like Torx T-50 or T-65 at first glance. They probably significantly change the balance.
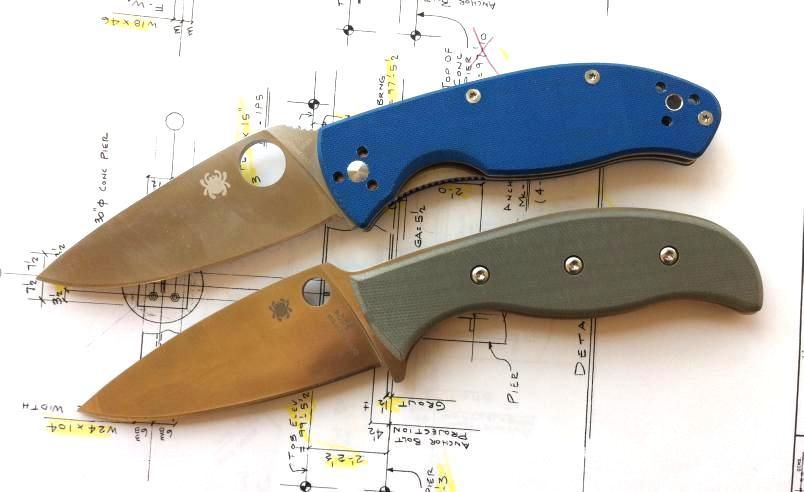
They're bulky, but made of a very lightweight alloy so they don't change the balance much. No different than using on of the various wood densities seen in this thread I imagine.
phillipsted wrote:I like the walnut dfriedl! It looks like it is stablized - did you need to add a finish to it to get that smooth silky texture?

TedP
Its raw walnut, sanded to 500 grit and then treated with tru-oil and buffed with a paper towel.
bdblue
Member
Posts: 1802
Joined: Tue Apr 24, 2012 10:04 pm
Location: Dallas, TX

#586

Post by bdblue »

I recently got the Chinese Mule along with some G10 scales. (Here it is communing with my Chinese Tenacious.) I will probably take off the G10 and make some wood scales for it.

Image
User avatar
phillipsted
Member
Posts: 3674
Joined: Tue Oct 05, 2010 11:30 am
Location: North Virginia

#587

Post by phillipsted »

I decided to post some shots of the lignum vitae scales on my ZDP-189 Mule this evening. They still aren't quite finished. Need to rub out some scratches, polish down the edge of the Mule's tang, and generally trim it up. But after a week of no electricity and no A/C, I figured I'd put it down for a few days.

In any event, this is my first time working with Lignum Vitae... Great stuff - very dense, hard, tough and oily - it clogs up files and sandpaper like nobody's business. It is also very forgiving, not chipping or splintering while working it. Plus, it is so resinous, you don't have to stabilize it or even put a top coat on it!

TedP

Image
Image
Image
User avatar
Thompson
Member
Posts: 44
Joined: Sat Feb 26, 2011 5:24 pm
Location: Georgia

#588

Post by Thompson »

Edit: After looking at more tutorials, I think I have everything figured out. I missed a few pages of this thread which had the info I was looking for.
I'm looking into buying a mule, and I just have a couple questions about what type of screws or pins you use to connect the handles? Can anyone show me what kind of screws they use, and where I could get them? Thanks!
User avatar
phillipsted
Member
Posts: 3674
Joined: Tue Oct 05, 2010 11:30 am
Location: North Virginia

#589

Post by phillipsted »

Hey, Thompson!

You've got a few choices about the style of pins/bolts you want to use on your knife. I use 3/16" pivot bolts with torx screws so I can make the scales detachable. Other folks use pins or Corby bolts along with epoxy to make a more permanent bond. Each of these methods use slightly different finishing processes.

I'd go check out the knife supply houses and pick the supplies for the method you want to try. (e.g., USA Knifemaker Supply, Texas Knifemaker Supplies, Jantz Supply)

Check back here if you have questions - we'd be glad to provide assistance!
User avatar
Thompson
Member
Posts: 44
Joined: Sat Feb 26, 2011 5:24 pm
Location: Georgia

#590

Post by Thompson »

phillipsted wrote:Hey, Thompson!

You've got a few choices about the style of pins/bolts you want to use on your knife. I use 3/16" pivot bolts with torx screws so I can make the scales detachable. Other folks use pins or Corby bolts along with epoxy to make a more permanent bond. Each of these methods use slightly different finishing processes.

I'd go check out the knife supply houses and pick the supplies for the method you want to try. (e.g., USA Knifemaker Supply, Texas Knifemaker Supplies, Jantz Supply)

Check back here if you have questions - we'd be glad to provide assistance!
Thank you for your help! I was still wondering what size pivot bolts to use, so that is very helpful. Thanks again!
User avatar
phillipsted
Member
Posts: 3674
Joined: Tue Oct 05, 2010 11:30 am
Location: North Virginia

#591

Post by phillipsted »

Thompson wrote:Thank you for your help! I was still wondering what size pivot bolts to use, so that is very helpful. Thanks again!
You are welcome! Here's what you are looking for, Thompson:

http://www.knifemaking.com/product-p/f6.htm

TedP
farns
Member
Posts: 30
Joined: Tue Jul 17, 2012 9:42 pm

#592

Post by farns »

This is my first attempt at putting scales on a mule. Except for some overzealous filing in a couple spots I am pretty happy with it. My question would be about finish, I have currently sanded to 600 grit and buffed the handle. It is bubinga and I would like to maintain a somewhat food safe finish. I understand that food safe finishes may need to be re-applied as time passes but was considering walnut oil with a coat of bees wax. Does anyone have experience that would recommend not doing this?

[ATTACH]20591[/ATTACH]
[ATTACH]20592[/ATTACH]
Attachments
mule_prefinish_02.JPG
mule_prefinish_01.JPG
User avatar
phillipsted
Member
Posts: 3674
Joined: Tue Oct 05, 2010 11:30 am
Location: North Virginia

#593

Post by phillipsted »

farns wrote:This is my first attempt at putting scales on a mule. Except for some overzealous filing in a couple spots I am pretty happy with it. My question would be about finish, I have currently sanded to 600 grit and buffed the handle. It is bubinga and I would like to maintain a somewhat food safe finish. I understand that food safe finishes may need to be re-applied as time passes but was considering walnut oil with a coat of bees wax. Does anyone have experience that would recommend not doing this?
First off, welcome to the Forum, farns! And what a beautiful mule - very nice work on the scales!

I'm sure others may have thoughts about the handle finish - but I wouldn't worry too much about the handle being food-safe. Normally, the blade is the main thing that comes in contact with the food.

As far as the scales are concerned, my main worry would be water infiltration of the wood and the harboring of bacteria. The best way to address this is to make the scales as close to "waterproof" as possible - this way you can wipe them down and sanitize them after use.

And the best product I've found for making knife scales waterproof is Tru-Oil, which is sold in sporting goods stores as a gun stock finish. Tru-Oil is a polymerized linseed oil base which cures hard and waterproof. Just make sure to put on very thin coats, wipe it down, let it dry, buff it with steel wool, and repeat. I've used it for years - and on a recent mule (see the pictures of the Purpleheart Swick above), I put on 8 thin coats over a couple of days. It sealed the pores and made a clear, hard, impervious finish. Great stuff!

TedP
Worry less - Breathe more...

Spydie Fanatic #185
User avatar
DCDesigns
Member
Posts: 1015
Joined: Fri Aug 05, 2011 5:50 pm
Location: ATL, Ga.
Contact:

#594

Post by DCDesigns »

eitenbuffalo34 wrote:I have a question, how does everyone do this?

Where do you all get the handle scale materials?
Do you do this with power tools (like a dremmel, etc.) or do you use files and sand paper?
How do you put the finish on (wood) or texture for other materials?
What screws/pivots do you all use?
and how do you figure out where the holes in the handle are behind the handle scale so that you can put the screw there?

I am thinking about getting one and trying this all out and just was looking for some advice because the mules on this forum are beautiful, thank you...
That is way too much to explain here. What you basically are asking for is a beginners crash course on knife making. I will explain the basics, but you have more research to do, books to read, websites to find, forums to peruse. The skill and information it takes to make and fit handles correctly is not likely something that can be learned just through one post. There is no one correct way to do it, so most likely you will develope your on technique based on your skills and whats available to you. What I use are three main tools to do just about everything when Im making handles. 1- Bandsaw- to rough out the handle shape - 2 Drill Press, to drill holes (as well as to use with a spindle sanding attatchment to do inside radii) 3- Belt/circular combination stand alone sanding machine- to do the rough shaping on outter radii. However, thats a couple grand worth of equipment, so if you arent a wood worker already, it is not likely you will have access to all of these. The one thing I would say you need access to out of these is a bandsaw (or scroll saw, even a jigsaw, something you can get a rough shape out of wood scales with) . However the most useful of the three, and if you were to BUY one, I would say get a drill press. Many attatchments exist that can turn it into several different tools. Also, it is MUCH MUCH more precise than trying to clamp things and use a hand drill. Its also the cheapest. You can find a decent Delta bench mounted drill press for $200 (dont bother with anything cheaper. Just as I would say dont bother with cheap bench mounted bandsaws. If all you are doing is shaping .3" thick wood, then I guess its ok, but it really cannot handle much thicker. for that you need at least 1 hp) The bare minimum saw I would say that is worth buying is a 14" 1hp+ bandsaw. They start at around $500 when you figure in shipping the 250lb thing and go up to a grand or more with all the bells and whistles or if it has a prestigious badge.

to answer some of your more specific questions. Where do you get handle material: personally, I sell figured woods for a living, so I fire up a chainsaw and walk into the forrest. But there are too many options to list for that aswer. Any knife supply website will have handle material, not necessarily at a value price, but they have it. Also many websites exist specifically to sell pre cut knife scales. The finish: again, no right anwer. Hundreds of products exist out there for finishing wood. You want one that is easy to apply evenly, that will not rub off after a lot of handling. You want durable. I have used everythign from CA (superglue) to automotive clear coat). Pin material - There are many options from screws to corbys to regular pin stock. I use regular old pins, solid metal rounds. And for your last question, how you figure where the holes go, you use the knife itself as your template. And I dont mean mark it, through it then drill, odds are you will screw up. I mean clamp the bloody thing to the handle material, and drill through it! Once you have one hole drilled, slide a pin the same size as the hole through the knife into the handle material to hold it still, and then drill the other holes, repeating the steps with the pins... Pro tip- you want a perfectly flat piece of material at least a half inch thick (High density particle board works well, but you can use any perfectly flat piece of hardwood), that you use as a sacrifical piece under your project. SInce you will drill through the handle material anyway, you want whatever is under it to be unimportant but perfectly flat. It will also help when you slide the pins through if you can also slide it into the sacrificial piece to keep the whole thing still. Do the same for the other side, then put it together. Take it to a sander and make the handle flush up to the steel tang and start shaping. There is your crash course. Hope it helps!
User avatar
DCDesigns
Member
Posts: 1015
Joined: Fri Aug 05, 2011 5:50 pm
Location: ATL, Ga.
Contact:

#595

Post by DCDesigns »

phillipsted wrote:Sorry for the tease, guys. I was just so excited about this one, I couldn't wait to share the results. This is my Super Blue Mule shod in some Cocobolo purchased off the 'bay. The Cocobolo was a bit softer and than other cocobolo I've worked with in the past and had more of an open grain - it might be an alternate species. But the color and contrasts are very fetching. I'll probably end up sealing it with TruOil sometime soon.

As I noted in the previous post, I used the washers under the screws to provide a more secure attachment. The scales are just screwed on at this point - they aren't expoxied. There are good points and bad points to that, I know. But I wanted to be able to take off the scales and check the scales for discoloration/rust periodically.

TedP

Image
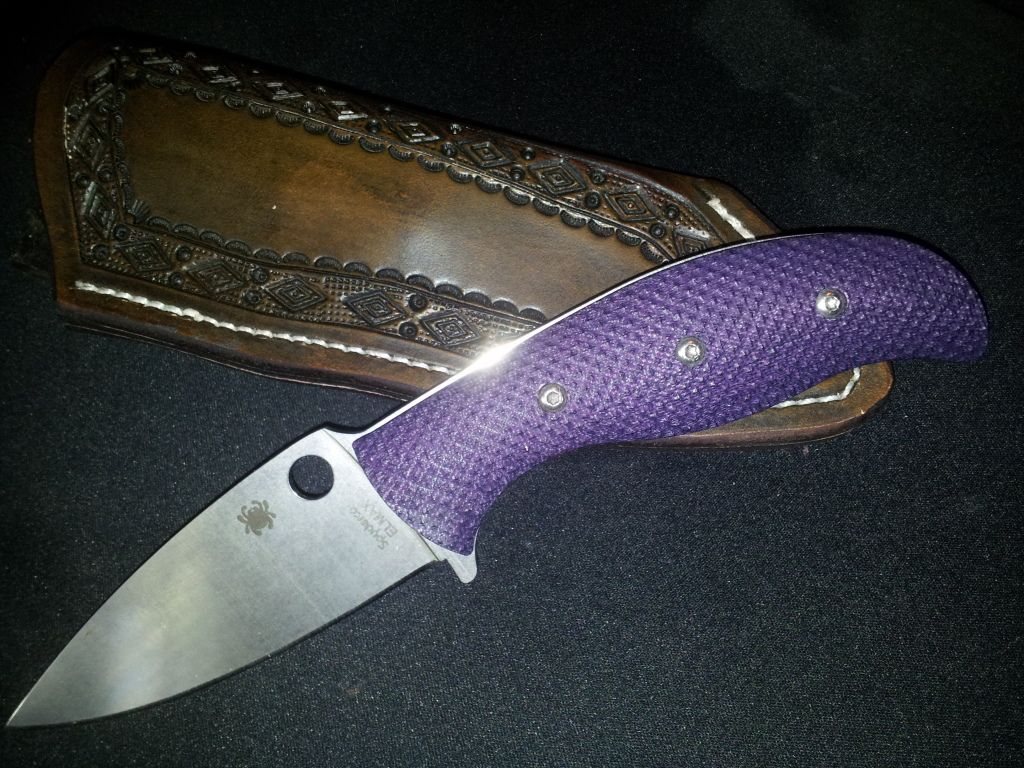
Thats beautiful work man. Very unique approach. If-8 I didnt commit one set of scales to one mule Id go crazy making tons of them to match my outfit and what not lol. Its always a tough choice for which wood to use. I have probably 12 different sets of scales commited that I have pre-roughed out for mule handles of the highest figured woods I have collected over the years, that I drag out everytime I get a mule and try to match the wood to the "character" of the steel. Its never easy!
User avatar
DCDesigns
Member
Posts: 1015
Joined: Fri Aug 05, 2011 5:50 pm
Location: ATL, Ga.
Contact:

#596

Post by DCDesigns »

nlmd wrote:Image

Looks like a good excuse for a first time post :)

Desert Ironwood scales
WOW, Great first post! welcome to the forums! Gotta love ariszona Ironwood. That is one really nice looking sheath too! The pieces Im using are the wildest of burls I have found. Im working on an Ironwood re-scale myself. Check it out!:Ironwood Bushcraft Thread
farns
Member
Posts: 30
Joined: Tue Jul 17, 2012 9:42 pm

#597

Post by farns »

phillipsted wrote: First off, welcome to the Forum, farns! And what a beautiful mule - very nice work on the scales!
Thank you for the nice comment. It was an experience filled with many lessons learned.
phillipsted wrote: And the best product I've found for making knife scales waterproof is Tru-Oil, which is sold in sporting goods stores as a gun stock finish. Tru-Oil is a polymerized linseed oil base which cures hard and waterproof.
I have read a lot on the forums about Tru-Oil. My budget on this is very small, so if I can not spend more that would be great. I have read some information about using teak/danish oil which I have some of that and rub on poly. Maybe those would work ok as a two stage application process. The teak oil looks very nice on a scrap piece of wood I have left over. Thoughts?

[ATTACH]20593[/ATTACH]
Attachments
mule_finishsample_01.JPG
User avatar
phillipsted
Member
Posts: 3674
Joined: Tue Oct 05, 2010 11:30 am
Location: North Virginia

#598

Post by phillipsted »

While we are waiting on the new 204P Mule to drop, I thought I would check in to see what everyone is working on.

I've got my last Woodcraft S30V Mule in the shop right now. I found the coolest set of black and white ebony scales on eBay. They are a cream salt-and-pepper along one edge and sort of a mottled reddish color on the other edge - with a jet black streak running right down the middle. I set up the knife so that the pins are drilled right smack dab in the middle of the black streak, which runs the entire length of the scales. My wife says that they look like a "calico cat".

Anyway, I finished shaping the scales today and start the sanding and finishing this week. I should have some pictures online in the next few days.

TedP

Image
User avatar
xceptnl
Member
Posts: 9009
Joined: Mon Feb 21, 2011 6:48 pm
Location: Tobacco Country, Virginia
Contact:

#599

Post by xceptnl »

^^^ WOW ^^^ Those look great Ted. Looking forward to seeing how they look on your 204P.
Image
sal wrote: .... even today, we design a knife from the edge out!
*Landon*
nlmd
Member
Posts: 4
Joined: Mon Mar 05, 2012 7:00 pm

#600

Post by nlmd »

more purple, ebayed sheath
Image
Post Reply