Show your Mule
-
chuck_roxas45

- Member
- Posts: 8797
- Joined: Wed Mar 03, 2010 4:43 pm
- Location: Small City, Philippines
-
Bladekeeper
- Member
- Posts: 936
- Joined: Fri Sep 07, 2012 7:24 pm
-
chuck_roxas45
- Member
- Posts: 8797
- Joined: Wed Mar 03, 2010 4:43 pm
- Location: Small City, Philippines
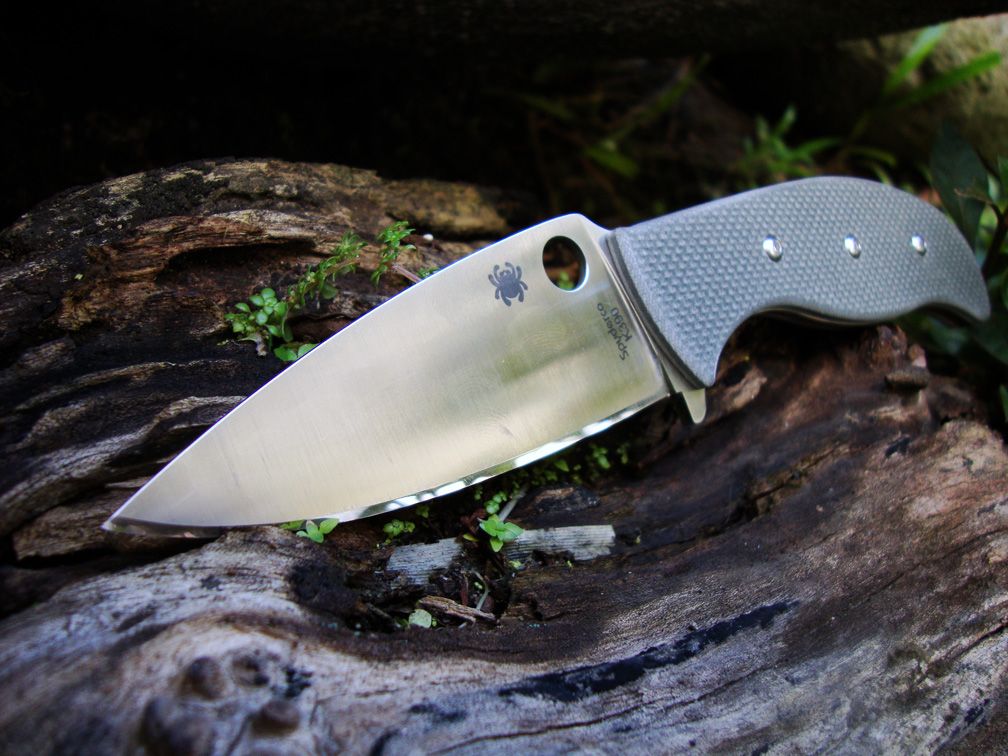
Thanks, I still haven't given it a proper workout. I wanna get a sheath done first so I can take it to either the auto repair shop or to the gunstore. They have dirty cardboard from shipments all the time. :)Bladekeeper wrote:Nice Mule chuck that polished edge gives it a sweet appeal too !.
http://uproxx.files.wordpress.com/2014/ ... ot-gif.gif" target="_blank
-
phillipsted

- Member
- Posts: 3674
- Joined: Tue Oct 05, 2010 11:30 am
- Location: North Virginia
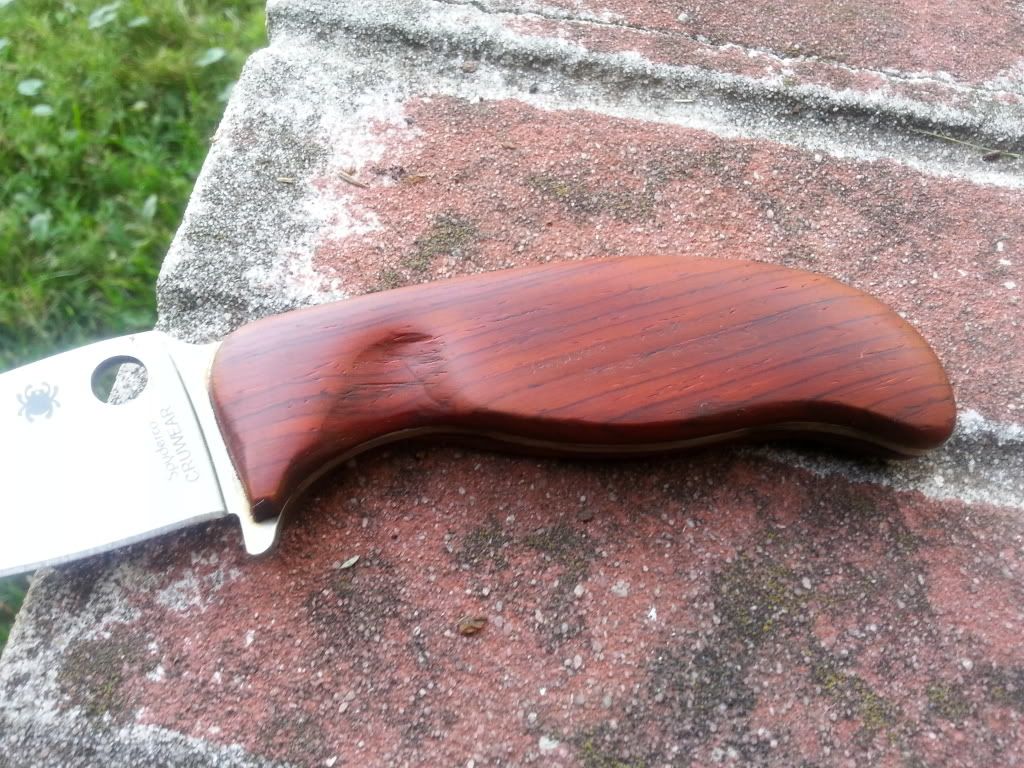
This is my M390 Mule with some new scales. The scales are made from unstabilized Australian red gum with thin red G10 liners. I decided to try something different this time and fitted a piece of red/black linen micarta to the tail of the scales using GFlex epoxy. As usual, these are knockdown scales held on with 3/16" pivot bolts and no glue. I ran out of leather lacing material as I was tying the lanyard, so I had to cut it a bit short. I'll end up retying it soon to make it more functional...
TedP


TedP


-
Bladekeeper
- Member
- Posts: 936
- Joined: Fri Sep 07, 2012 7:24 pm
Do you find aesthetically that since you started using liners the Mules are just that extra bit refined ?.phillipsted wrote:This is my M390 Mule with some new scales. The scales are made from unstabilized Australian red gum with thin red G10 liners. I decided to try something different this time and fitted a piece of red/black linen micarta to the tail of the scales using GFlex epoxy. As usual, these are knockdown scales held on with 3/16" pivot bolts and no glue. I ran out of leather lacing material as I was tying the lanyard, so I had to cut it a bit short. I'll end up retying it soon to make it more functional...
TedP
Or is it neither here not there for you ? great knife btw :) .
-
phillipsted
- Member
- Posts: 3674
- Joined: Tue Oct 05, 2010 11:30 am
- Location: North Virginia
Thanks, Bladekeeper!Bladekeeper wrote:Do you find aesthetically that since you started using liners the Mules are just that extra bit refined ?.
Or is it neither here not there for you ? great knife btw :) .
Personally, I don't lean one way or the other aesthetically - it all depends on the project itself. There are some occasions where liners add a really cool look to the knife that is impossible to achieve otherwise - other times they provide a nice contrast to the wood. I'm working on a set of unstabilized redwood scales right now that have a full 1/8" ivory paper micarta liner. This is much thicker than I normally use, and it almost looks like a layer cake with redwood frosting. :) In this case, I just liked the effect. But the main reason I started using liners was more practical.
A lot of woods are splintery, chippy, or have tightly interlocked grain (like the unstabilized Redwood, Koa, Palm, and other species) - which means they tend to develop a ragged edge where the scales meet the tang. This can be especially worrisome if you've put a lot of time into a set of scales and the wood chips during the final sanding/shaping. I've tried to repair scales that have done this many times, but have never had a satisfactory result. The liners, since they are usually a tough synthetic material, provide a bit more stability for the tang side of the scales and make it easier to finish off the knife.
TedP

That is very cool. I would get some really thick slabs of lexan and contour the scales and polish them out. They'd be almost impossible to get that clear again but you could get them close.Sharktooth wrote:Lexan scales!

What would also be cool is aluminum diamond plate...hmmmm...
That's not bad at all, you just need to blend that in a little better. I'm assuming that's a thumb relief? That was the first thing that popped into my head. I bet it's comfortable.Rwb1500 wrote:I feel like a hack even posting this in present company but it is what it is. In my defense this was the first time I've ever worked with wood period, and basically used only a Dremel and hand tools. It feels great in the hand it just isn't so pretty. I actually finished it months ago and ended up putting it in a box and thinking I wasn't going to use it until I found a sheath. Well I came upon it today by accident so I figured I'd share. The good news is I learned a lot and am ready for another try.
I hate you Chuck. If there ever was a mule I wish I had got (aside from the S90V), it's this one. I don't know why, because I would probably never use it, but if you're gonna have a mule this one is about as good as it gets.chuck_roxas45 wrote:
~David
-
phillipsted
- Member
- Posts: 3674
- Joined: Tue Oct 05, 2010 11:30 am
- Location: North Virginia
I made a set of scales this weekend for a friend. These are made from stabilized black palm. Talk about difficult to work with! Wow. Even though it was stabilized, the wood split and chipped. It had all sorts of weird soft spots in the grain. Really a challenge. One of the scales chipped a large chunk out right during final sanding - so I grabbed the bottle of CA glue and just saturated both sets of scales with thin CA. Let it harden, sanded it down to 40 grit, then soaked them again. Sanded them one more time and finished with a top coat of Tru-Oil followed by Ren Wax. A little rough around the edges, but now that it is sealed up, it should be tough as nails.
Sorry for the low-quality photos. My basement doesn't have good lighting for photos.
TedP


Sorry for the low-quality photos. My basement doesn't have good lighting for photos.
TedP


-
phillipsted
- Member
- Posts: 3674
- Joined: Tue Oct 05, 2010 11:30 am
- Location: North Virginia
I found a chunk of old-growth redwood burl that had been sitting in a woodworker's shop for many years. It was unstabilized, but a lot denser and harder than most second-growth redwood available on the market. Still softer than many woods, it has a really nice feel in the hand because it hasn't been stabilized. I paired it with a 1/8" ivory paper micarta liner because I liked the contrast between the silky redwood and the creamy liner.
I sanded them out to 1000 grit, sealed them with 5 coats of TruOil and a top coat of Ren Wax. As usual, these are knockdown scales - attached with 3/16" pivot bolts and screws (no epoxy).
Unfortunately, these scales aren't meant for hard use - they are simply too soft to hold up to any heavy camping trip or yard work. I'll probably unmount them from the K390 and put them on another mule at some point. The K390 begs to be used!
TedP


-
jabba359

- Member
- Posts: 4963
- Joined: Fri Feb 10, 2006 10:07 pm
- Location: Van Nuys, CA U.S.A. Earth
- Contact:
Finally got some time to finish up some scales for one of my 9Cr18Mo Mules. Brown canvas micarta with orange G-10 liners. Sanded it to 1000 grit and then coated with mineral oil and wiped clean with a rag. The scales aren't super shiny, but I like how they feel. It would probably look a little nicer with some sort of sealant, but I don't want to lose the tactile feeling it has right now, so I may just stick with it as is.


-
phillipsted
- Member
- Posts: 3674
- Joined: Tue Oct 05, 2010 11:30 am
- Location: North Virginia
Nicely done, Kyle! Your fit and finish looks great - and I love the fall color theme.
I agree with you about the canvas micarta. Something about the tactile feel of the material just begs to be held in the hand. Sometimes adding a sealant just ruins the whole "warm to the touch" feeling.
One nice thing about micarta is that it wicks up a small amount of moisture from your hand, making it less slippery. However, the material is almost completely impervious to water. The Milspec tests for phenolic CE-grade laminate puts the material under a 24-hour soak test and allows for a fraction of a percent of water retention and virtually no penetration. I like it a lot better than G10 or any of the epoxy/glass laminates.
Again - a beautiful and functional knife you have there, Kyle!
TedP
-
jabba359
- Member
- Posts: 4963
- Joined: Fri Feb 10, 2006 10:07 pm
- Location: Van Nuys, CA U.S.A. Earth
- Contact:
Thanks for the compliments! You did set the bar pretty high for the rest of us!phillipsted wrote:Nicely done, Kyle! Your fit and finish looks great - and I love the fall color theme.
I agree with you about the canvas micarta. Something about the tactile feel of the material just begs to be held in the hand. Sometimes adding a sealant just ruins the whole "warm to the touch" feeling.
One nice thing about micarta is that it wicks up a small amount of moisture from your hand, making it less slippery. However, the material is almost completely impervious to water. The Milspec tests for phenolic CE-grade laminate puts the material under a 24-hour soak test and allows for a fraction of a percent of water retention and virtually no penetration. I like it a lot better than G10 or any of the epoxy/glass laminates.
Again - a beautiful and functional knife you have there, Kyle!
TedP
-
jabba359
- Member
- Posts: 4963
- Joined: Fri Feb 10, 2006 10:07 pm
- Location: Van Nuys, CA U.S.A. Earth
- Contact:
I've been planning this particular combination for some time and finally got the necessary materials to get it done. The Super Blue name made me think of Superman, perhaps appropriately known as the "Man of Steel". So I decided to do a Super Blue: Man of Steel edition theme. Red G-10 bolsters, blue G-10 handle, yellow liners, metal "Superman" shield on glowing background. I forced a patina with vinegar on the handle and then cut up a bunch of things to give it a nice patina on the blade. Wow, this slices like a beast!
I'm sort of happy with how it turned out, but wish the cutout for the Superman logo was cleaner (I just drilled some holes and then used hand files to shape the cutout). I need to fill in around the edges of the logo so junk doesn't get in below the insert. The glow powder ended up looking a bit chunky after mixing it and brushing it on (as you can see in the last picture), so I probably should have gotten GITD paint with less texture to it.
I've already got a few ideas for my next concept knife (probably will go on my Cobalt Special Mule), but unlike the Superman shield that I put on this (which I found a nice quality one on eBay), I may have to have someone machine something for the next one as I've been unable to source a pre-made piece that fits my needs. It takes some planning and work, so I'll probably make some regular handles in the meantime for my other Mules while I get the details figured out.