
Yessir, I think it would be a phenomenal combo. I just hope Mr. Ealy has some to spare in the right thickness. Otherwise might be a wait to get it. It might be worth it though. Im waiting to hear back from him now.OldSarSwmr wrote:DC, I like the Lion because of the similarity to the ironwood. The wood flowing into the damascus, I think will be beautiful. Can't wait to see it!
Dan
Removing The Bushcraft's Handles to Make My Own
JABBA, what can I say man, THATS FREAKING AWESOME OF YOU. Thanks!jabba359 wrote:Hey DCDesigns, I mocked up some samples using your wood example and the Damascus patterns you were considering. This may help you visualize what the different combos would look like.
Lion
Spider
Tiger
I can say I think this settles it, Nothing but Lion will do. Man.... Now this just makes me want to get started. I want to make that knife a reality. Too cool.
-
jabba359

- Member
- Posts: 4963
- Joined: Fri Feb 10, 2006 10:07 pm
- Location: Van Nuys, CA U.S.A. Earth
- Contact:
Keep in mind that the darkness and contrast of the Damascus can vary depending on how you treat it, so the spider pattern's bright silvers may be toned down a bit or you may be able to get the lion with the brighter silver if you want. I'm not sure how to achieve which result, but I'm sure the Damascus maker can give you tips on how to get the finish you're after. Also, the size of the patterns may not be to scale, as I have no idea what width those examples are in real life.
Id say you are pretty close, they are somewhat close to 1:1, since I believe that is photograph of a knife billet. Cant be too far off, looks amazing.jabba359 wrote:Keep in mind that the darkness and contrast of the Damascus can vary depending on how you treat it, so the spider pattern's bright silvers may be toned down a bit or you may be able to get the lion with the brighter silver if you want. I'm not sure how to achieve which result, but I'm sure the Damascus maker can give you tips on how to get the finish you're after. Also, the size of the patterns may not be to scale, as I have no idea what width those examples are in real life.
I have done a decent bit of etching with ferric chloride, and I havent been able to get that great of results. Every time I have done it thought, I was re-etching a hardened blade. The areas I have etched that were not hardened took the etch pretty well. Since it will come annealed in the billet form, I think it will etch pretty easily. Tons of different things can be used though, and Im definately not well versed in them. I just use diluted PCB etchant (ferric chloride and a small amount of HCl.)
Other things I have heard of doing is making it a deep etch with FC, then hitting it with a gloss black baking lacquer. Once it hardens, you lightly sand to expose the peaks. I might give that a try since I want it really dark.
Edit: Also the black areas (areas that will etch) are the steels that are high in carbon (1095, or I think 1084 in this case) and something like 15n20 (low carbon steel) or even pure nickel is used for the contrasting lighter areas that do not etch. Since I want this one dark, Ill probably just tell him to go heavy on the high carbon steel.
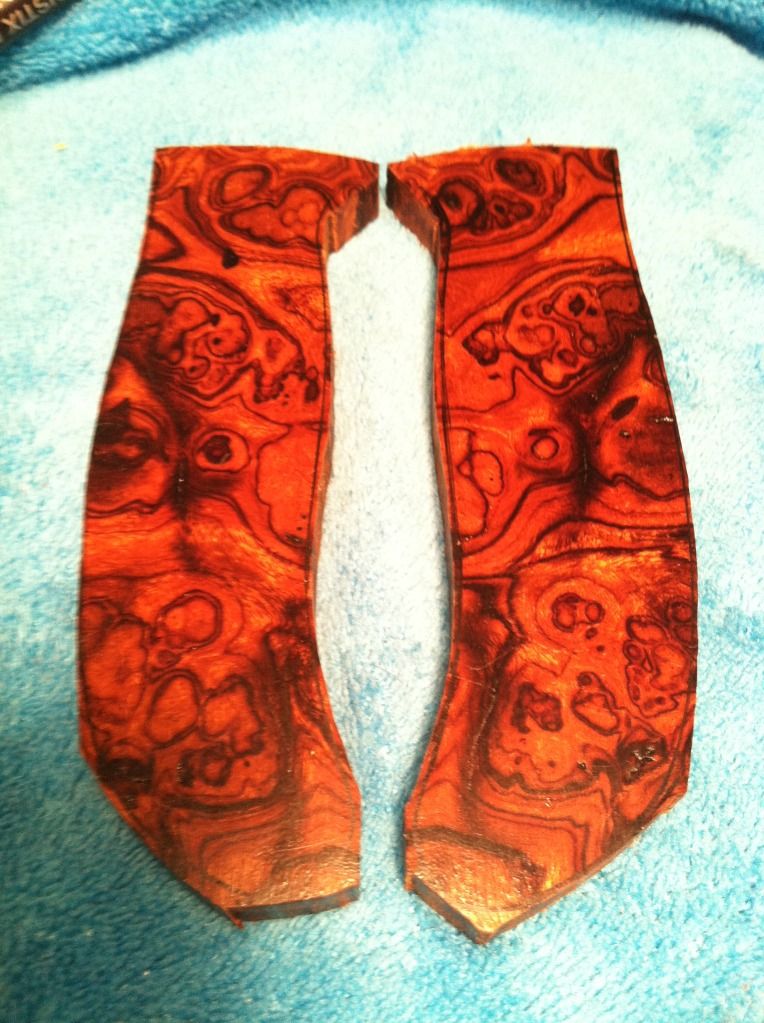
- got the scales in yesterday, they are even more stunning! I'm not used to buying individual knife scales, I'm usually the one selling, but you have to take what you can get with this stuff. I have only seen this burlwood for sale a handful of times, its got to be one of the rarest in NA. I am really excited about this project, I will start the work in progress thread when I get the knife.
I'm thinking this little project will be my christmas present to myself as it could get costly fast. I've also got two mules to finish, and with the cruware mule coming back out, it might actually be christmas til I get to it. Which is fine. I have not heard back on the damascus, and - imagine that will take a while as well. I don't really want to start anything until I have all the components. Well maybe some filework... :D
I'm thinking this little project will be my christmas present to myself as it could get costly fast. I've also got two mules to finish, and with the cruware mule coming back out, it might actually be christmas til I get to it. Which is fine. I have not heard back on the damascus, and - imagine that will take a while as well. I don't really want to start anything until I have all the components. Well maybe some filework... :D
-
ChapmanPreferred

- Member
- Posts: 2342
- Joined: Fri Sep 24, 2004 10:33 am
- Location: PA, USA
- Contact:
I hope to subscribe to your WIP thread. I think I would stick with your beautiful Ironwood scales without the bolster, but that's just me.
SFO Alumni/Authorized Spyderco Dealer (Startup)
Work EDC List
FRP: Nisjin Cricket PE, Manbug PE, Dragonfly PE
FLP: SS Cricket SE, byrd Flatbyrd CE
BRP: CF Military S90V
BLP: Forum S110V Native
[SIGPIC][/SIGPIC]
Work EDC List
FRP: Nisjin Cricket PE, Manbug PE, Dragonfly PE
FLP: SS Cricket SE, byrd Flatbyrd CE
BRP: CF Military S90V
BLP: Forum S110V Native
[SIGPIC][/SIGPIC]
I would agree on all points (though no one asked me, and my opinion really should not matter on YOUR knife).ChapmanPreferred wrote:I hope to subscribe to your WIP thread. I think I would stick with your beautiful Ironwood scales without the bolster, but that's just me.
I would like to share a couple thoughts that may or may not have been shared already in this thread.
The pattern in the damascus may become practically invisible if the knife is appreciably used (acids/oils from the hands may mute the contrast).
Some choose to avoid metallic handle materials due to their heat conductance.
As I said, my opinions are my opinions, and your knife is YOUR knife. However you ultimately choose to proceed, I am sure you will find this project satisfying and there is no doubt many of us will be interested in seeing the progress and results!
That wood looks fantastic!
Thanks,
Ken (my real name)
...learning something new all the time.
Ken (my real name)
...learning something new all the time.
Thanks man. The plan at the moment is to do the lion damascus bolsters, but nothings concrete yet. One good thing about being the maker as well as the end user, I can reetch it if necessasary. Also if I etch deep, and use baking lacquers, it will be prettymuch permanent.unit wrote:I would agree on all points (though no one asked me, and my opinion really should not matter on YOUR knife).
I would like to share a couple thoughts that may or may not have been shared already in this thread.
The pattern in the damascus may become practically invisible if the knife is appreciably used (acids/oils from the hands may mute the contrast).
Some choose to avoid metallic handle materials due to their heat conductance.
As I said, my opinions are my opinions, and your knife is YOUR knife. However you ultimately choose to proceed, I am sure you will find this project satisfying and there is no doubt many of us will be interested in seeing the progress and results!
That wood looks fantastic!
I've removed my share of handles on various knives.
I will usually start off drilling out the pins some in case they are corby rivets, then drive them the rest of the way through.
After the pins are removed, I will then try to put one side of the handles in a vise, if you can get enough purchase on them.
Next, find a nylon mallet and start tapping the spine of the knife, they will usually break free this way, flip knife in vise and repeat.
Scrape the epoxy off with a razor blade and clean with acetone.
Goes without mentioning to tape up the blade...
Goodluck
Time to revive this thread! OK, so I had to take a break for a while on the knife making/collecting due to funds becoming really scarce. However I saw Sal at Blade show this year, and he let me know that he still had the bushcraft second with the cracked handles. So a couple weeks back I sent a donation to the Childeren's Hospital to Sal, and he sent be the knife! The handles were really quite cracked, I can see why he didnt even sell it as a second. Part of it was held on by a rubber band.
TooSharp: Im afraid it was not really necessary to get complicated on the scale removal. I took a small screwdriver to it and in 5 minutes I had a bushcraft knife blank! (the bushcraft uses corby fasteners. I will probably just use pins)
I decided I will be putting a acid etched and stonewashed finish on the entire knife like my GB. Save for the scandi edge which will be polished to mirror for contrast.

I have alreay etched the blade dark as I like, and tomorrow I will stone wash.
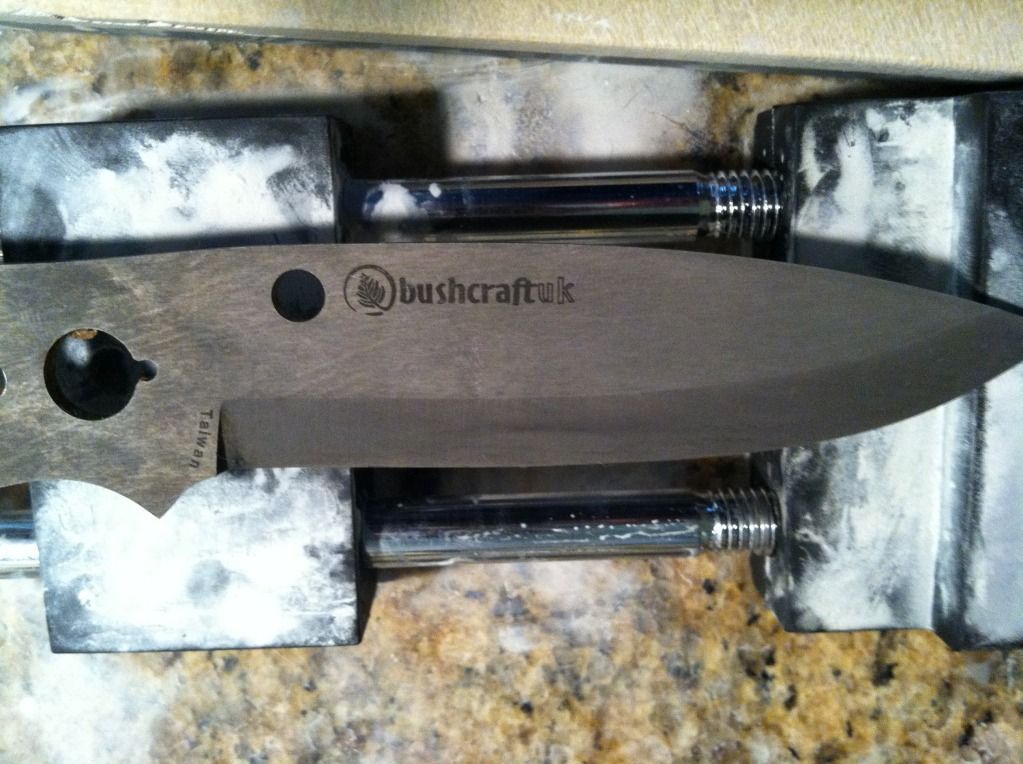

I have started to define the bevel again with my norton 220 stone. Just a really rough sharpening so I can get the general look down. I will tape it completely before the poor mans stone wash (which I prefer to a "factory" stone wash finish). here is what I have so far:


More to come soon!
TooSharp: Im afraid it was not really necessary to get complicated on the scale removal. I took a small screwdriver to it and in 5 minutes I had a bushcraft knife blank! (the bushcraft uses corby fasteners. I will probably just use pins)
I decided I will be putting a acid etched and stonewashed finish on the entire knife like my GB. Save for the scandi edge which will be polished to mirror for contrast.
I have alreay etched the blade dark as I like, and tomorrow I will stone wash.
I have started to define the bevel again with my norton 220 stone. Just a really rough sharpening so I can get the general look down. I will tape it completely before the poor mans stone wash (which I prefer to a "factory" stone wash finish). here is what I have so far:
More to come soon!
-
ricechrispy
- Member
- Posts: 161
- Joined: Wed Oct 05, 2011 9:12 am
- Location: SLC, UT
-
superspyder
- Member
- Posts: 28
- Joined: Fri Jun 29, 2012 8:39 pm
Thanks! Im really looking forward to seeing how it turns out!ricechrispy wrote:Really looking forward to seeing more of this. Thanks for posting.
With carbon steel you can use anything acidic. I used just plain old white vinegar, soaking for about 4 hours at a time, three soaks. In between you have to remove the black scale that builds up as it will prevent further darkening of the blade. Also before you put any steel into any etching solution, you MUST use alcohol or something similar to clean it entirely. Any fingerprints or oils left on the blade will become etched into it, and can actually cause deep pitting. Stainless steels require much nastier stuff to etch, real acids like ferric and hydrochloric (muriatic in the consumer form), or a PCB etchant available at electronics stores which is usually based in ferric chloride with a dash of Hcl. Hope that helps!What chemicals did you use to darken the blade?
OK, so those of you who though I should use just wood for the scales have won out. After owning the bushcraft for a week or so, seeing how you have to sharpen it, its heft, and how it behaves cutting different material, I can tell this is going to be a knife I will thump on. SO, It did not seem right to gussy it up with all the bells and whistles since It'll get smacked around the woods, doesnt fit the character of the knife. NOW, when I go to rescale a Southfork (which might be next), bolsters it is, I will go all out (maybe not filework, as I dont want to spend the 6 years necessary to do so with s90v.)
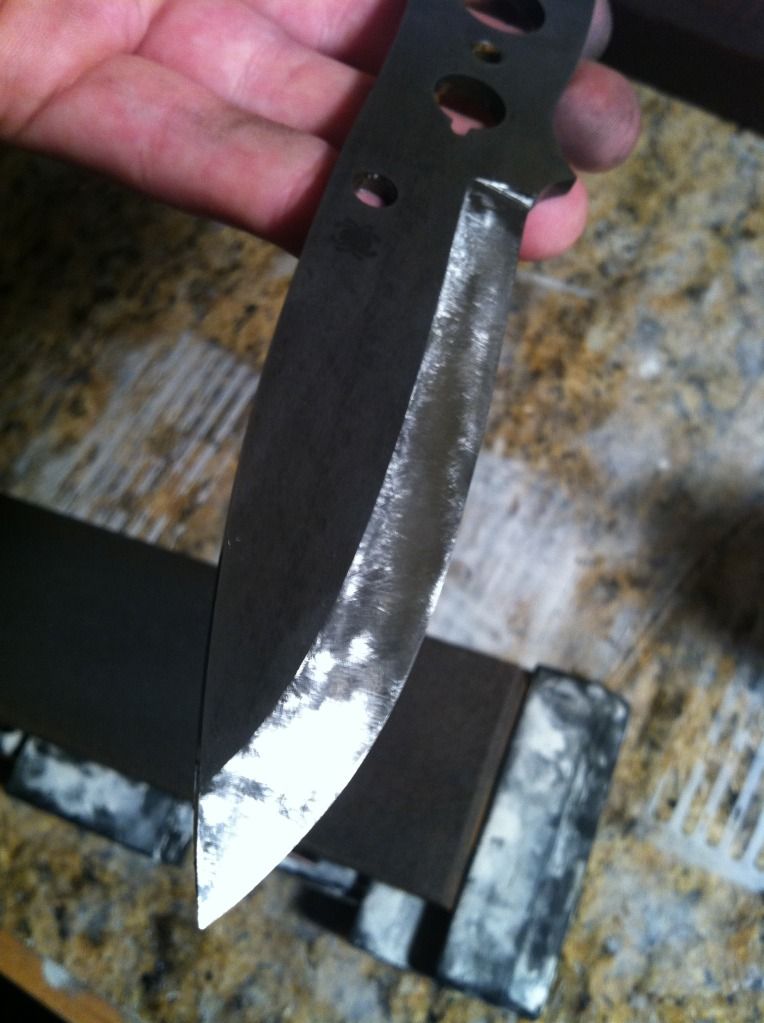
I dont want the Bushcraft to feel fragile in anyway, so all ironwood it is. Also the damascus stock I have is a little thin, and waiting for more would take a while and I really just cant wait to make this thing. So here is what i have so far today: She is stonewashed, bevels re roughly sharpened on a 220, and the scales have been roughed out of the ironwood.


I dont want the Bushcraft to feel fragile in anyway, so all ironwood it is. Also the damascus stock I have is a little thin, and waiting for more would take a while and I really just cant wait to make this thing. So here is what i have so far today: She is stonewashed, bevels re roughly sharpened on a 220, and the scales have been roughed out of the ironwood.

Love the stonewashing job!
Click here to zoom: Under the Microscope
Manix2, Elmax MT13, M4 Manix2, ZDP Caly Jr, SB Caly3.5, Cruwear MT12, XHP MT16, South Fork, SB Caly3, 20CP Para2, Military Left Hand, Perrin PPT, Squeak, Manix 83mm, Swick3, Lil' Temperance, VG10 Jester, Dfly2 Salt, Tasman Salt
Chris
Manix2, Elmax MT13, M4 Manix2, ZDP Caly Jr, SB Caly3.5, Cruwear MT12, XHP MT16, South Fork, SB Caly3, 20CP Para2, Military Left Hand, Perrin PPT, Squeak, Manix 83mm, Swick3, Lil' Temperance, VG10 Jester, Dfly2 Salt, Tasman Salt
Chris
Its also kinda cool how you can tune the finish by changing the size of rocks used, and the vessel you put it in, as well as how you shake it. I used slightly larger than usual rocks, in a 1 gallon vinegar jug, shaken in circles and back and forth. The result is longer scratches, more unique patterns, quite nice. Very different from when I stone washed my GB recently with small rocks in a flat tupperware shaken up and down. There were many more, smaller more circular scratches. Both different, both very nice looking!

Re: Removing The Bushcraft's Handles to Make My Own
I know this thread is long gone, but I was wondering if there were any pics out there of how this one ended up. I have myself a bushcraft blank and am going to be putting some scales on it. I am still debating on whether to go hi tech (CF) or classic (wood). Also, measurements indicate that the scale holes are drilled metric. Wondering if the OP found that inch sizes for the pins and tube worked fine or if he bit the bullet and drilled out the holes. Any info would be appreciated.