WOW Thank you very much for this tutorial! I will definitely be referencing it whenever I decide to make my mule! :D
VERY VERY helpful!
Beautiful kninfe as well! Astounding work!
Mule Team Tutorial


More Mules
Here are a few more ....
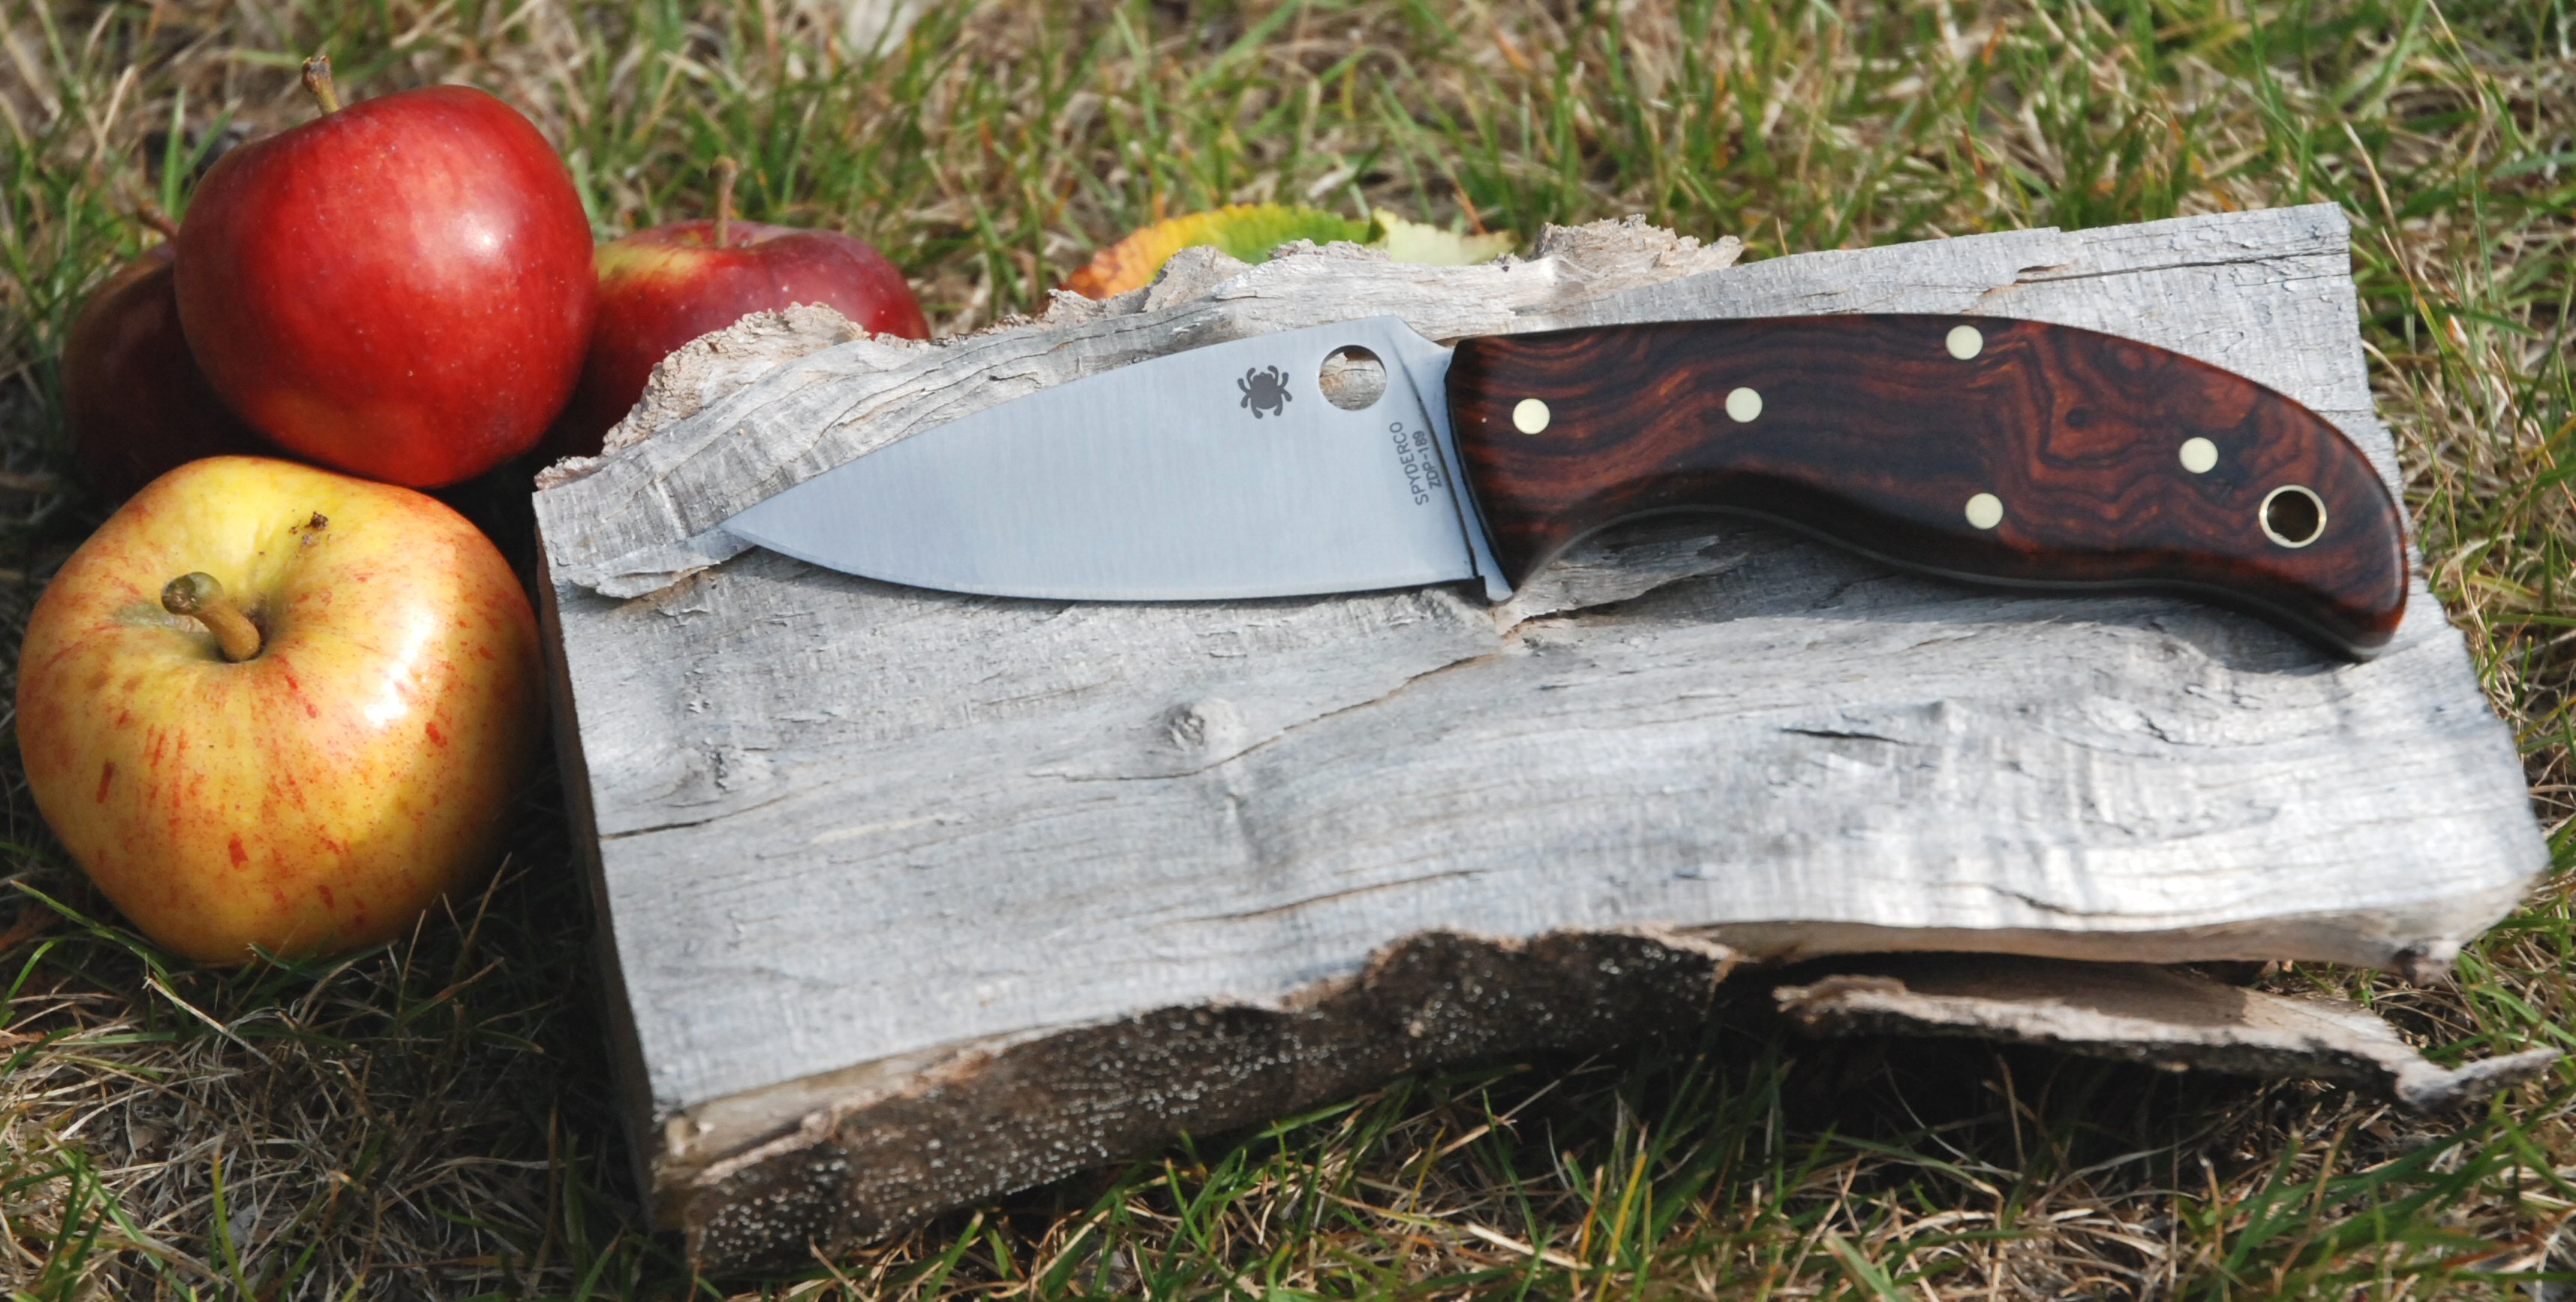
Orange G10 with black liners


Carbon Fibre

Black Linen Micarta with red liners (needs to be buffed)

Stabilised Chestnut Burl


Orange G10 with black liners
Carbon Fibre
Black Linen Micarta with red liners (needs to be buffed)
Stabilised Chestnut Burl
-
Hector Castro
- Member
- Posts: 411
- Joined: Fri Sep 11, 2009 7:26 pm
- Location: DFW Texas
-
dolphincry

- Member
- Posts: 48
- Joined: Sun Apr 26, 2009 8:43 pm
- Location: Kuala Lumpur, MY
- Contact:
-
Hector Castro
- Member
- Posts: 411
- Joined: Fri Sep 11, 2009 7:26 pm
- Location: DFW Texas
Does anyone see anything wrong with using Aluminum rod and tube for the pins and lanyard hole? i am thinking this would be easier to sand and machine vs Stainless rod and tube. It would also still be impervious to the elements.
What is your thoughts?
Quickbeam,
what did you use for those large spacers in yours?
Making scales
I was thinking of using my router and a template bit with a bearing to make scales. I would mount a thick block of wood to one side of the mule to make a nice fitting blank/pattern to work off of. Trace it out, Cut it out on the bandsaw so it is close, then sand it the rest of the way,to match the handle.
Then I could just use this on the router table with the template bit to cut all my material to shape. I purchased 5 of the current mules to play with. I am an avid wood worker, so I think this knife project is right up my alley!
-
ghostrider

- Member
- Posts: 4113
- Joined: Tue Feb 15, 2005 12:12 pm
- Location: Grand Rapids, Michigan
Thanks for the tutorial. I've recently come into some blank blades that I want to put handles on, and enjoyed reading it.
Google "dielectric effect of aluminum and steel". I don't know what it will do, but haven't people been using aluminum guards for steel knives? I've been wondering the same question lately.Hector Castro wrote:Does anyone see anything wrong with using Aluminum rod and tube for the pins and lanyard hole? i am thinking this would be easier to sand and machine vs Stainless rod and tube. It would also still be impervious to the elements.
What is your thoughts?
...
First they came for the Trade Unionists, and I did not stand up, because I was not a Trade Unionist.
[INDENT]
[INDENT][INDENT]Attributed to Pastor Martin Niemöller [/INDENT] [/INDENT][/INDENT]
Thread for tying tips:
http://spyderco.com/forums/showthread.php?t=18317
Avatar provided by DAYWALKER
Hawkbills- Sink in the tip, and let it rip!!! :D - Axlis
[INDENT]
[INDENT][INDENT]Attributed to Pastor Martin Niemöller [/INDENT] [/INDENT][/INDENT]
Thread for tying tips:
http://spyderco.com/forums/showthread.php?t=18317
Avatar provided by DAYWALKER
Hawkbills- Sink in the tip, and let it rip!!! :D - Axlis
As far as I know steel and aluminum can be used together safely. After all, there are plenty of aluminum scaled knives around. If I'm understanding this tutorial correctly, the pins aren't integral to the strength of the knife-the epoxy does most of the work there, so I think Aluminum would be fine. If the pins were actually holding the scales to the knife, then I would worry about the strength of the pins... not that aluminum wouldn't be strong enough, but it's much more ductile than steel, and also probably wouldn't behave like steel if used like a rivet or something like that. If they're just there for show, though, and maybe to keep the scales and the holes lined up, there shouldn't be any issues at all.
-
CaptainBeaky

- Member
- Posts: 28
- Joined: Thu Sep 03, 2009 1:58 am
- Location: The Green and Pleasant Land
Hi All
I used Nick's tutorial as a reference for doing my first Mule - thanks, Nick :)
There's a couple of things I do slightly differently, having done a few scalings now... (don't think this is any criticism of Nick - his work is miles better than mine; just trying to muppet-proof the method for myself :rolleyes :)
First up, I draw the outline on the taped-together block including the holes, and drill the holes first. As soon as I've done the first hole, I put a temporary pin in. Once the second (and any subsequent) hole is drilled and pinned, there is no chance of the scales moving relative to each other, and I recheck the scale outline against the tang before reaching for the coping saw.
Secondly, or possibly zerothly as it affects the firstly above - if you are using 1/4" pins or tube, a 6.4mm drill bit gives a smooth push fit. Tight enough to not allow the scales to move, but easy enough to push in and out using a pin punch without cracking the wood. If you are using a hand drill, try a 6.3mm bit and ease the hole out to size with a round file.
Thirdly, has anyone found any brass stock that fits the holes, 'cos I haven't! Using under-size pins or tube seems to work OK, so I just offset the pins in the holes in opposite directions to get a rigid fit.
Hope this is helpful :)
-
peacefuljeffrey

- Member
- Posts: 1192
- Joined: Wed Jun 07, 2006 11:42 am
This thread is really cool! I'm late tuning in, though.
I have two Mule Team knives (don't even know which ones--I think they might have been the first ones out) but I haven't done a thing with them because, well, I don't have anywhere near the tools (drill press, vice, mostly) to be attempting something like what's been shown here.
I am curious, Quickbeam, do you ever put the knives together with screws so that the scales can be taken off? Like with G-10 handles or something? How would the construction be different in such a case?
"Within this frame an ocean swells -- behind the smile -- I know it well..."
-
richroemer

- Member
- Posts: 18
- Joined: Fri May 15, 2009 8:28 pm
Some info here on removable mule handles:
http://www.spyderco.com/forums/showthread.php?t=40418
http://www.spyderco.com/forums/showthread.php?t=40418
hobby-lobby.com has 3/8" thin-walled brass tubing that works a treat. This is a RC airplane outfit, not the craft supply chain.
Texas knife has 3/8" brass rod, as does the Ace Hardware here in town, but at half the price.
I like the tubing, it makes for a lighter knife. I did one with all 4 3/8" holes plugged with tubing, but prefer the one with only the two end holes better, it's more comfortable in hand, since I did some major sculpting of my handles. The solid rod looks the best. If I wasn't a computer spaz, I'd post some pics...
I use the mule itself as a template, clamp it up, drill one hole, insert a rod, and drill another hole, insert a rod, and do the rest of the holes, if any. Clamp things down properly if you try this! Losing fingers sucks! I sand down my rod or tubing until it fits into the holes.
Gordon
CaptainBeaky wrote: Thirdly, has anyone found any brass stock that fits the holes, 'cos I haven't! Using under-size pins or tube seems to work OK, so I just offset the pins in the holes in opposite directions to get a rigid fit.
-
CaptainBeaky
- Member
- Posts: 28
- Joined: Thu Sep 03, 2009 1:58 am
- Location: The Green and Pleasant Land
gaj999 - I use 5/32" brass rod (from, yes, my local R/C aircraft shop  ) in the smaller holes and 9/32" brass tube in the larger - picture here: clicky
I just haven't found any stock which fits the holes exactly, as they are an odd size.
You seem to have arrived at more or less the same method as me - spring clamp the tang down onto a board on top of the scale pair, drill first hole and pin, check alignment and drill second hole and pin. Check alignment and drill the rest of the holes, pinning each one as soon as drilled.
The board cramp I made up specially for drilling scales on the drill press - it's a piece of 16mm plywood with one half of a spring sash cramp bolted to a block screwed to the ply. Just means I can hold the board not the blade while drilling, and there is a substantial block of wood (2x2) between my fingers and the sharp bit if anything should move :cool:
Welcome to this thread and the forum. On the snip above, are you referring to the holes in the tang for pins/screws, or the hole for the lanyard at the rear top? That hole is .250 ID and matching tubing is readily available in stainless, titanium, brass and nickel silver. I don't particularly like the location and I'm guessing that is not your question. In terms of tubing that fits the holes for the pins/screws, I have not tried.CaptainBeaky wrote:Thirdly, has anyone found any brass stock that fits the holes, 'cos I haven't! Using under-size pins or tube seems to work OK, so I just offset the pins in the holes in opposite directions to get a rigid fit.
Your work looks great, though I'd think (YMMV) that that many holes in the scales might weaken the scales (especially if natural wood; less of an issue with a synthetic like micarta, G10 or carbon fiber).
Knifekits.com has "hidden" fastners that fit the holes perfectly. They're typically ground/sanded flush with the scales.
Welcome again. :spyder:
Once I have two holes pinned, nothing is going to move, so I just drill the rest. I have a crappy drill press from Harbor Freight that I can stall while hanging onto the Mule, so I don't actually clamp it down. :eek: Not exactly proper procedure! And yes, I did it right, with a drill press vise, until I figured out that it was safe as long as I was careful. Now I just clamp the mule to the scales and let 'er rip.
I've only ever used 3/8" rod and 3/8" tube in the big holes, I haven't messed with the little holes, or the lanyard hole either. I ground the crap out of one of the MT05s today and will make a knife for the camp kitchen out of it with two pins of solid brass for easy wash up. First and third 3/8" holes as the rear most hole is now way too close to the edge of the tang to use. :D The guard is gone, too. Cheap fun.
Otherwise, I've pretty much settled on two 3/8" tubes in the fore and aft holes as my standard.
Gordon
CaptainBeaky wrote:gaj999 - I use 3/8" brass rod (from, yes, my local R/C aircraft shop
I just haven't found any stock which fits the holes exactly, as they are an odd size.
You seem to have arrived at more or less the same method as me - spring clamp the tang down onto a board on top of the scale pair, drill first hole and pin, check alignment and drill second hole and pin. Check alignment and drill the rest of the holes, pinning each one as soon as drilled.
The board cramp I made up specially for drilling scales on the drill press - it's a piece of 16mm plywood with one half of a spring sash cramp bolted to a block screwed to the ply. Just means I can hold the board not the blade while drilling, and there is a substantial block of wood (2x2) between my fingers and the sharp bit if anything should move :cool:
Hector Castro wrote:Does anyone see anything wrong with using Aluminum rod and tube for the pins and lanyard hole? i am thinking this would be easier to sand and machine vs Stainless rod and tube. It would also still be impervious to the elements.
What is your thoughts?
Quickbeam,
what did you use for those large spacers in yours?
Making scales
I was thinking of using my router and a template bit with a bearing to make scales. I would mount a thick block of wood to one side of the mule to make a nice fitting blank/pattern to work off of. Trace it out, Cut it out on the bandsaw so it is close, then sand it the rest of the way,to match the handle.
Then I could just use this on the router table with the template bit to cut all my material to shape. I purchased 5 of the current mules to play with. I am an avid wood worker, so I think this knife project is right up my alley!
Hi Hector,
I haven't used Aluminium before but I don't see why it won't work. The spacers are cut from 8mm stainless tube. I bought a metre of it online from a supplier in the UK.
I think it would be just as quick to use a rasp as to use the router. Knife scales are usually quite small - tricky to clamp or hold when using power tools.
Nick
So far I have always glued my knives, the early Mules weren't stain reistant so I wanted to lock out any moisture that might react with the handle. You'd have to find some way of ensuring the bolts fit the holes in the tang exactly, otherwise the scales would slop about too much! Either buy bolts that are the right diameter for the tang holes or find some spacers to take up the slack. Ru Titley did a lovely Mule with textured G10 and Torx Bolts over on British Blades.peacefuljeffrey wrote:This thread is really cool! I'm late tuning in, though.
I have two Mule Team knives (don't even know which ones--I think they might have been the first ones out) but I haven't done a thing with them because, well, I don't have anywhere near the tools (drill press, vice, mostly) to be attempting something like what's been shown here.
I am curious, Quickbeam, do you ever put the knives together with screws so that the scales can be taken off? Like with G-10 handles or something? How would the construction be different in such a case?
Nick
I sometimes do it this way too, usually it depends on how tight the fit of the pins is. I try to avoid getting any glue lines between the pin and the scales, especially if the scales are light in colour as the glue line becomes very obvious. Rather than opening the holes out with a file I sand down the pin by mounting it in the chuck of a drill.CaptainBeaky wrote:Hi All
I used Nick's tutorial as a reference for doing my first Mule - thanks, Nick :)
There's a couple of things I do slightly differently, having done a few scalings now... (don't think this is any criticism of Nick - his work is miles better than mine; just trying to muppet-proof the method for myself :rolleyes :)
First up, I draw the outline on the taped-together block including the holes, and drill the holes first. As soon as I've done the first hole, I put a temporary pin in. Once the second (and any subsequent) hole is drilled and pinned, there is no chance of the scales moving relative to each other, and I recheck the scale outline against the tang before reaching for the coping saw.
Secondly, or possibly zerothly as it affects the firstly above - if you are using 1/4" pins or tube, a 6.4mm drill bit gives a smooth push fit. Tight enough to not allow the scales to move, but easy enough to push in and out using a pin punch without cracking the wood. If you are using a hand drill, try a 6.3mm bit and ease the hole out to size with a round file.
Thirdly, has anyone found any brass stock that fits the holes, 'cos I haven't! Using under-size pins or tube seems to work OK, so I just offset the pins in the holes in opposite directions to get a rigid fit.
Hope this is helpful :)
I also use carpet tape to fix the two blocks together, its very strong stuff, they don't move anywhere while I'm drilling.
Nick