Show your Mule
-
phillipsted

- Member
- Posts: 3674
- Joined: Tue Oct 05, 2010 11:30 am
- Location: North Virginia


-
3rdGenRigger

- Member
- Posts: 2414
- Joined: Sat Jul 20, 2013 8:01 pm
- Location: Calgary Alberta Canada
-
phillipsted
- Member
- Posts: 3674
- Joined: Tue Oct 05, 2010 11:30 am
- Location: North Virginia
Stew - I haven't tried to etch the suminagashi, but I have tried using ferric chloride to etch Damasteel and other stainless damascus - and it isn't nearly strong enough. You need something like battery acid (sold as "electrolyte" at the auto supply store) to do the trick.Stew wrote:Has anyone etched the suminagashi mule any further? I have just finished one in buckeye and it would be nice to see the layers in the steel round the handle. I don't want to spend time gently tickling it with a cotton bud and ferric chloride if it's not going to be anywhere strong enough.
In the Mule, I think the two steels are VG-10 (the shiny parts) and the erosive layers (the dark parts) are martensite stainless. This means you'll probably have to have something stronger than PCB etchant from Radio Shack to etch the Mule.
That's my $0.02, anyway. :)
TedP
-
phillipsted
- Member
- Posts: 3674
- Joined: Tue Oct 05, 2010 11:30 am
- Location: North Virginia
"Sometimes you eat the bear and sometimes... well, he eats you" ("The Big Lebowski")
I started my latest set of Mule scales a few months ago. I picked up a chunk of stabilized red mallee which was really beautiful - swirls of red and white, wonderful grain with lots of eyes. I sat on it for a few months to let it stabilize and acclimatize. These types of burls, even when stabilized, are notorious for warping and twisting even months after you think they are stable. After a couple of months, I sliced a couple of 3/8" slabs off of the block for Mule scales. To be safe, I clamped them to the bench tightly for ten days.
When I was ready to start fabricating the scales, I unclamped them, and sanded them flat on both sides. I found a nice sheet of 1/16" red G10 for a liner and glued the mallee slabs to the G10 liners using West GFlex epoxy, clamping them down flat for a couple of days. When they came out of the clamps, I trimmed them up and sanded them down - everything was nice and flat. So far, so good!
I worked on the scales for a couple of weeks - cutting them out, drilling and counterboring holes for pins, contouring with files, filling cracks with CA glue, and sanding to shape. I had them all trimmed up and flush with the tang - just about ready for final sanding and finishing. About this time, I noticed that the scales were starting to pull away from the tang a little - and over the next 24 hours, the scales warped significantly.
At this point, the only option was to crack the G10 liners off of the wood, sand the scales flat, and epoxy new liner onto the scales. However, since I'd trimmed the scales flush with the tang, the process of breaking the epoxy and and reattaching fresh liners wouldn't leave me with any margin for error. Sigh.
I just smiled and quickly sanded the set of scales out to 400 grit and put them aside. Next week, I'm going to build a jig to clamp them flat for a few months to see if they twist back into shape. We'll see... Anyway, as you guys know, natural materials are sometimes a bear to deal with - even if they have been stabilized.
Off to my next project!
TedP


-
jabba359

- Member
- Posts: 4965
- Joined: Fri Feb 10, 2006 10:07 pm
- Location: Van Nuys, CA U.S.A. Earth
- Contact:
That's a bummer Ted. I do have one question about your flattening method: By artificially flattening the wood in clamps, are you forcing it into a shape that it will always want to twist back out of? For instance, if you let them sit and acclimate, warping as they will, wouldn't they eventually reach their naturally acclimated shape? At that point you could sand them flat and wouldn't be fighting all the forces that cause them to warp. It makes sense in my head, but I haven't done a lot of work with wood scales, so I could be completely wrong. The concept is clear in my head, so I hope I'm explaining it clearly enough to make sense.
-
phillipsted
- Member
- Posts: 3674
- Joined: Tue Oct 05, 2010 11:30 am
- Location: North Virginia
Good question, Kyle. I will defer to folks who know more than I do about this subject. However, look at the age-old technique of "steam bending" wood for furniture, boat ribs and strakes, etc. You soften the wood up with hot steam, bend to position and let it dry in its new shape. When dry and fixed in position, the wood stays bent permanently.
My experience with burls leads me to believe that they are a bit more complex than straight-grained wood. The burl's grain dries at different rates, contains different amounts of resin, etc., and isn't anywhere near uniform. That is why you see a lot of checking, popped eyes, and warping with burls as they dry. I've had a piece of cut burl on my bench for over two years. It was close to dry when I bought it, but not quite ready to use. It is still moving and twisting around two years later. Once I notice that it has slowed down, I'll trim it out and try to use it.
Stabilizing the burl will help with this problem somewhat. Infusing the wood's grain with plastic helps to add rigidity to the piece and give the wood less room to expand and contract. HOWEVER, burl wood is generally highly variable in density, porosity, resin content, inclusions (e.g., ingrown bark) and other factors. In other words, it doesn't soak up the stabilizer uniformly across the piece - and so stabilizing doesn't entirely solve the problem.
On a side note - I'm considering solving this particular problem the old-fashioned way. I'm thinking about epoxying the scales to the tang and clamping them up tight. With proper preparation of the surfaces, it should hold the scales in place. I normally make knock-down scales that can be removed, but this may be a case where stronger measures are called for... :cool:
Cheers!
TedP
Worry less - Breathe more...
Spydie Fanatic #185
Spydie Fanatic #185

-
jabba359
- Member
- Posts: 4965
- Joined: Fri Feb 10, 2006 10:07 pm
- Location: Van Nuys, CA U.S.A. Earth
- Contact:
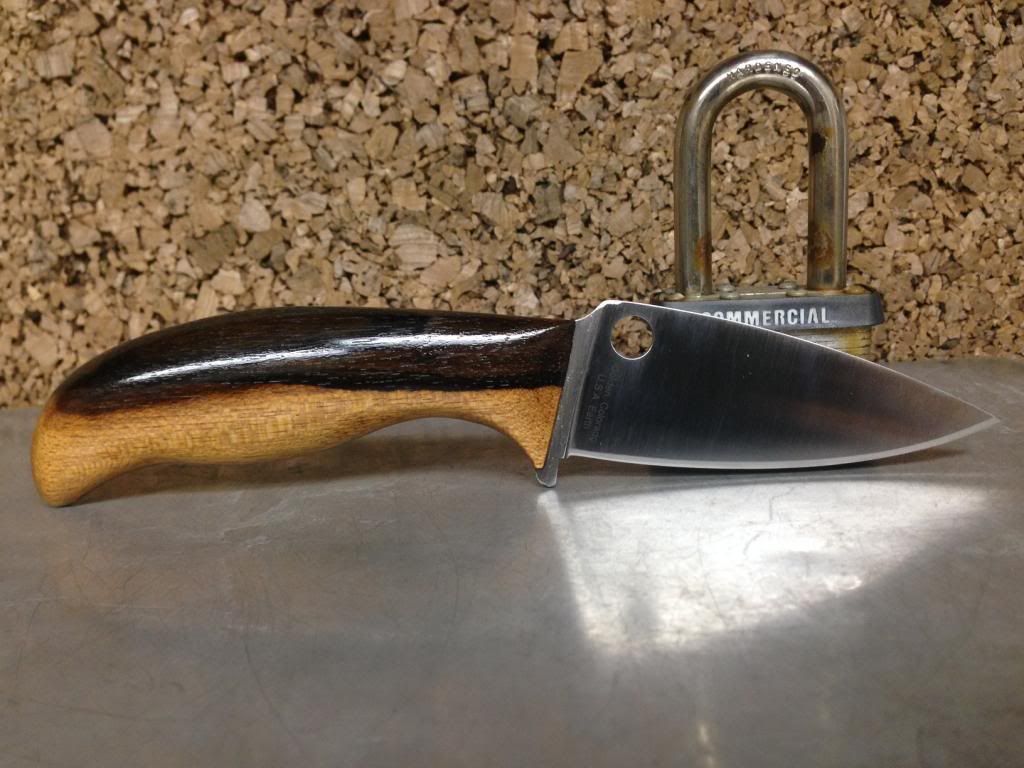
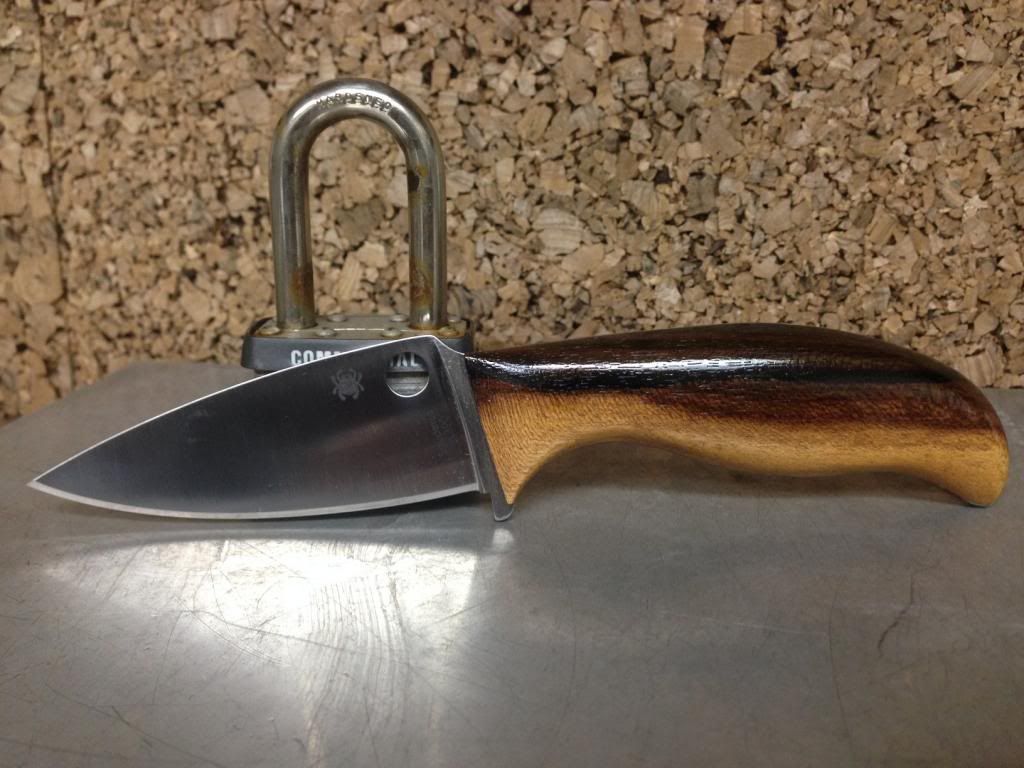
I'd heckle you if I could, but those scales look fantastic! I really like the color gradation from dark to light.dishcore wrote:Hello all,
Long time reader, few time poster. I spent some time over on BF working on my K390 with some advice from TedP.
Scale material is Ziricote.
It's my first try at doing a scale setup on anything, so please heckle
-
phillipsted
- Member
- Posts: 3674
- Joined: Tue Oct 05, 2010 11:30 am
- Location: North Virginia
-
phillipsted
- Member
- Posts: 3674
- Joined: Tue Oct 05, 2010 11:30 am
- Location: North Virginia
I've had this K390 mule on my bench for a few months now - with the holidays and stuff, I haven't been able to get it polished up until this weekend. These scales are sliced off of a slab of stabilized red Eucalyptus. I really liked the way that the wood looked when contrasted against a 0.125" ivory paper micarta liner. This is the same liner material that I used on an earlier set of old-growth redwood scales. I just love the color striations in the Eucalyptus - coupled with the iridescent figure in the wood, it is really attractive.
As always, I epoxied the scales with West Systems epoxy. Trimmed the scale down to size with a coping saw, shaped them with files and rasps and sanded down to 1200 grit with Rhynowet Red paper. They are finished with five thin coats of TruOil topped with some Renaissance Wax. I used 3/16" (0.1875") pivot bolts to attach the scales, counterboring the holes to 0.25". I placed a thin washer under the head of each pivot screw to make the holes look nice and clean and give the bolts more purchase on the scales.
Cheers!
TedP


-
Officer Gigglez

- Member
- Posts: 801
- Joined: Wed Nov 13, 2013 4:22 pm
- Location: Originally out of Arizona, currently live in Missouri.
One of the coolest knives I have ever seen. Great work!jabba359 wrote:I've been planning this particular combination for some time and finally got the necessary materials to get it done. The Super Blue name made me think of Superman, perhaps appropriately known as the "Man of Steel". So I decided to do a Super Blue: Man of Steel edition theme. Red G-10 bolsters, blue G-10 handle, yellow liners, metal "Superman" shield on glowing background. I forced a patina with vinegar on the handle and then cut up a bunch of things to give it a nice patina on the blade. Wow, this slices like a beast!
I'm sort of happy with how it turned out, but wish the cutout for the Superman logo was cleaner (I just drilled some holes and then used hand files to shape the cutout). I need to fill in around the edges of the logo so junk doesn't get in below the insert. The glow powder ended up looking a bit chunky after mixing it and brushing it on (as you can see in the last picture), so I probably should have gotten GITD paint with less texture to it.
I've already got a few ideas for my next concept knife (probably will go on my Cobalt Special Mule), but unlike the Superman shield that I put on this (which I found a nice quality one on eBay), I may have to have someone machine something for the next one as I've been unable to source a pre-made piece that fits my needs. It takes some planning and work, so I'll probably make some regular handles in the meantime for my other Mules while I get the details figured out.


Spyderco Knives (in order of obtainment):
-Tenacious, Combo edge
-Tasman Salt, PE
-Persistence Blue, PE
-Pacific Salt, Black, PE
-Delica 4, Emerson Grey
-DiAlex Junior
-Byrd SS Crossbill, PE
-Endura 4 Emerson Grey
-Byrd Meadowlark 2 FRN, PE
-Resilience
-Tenacious, Combo edge
-Tasman Salt, PE
-Persistence Blue, PE
-Pacific Salt, Black, PE
-Delica 4, Emerson Grey
-DiAlex Junior
-Byrd SS Crossbill, PE
-Endura 4 Emerson Grey
-Byrd Meadowlark 2 FRN, PE
-Resilience