Page 4 of 32
Re: Community Sharpening Journal, Part 2
Posted: Sun Oct 06, 2024 3:06 pm
by vivi
SpyderEdgeForever wrote: ↑Wed Oct 02, 2024 10:01 pm
Vivi I really need to get in on this. I appreciate you taking the time to post these. I need to improve my sharpening skills, I'm still a novice at it after all these years of knife use and collecting. Your videos and posts are great. One of the major issues is that I don't want to accidentally damage or scratch up the blade edges and finish if I sharpen it wrong. As an example I recently did some free hand sharpening using one of those Work Sharp devices. I started to feel a sharper edge in testing it, but, I also scratched some of the finish, too.
I've learned to not worry about that. An old karate instructor used to say something like "don't let the pursuit of perfect keep you from doing something great."
Others suggested taping the blade, and that can help. If I'm doing a special knife for a customer, I go slow and use bench stones rather than my belt sander.
I mess my knives up all the time, despite my experience level. But they cut circles around their factory edges.
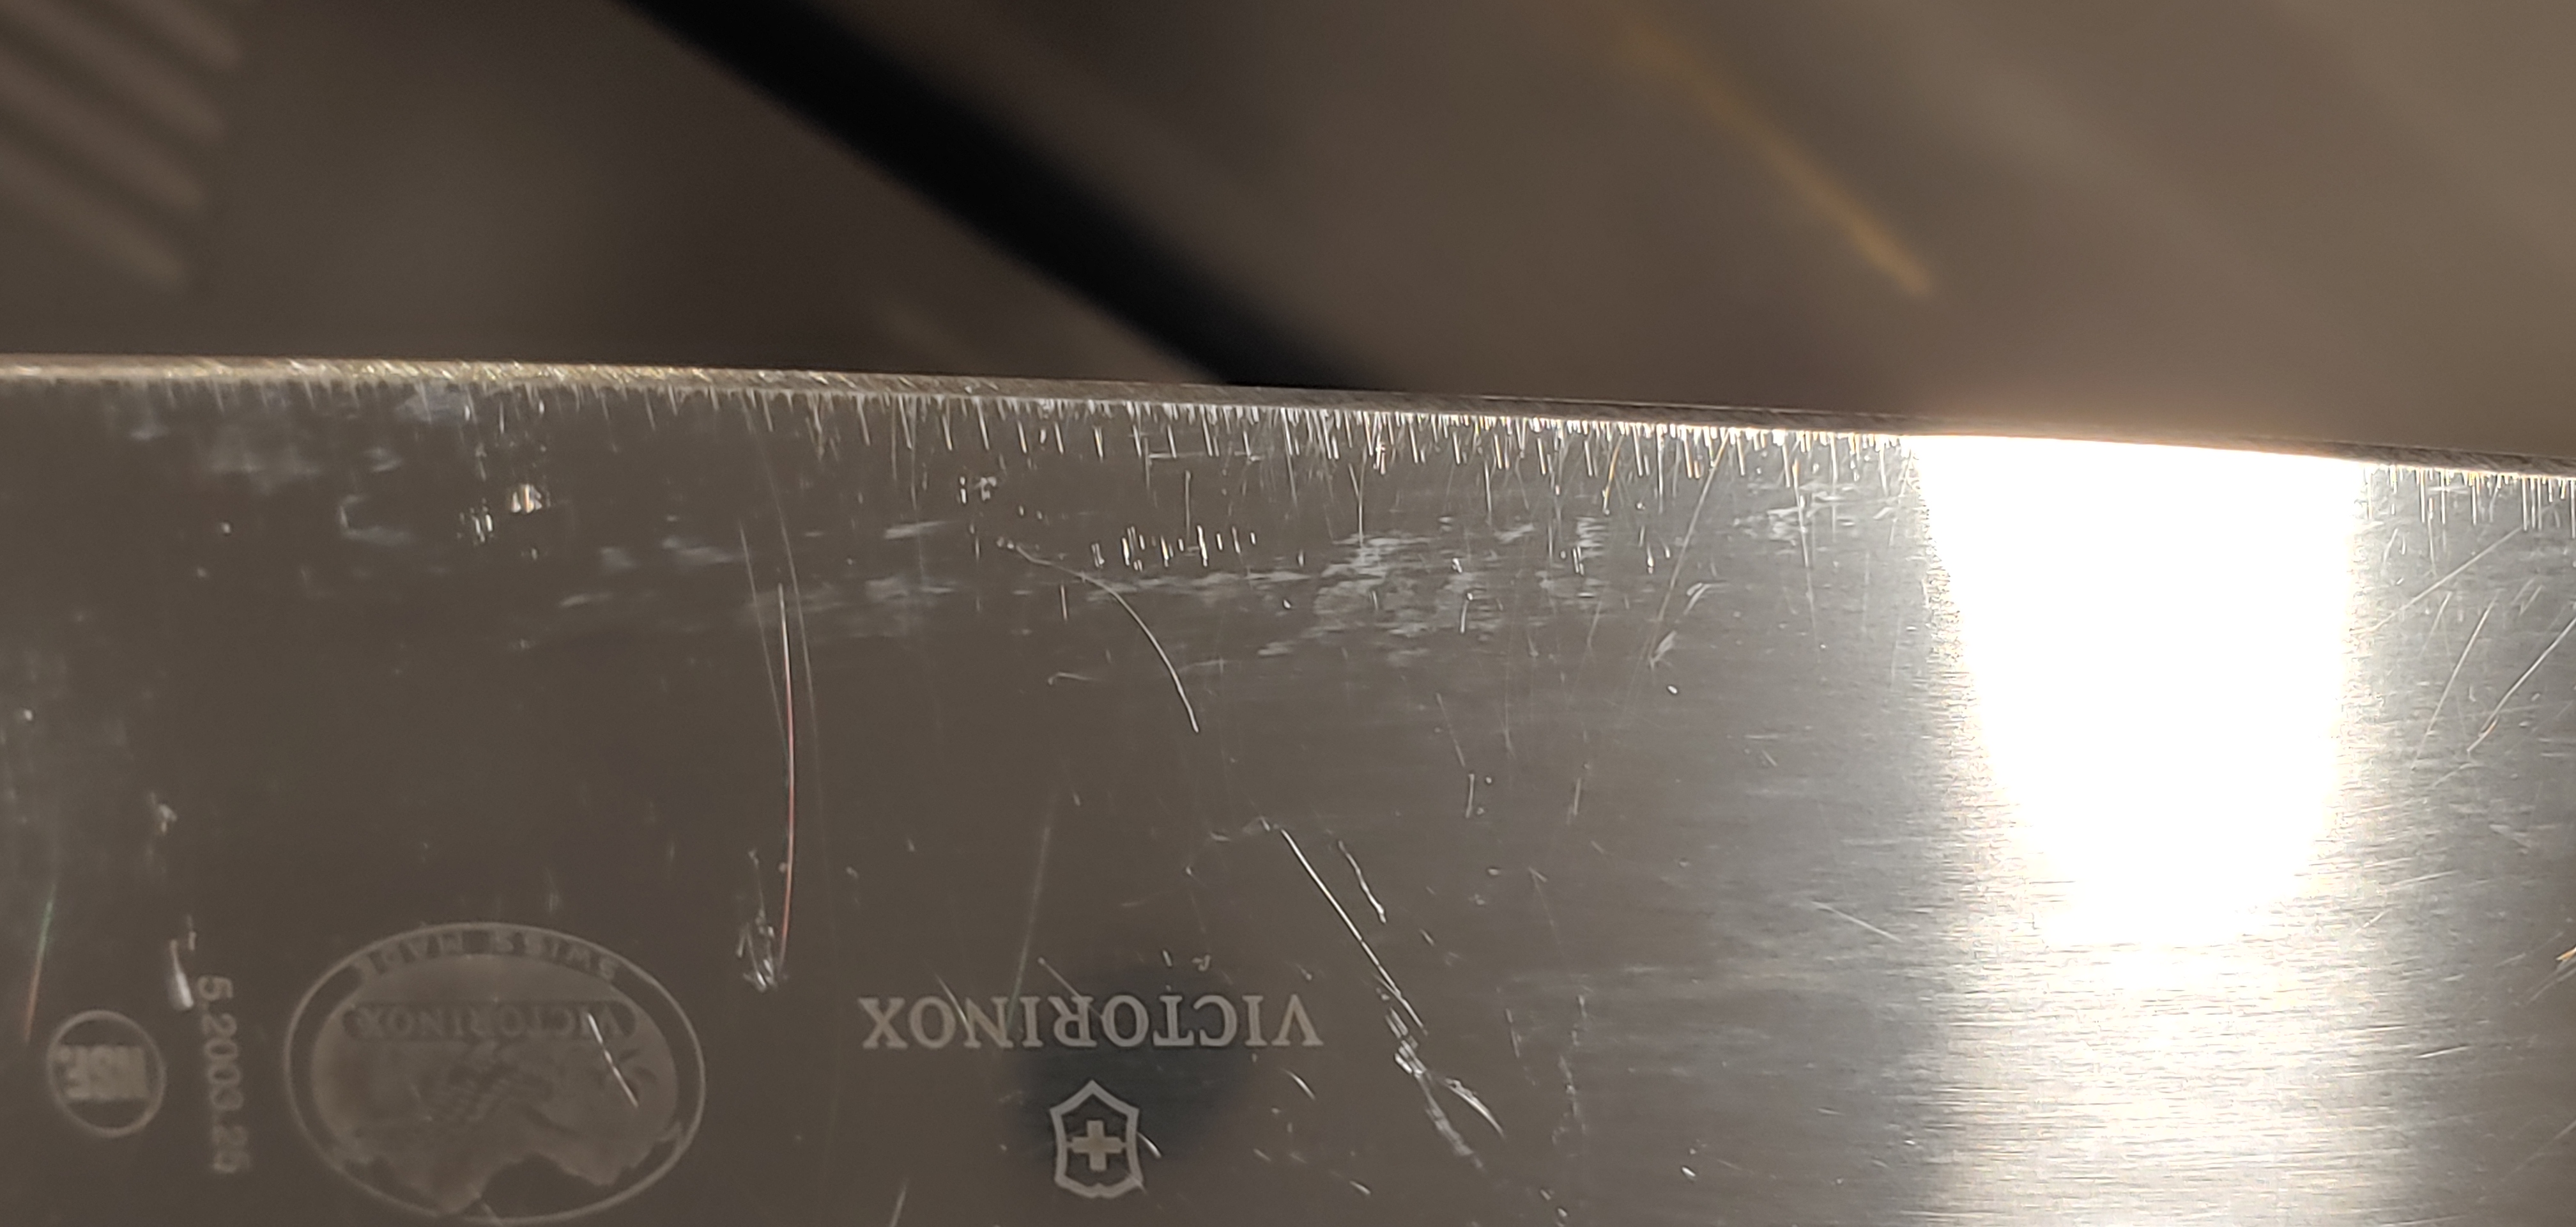
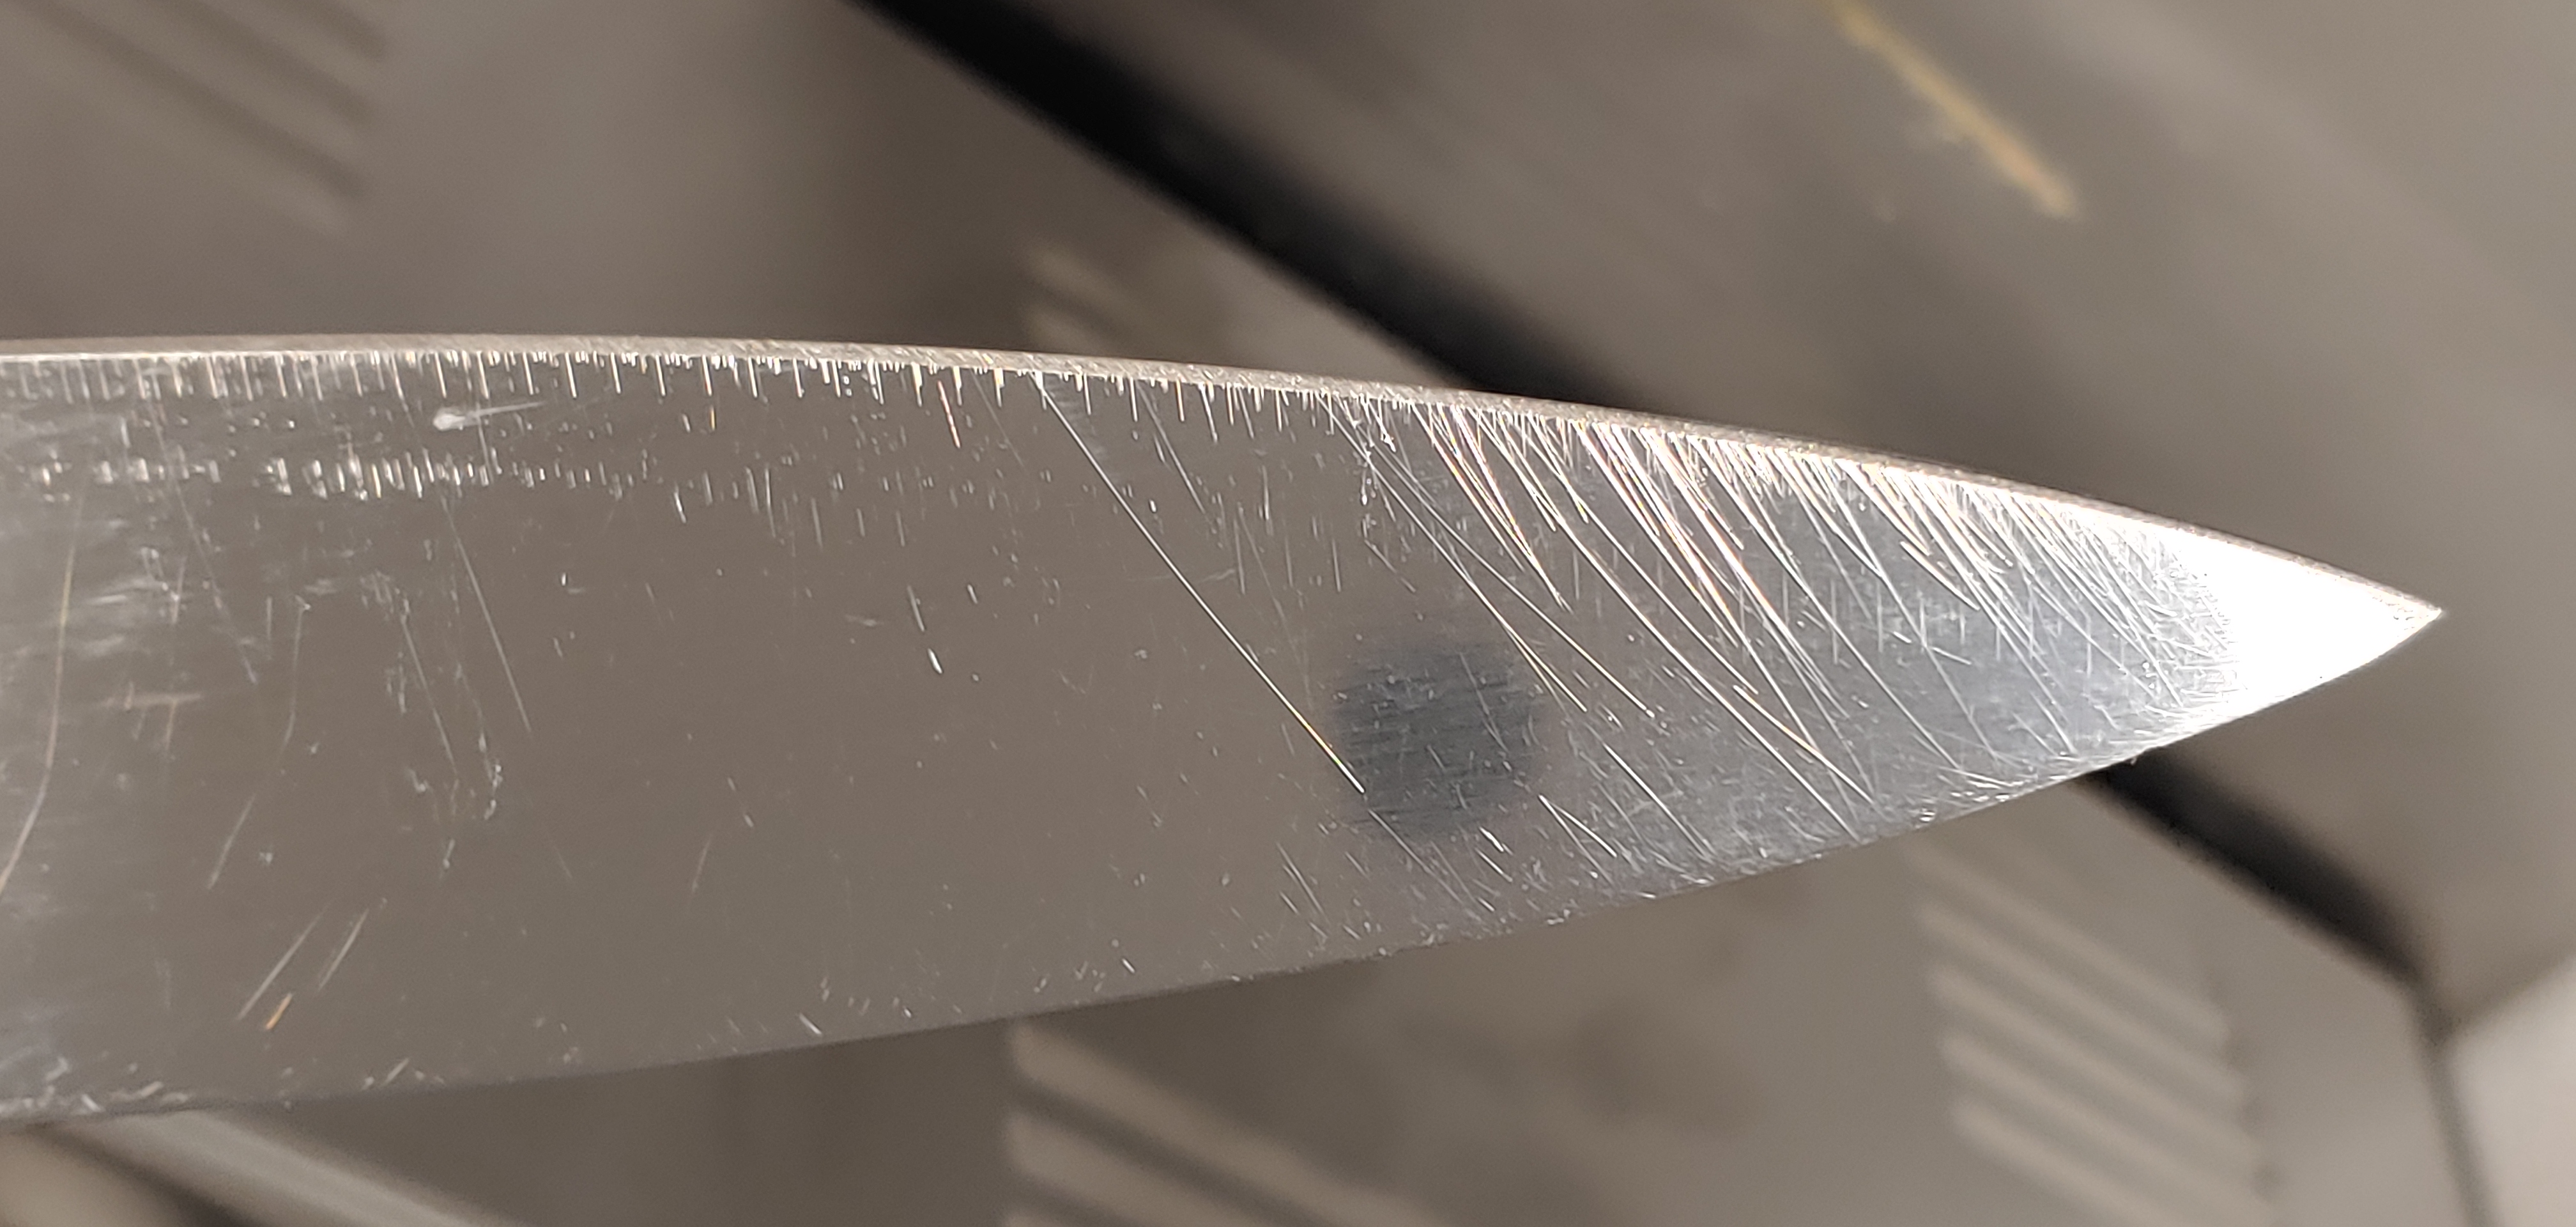
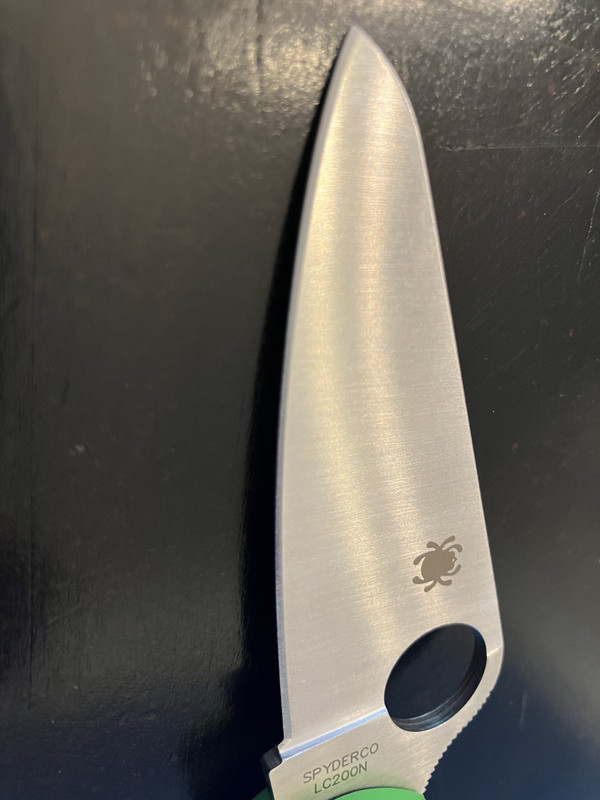
Here's the chef knife I use at work most days. An old beater Victorinox that's got scratches from both a belt sander and from hand sharpening on short 6" diamond stones (10" blade).
Then here's todays carry, a Recon 1. If you look close you can see I ground the ricasso a bit, getting sloppy on my bench stones:
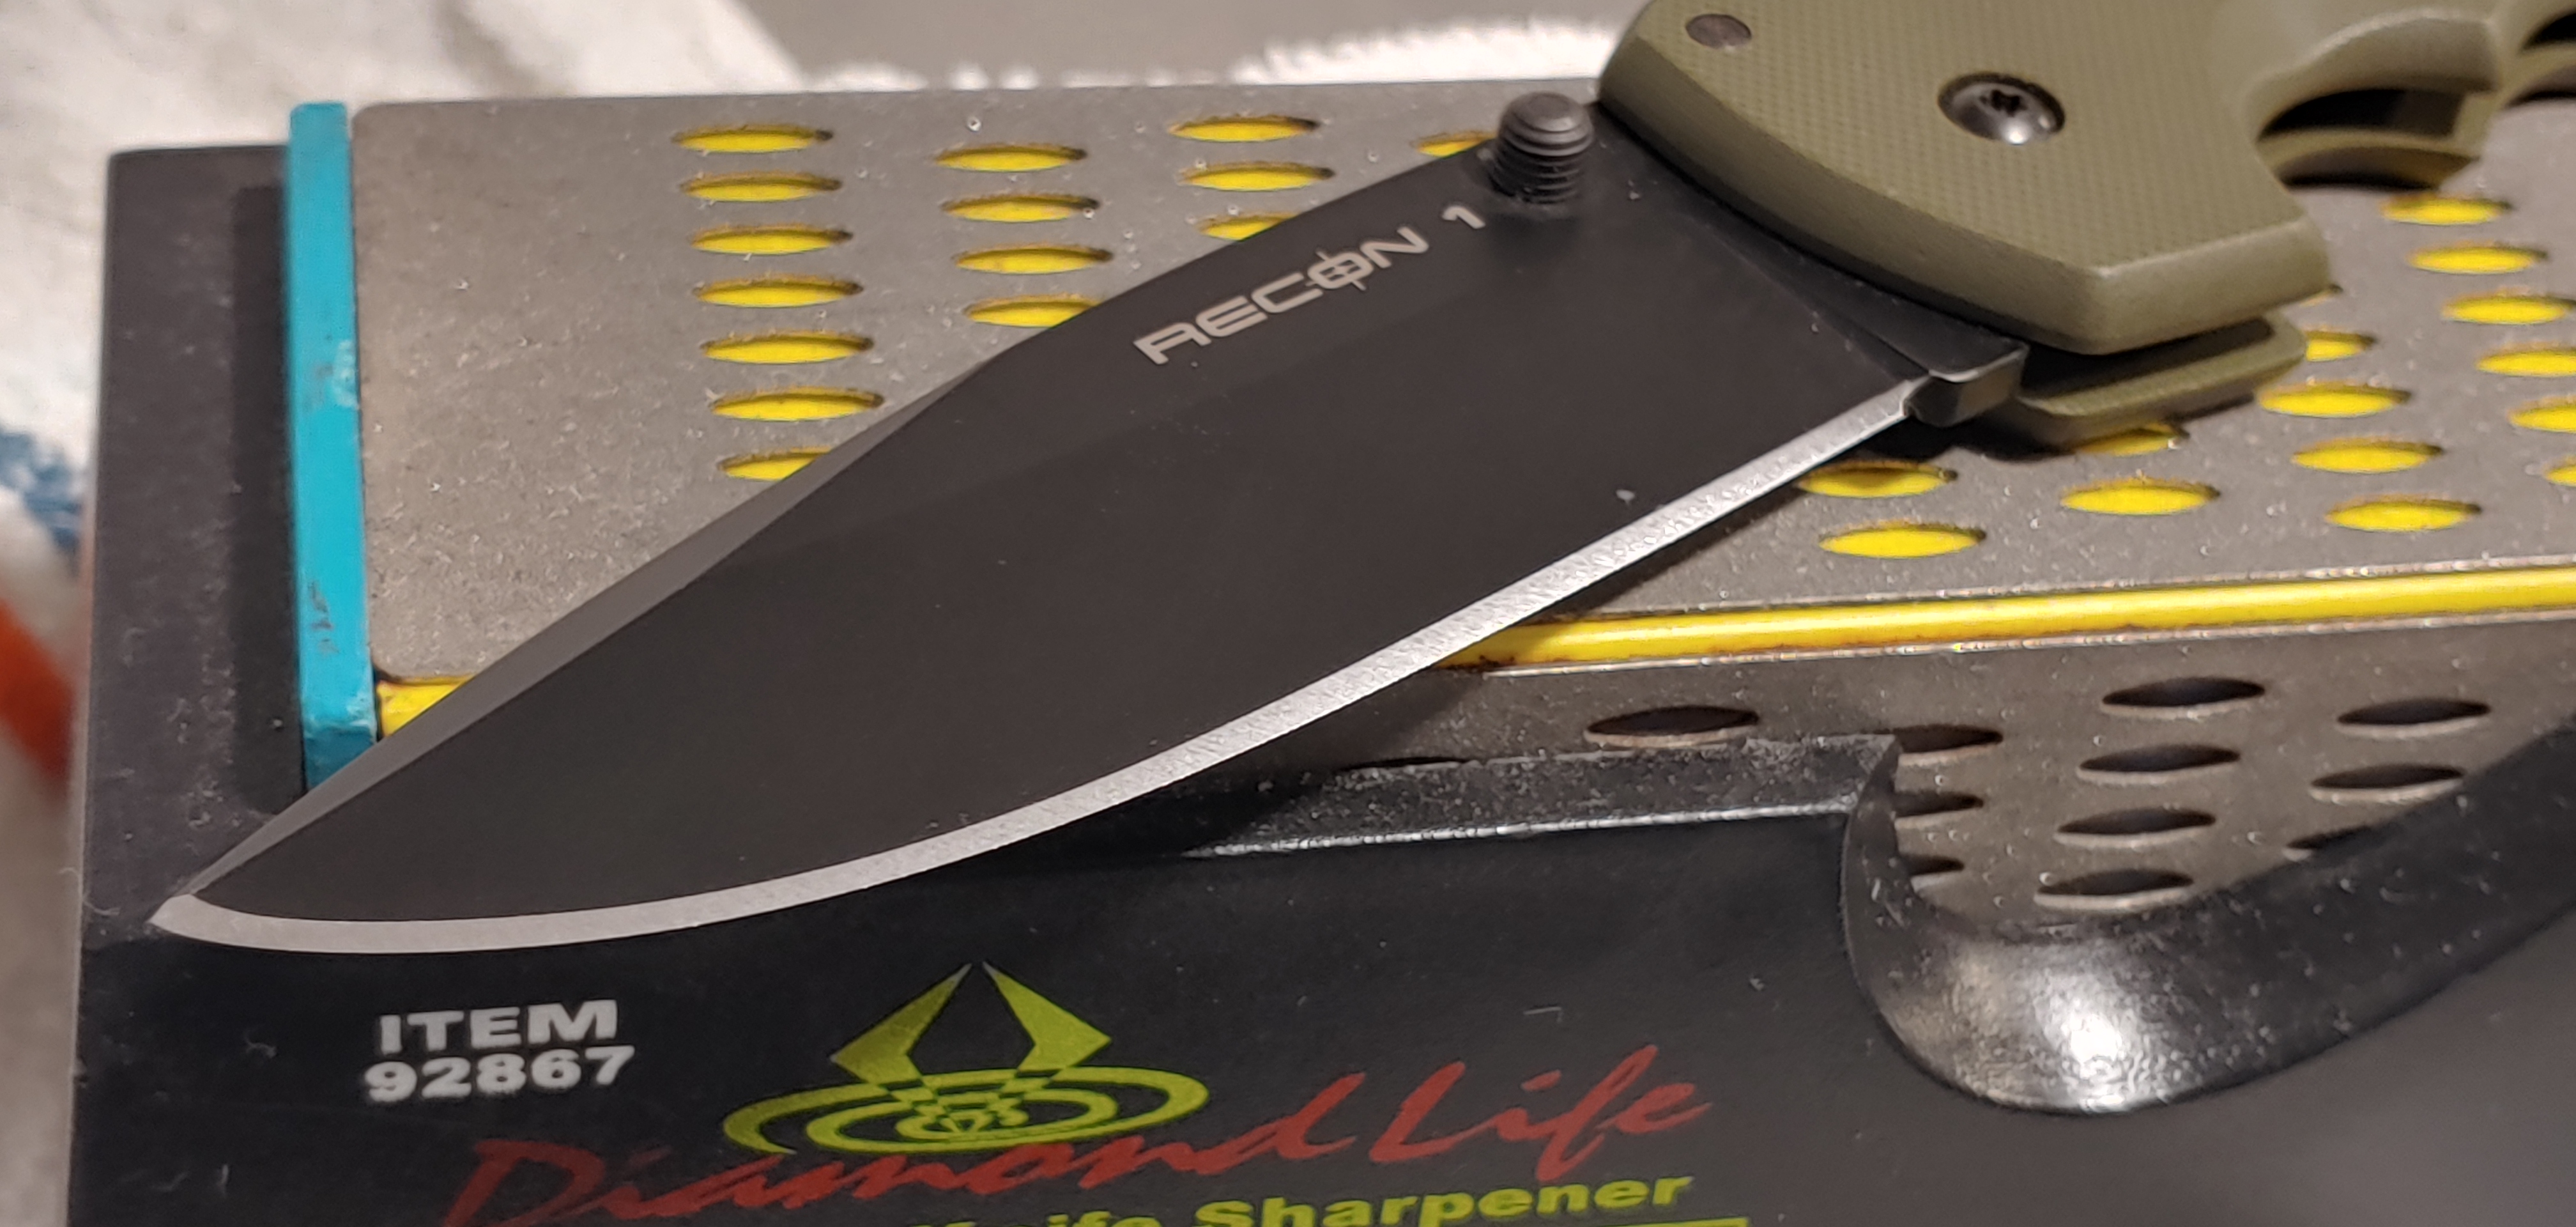
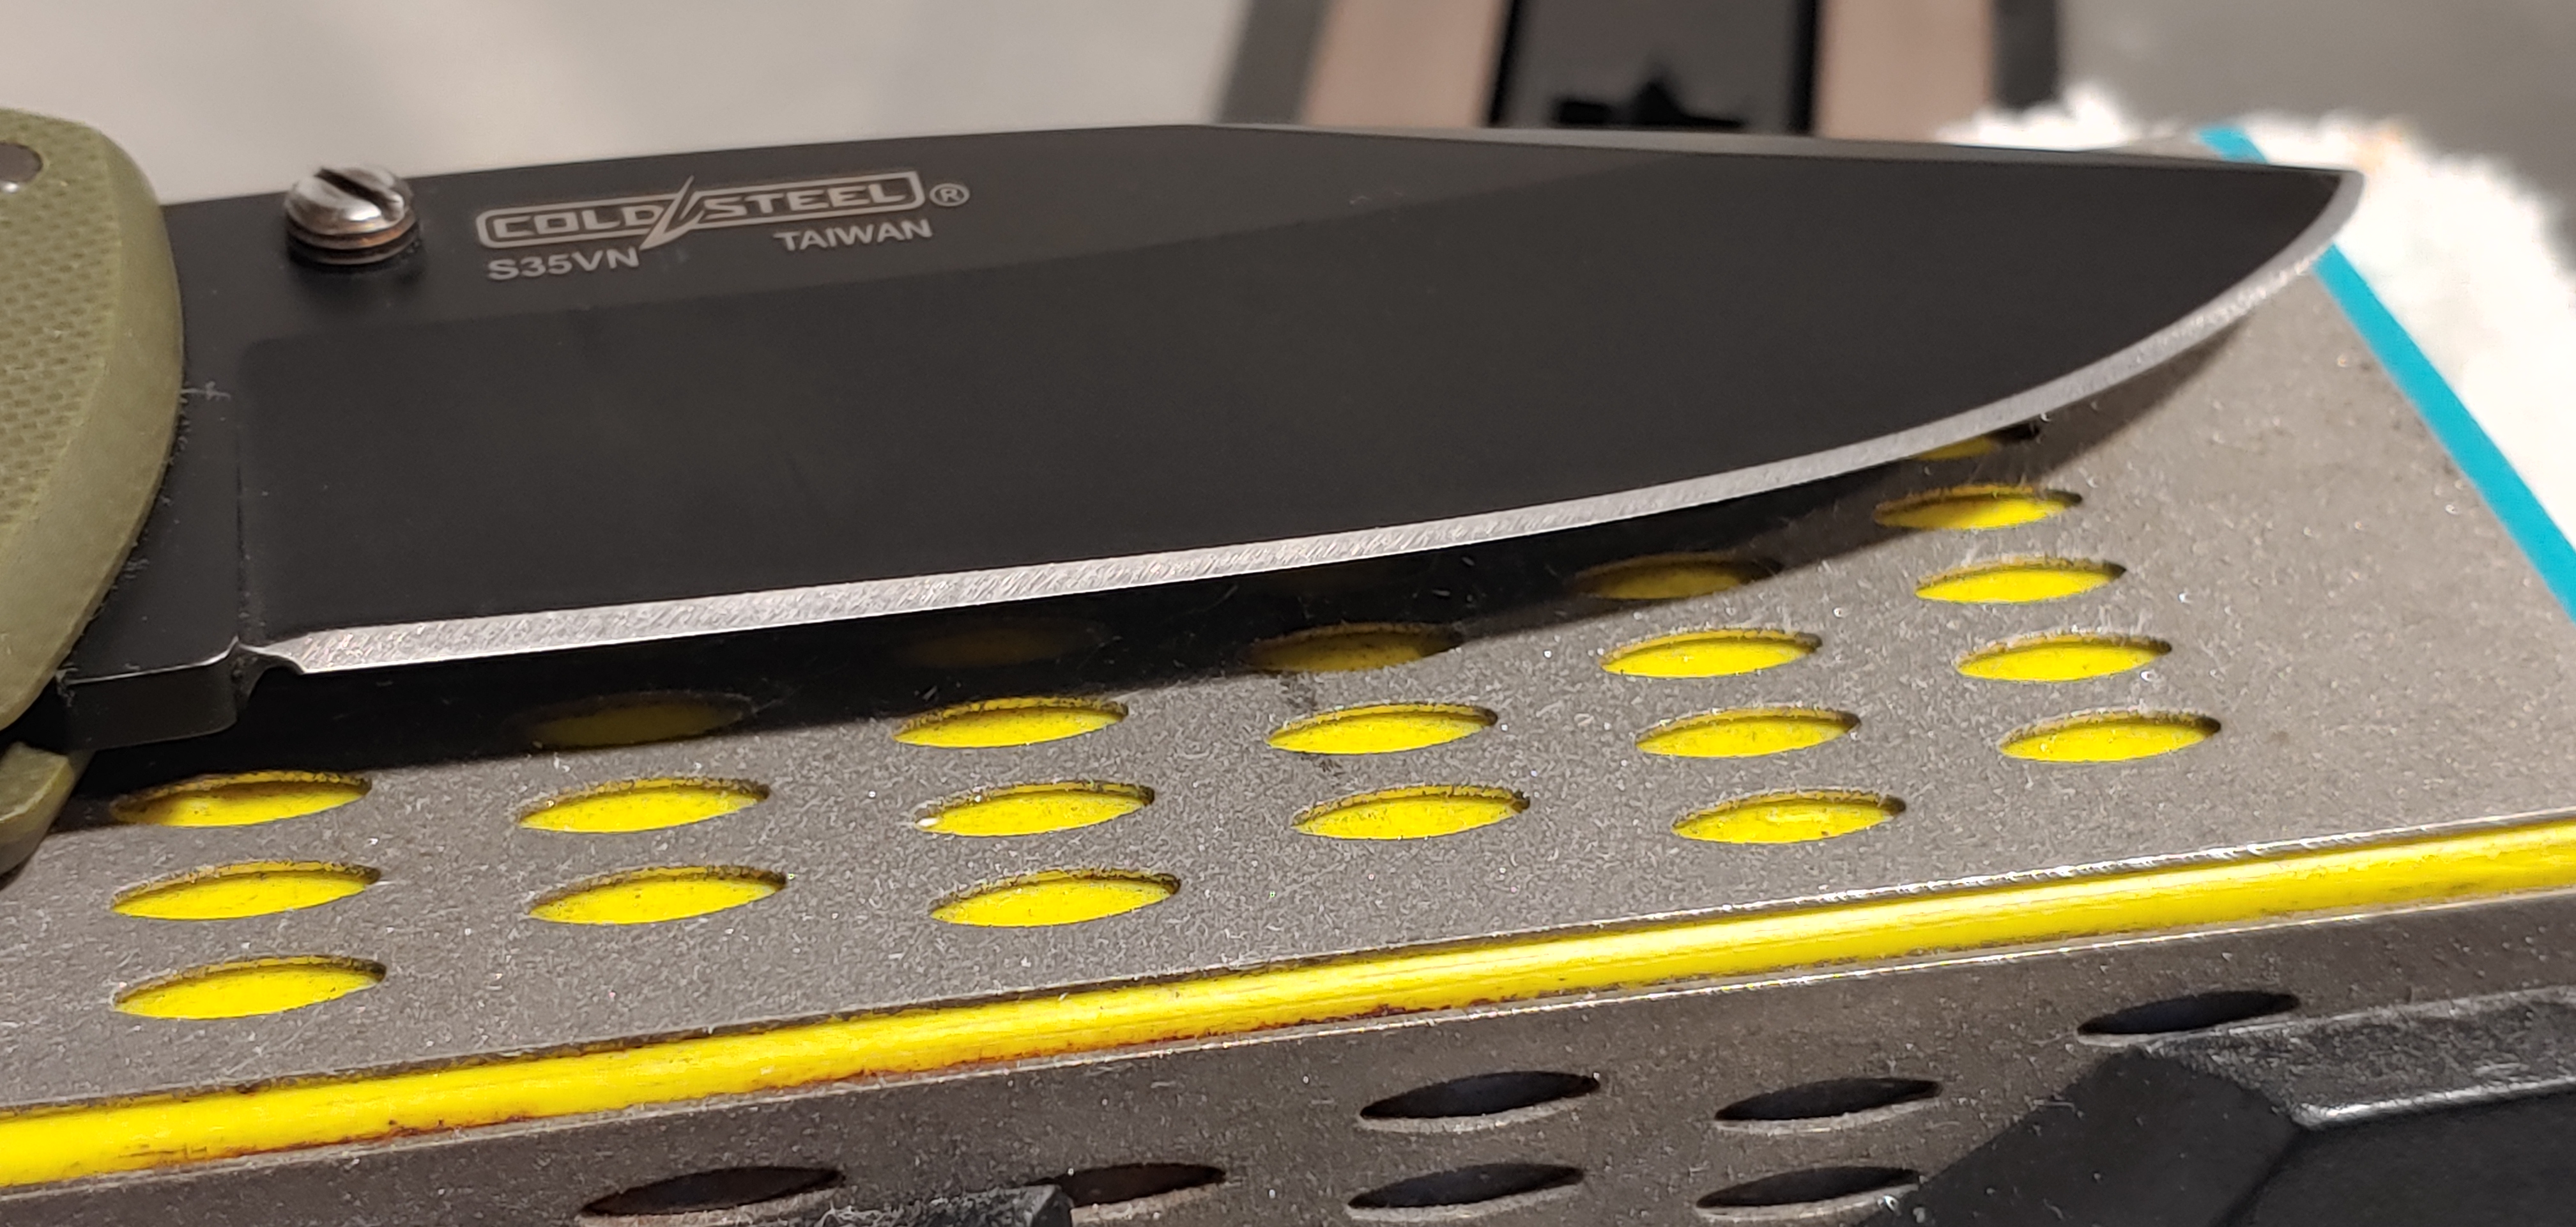
I carried my Military folder instead of the Recon for a few days this past week, and I noticed a difference in how easily they each cut through cardboard. So I thinned the Recon out a bit more on a harbor freight diamond stone, starting on 200 grit then refining the bevel on 300 grit.
Two strokes per side on the fine sharpmaker rod corners using the smallest amount of pressure possible. Tuned the edge a little more towards push cutting than I usually do, but there are still small remains of teeth on the edge to give it a nice bite when slicing.
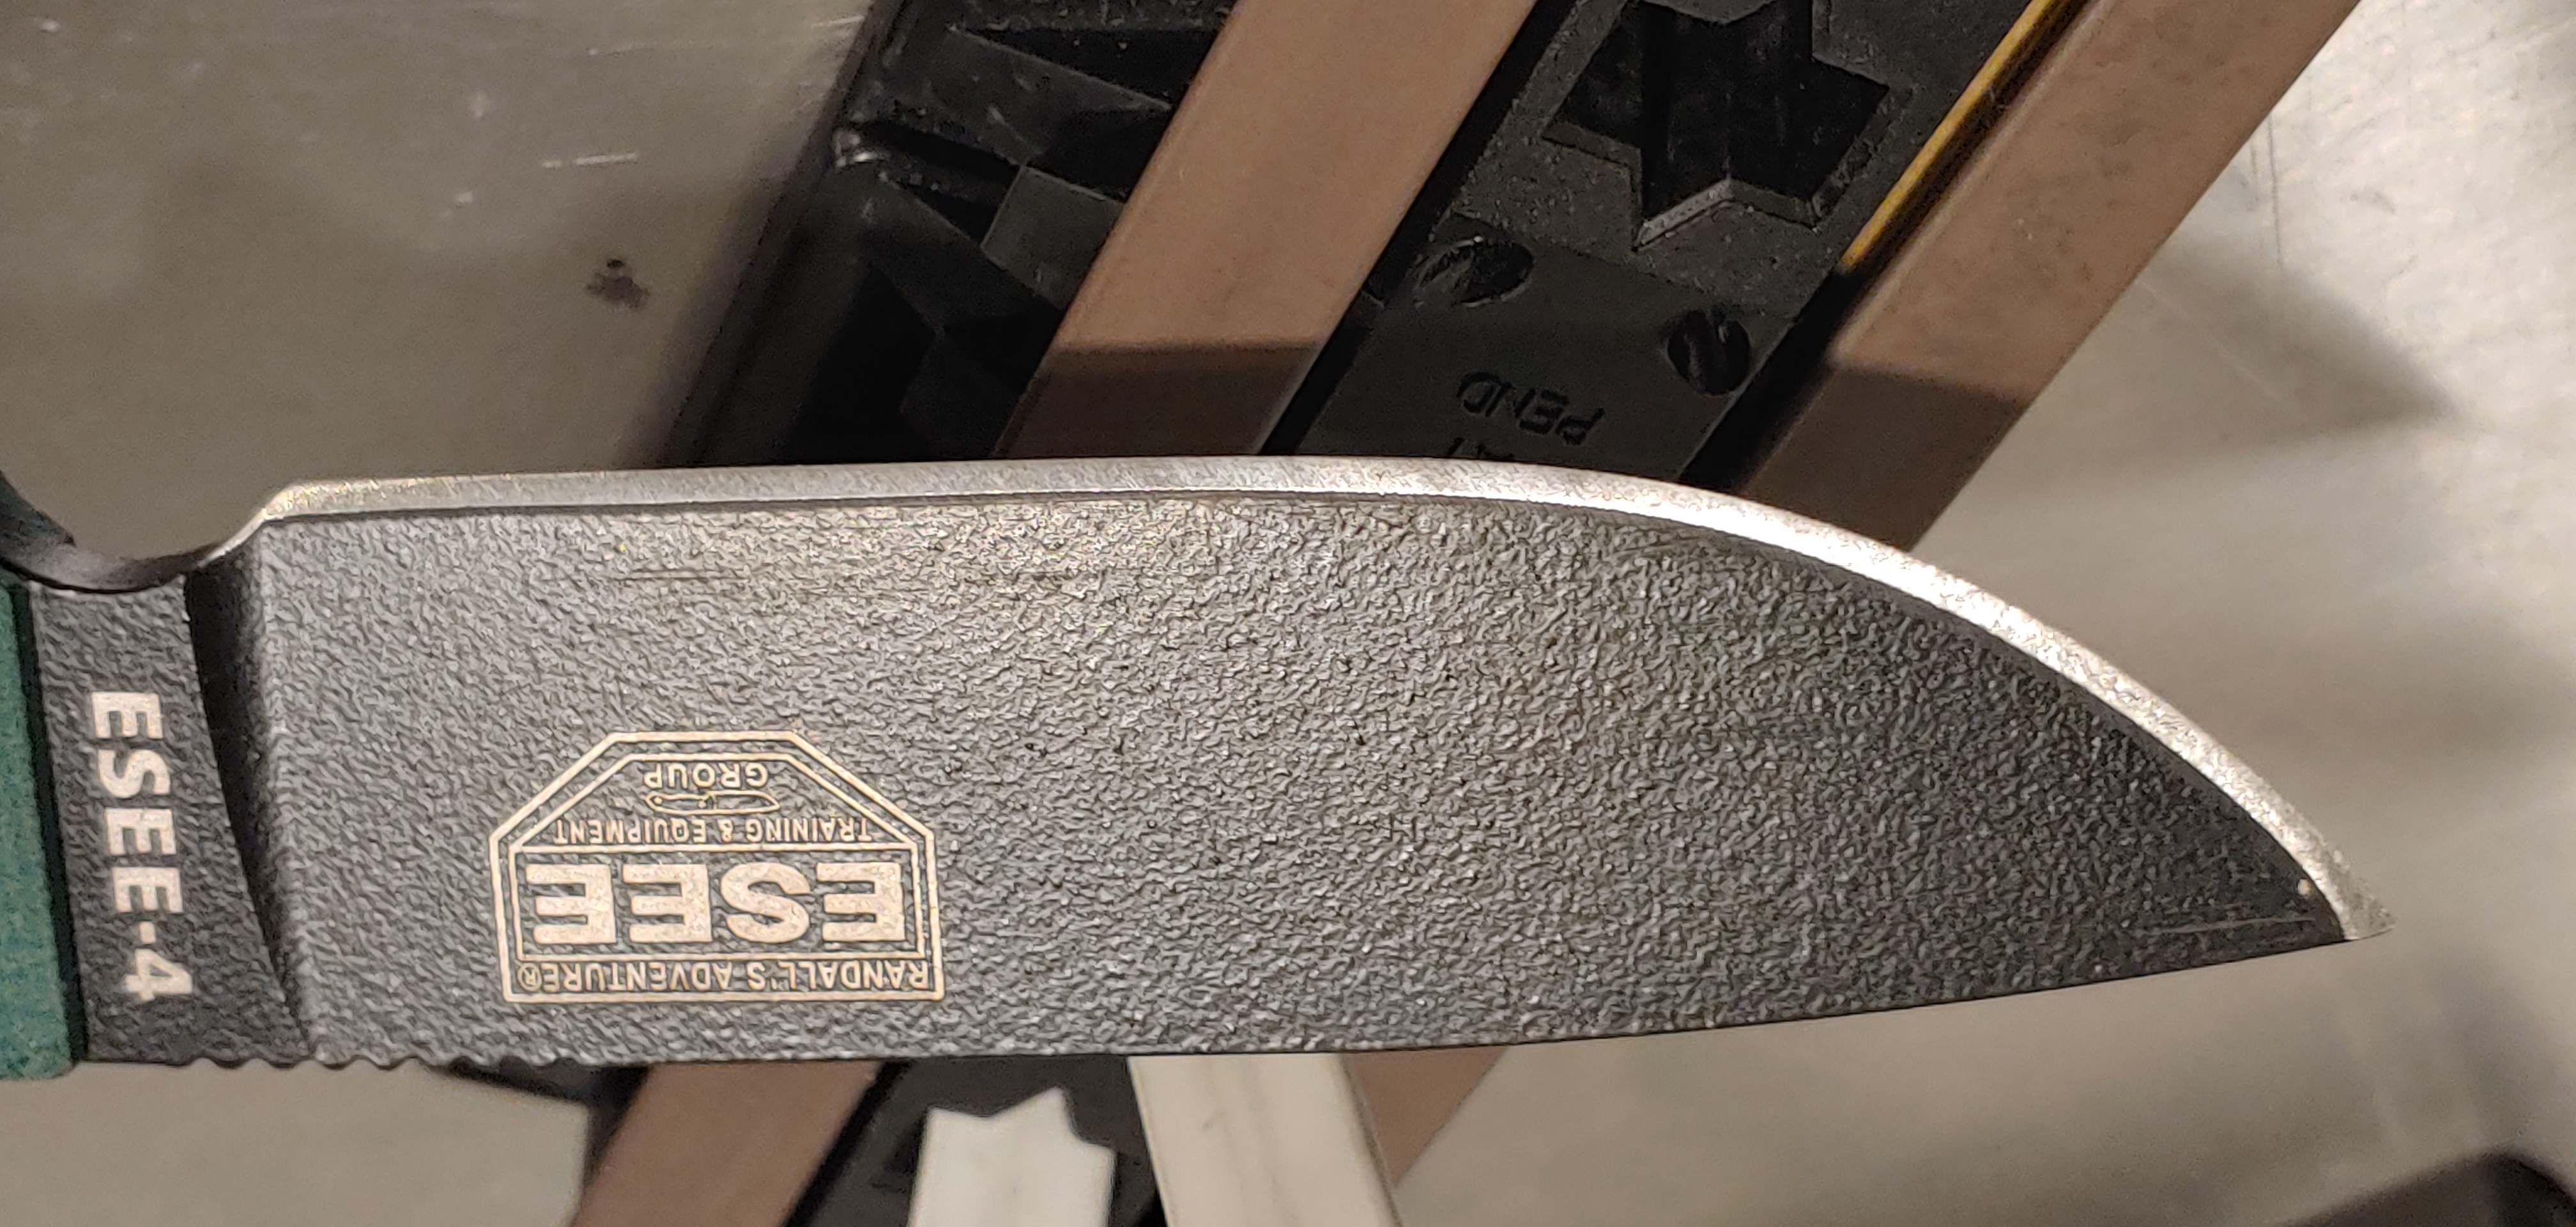
The ESEE 4 was much quicker in comparison. I keep the edge a bit on the thicker side intentionally, though it is definitely thinner than the factory edge, which cuts poorly when carving wood. I simply did ~8 strokes per side on the fine rod corners, then the same number on the flats. Alternating of course.
I always use the following as an example of how light your sharpmaker strokes should be:
https://streamff.com/v/be2aba5a
Sharpmaker placed on a smooth stainless steel counter top. Not secured with my off hand, a wet towel underneath or anything else. Sharpening a fairly heavy knife.
If you can't do this without moving the base when doing your finishing strokes, you're pushing too hard.
Do it this way and make sure your stones are clean (bar keepers friend + green scouring pad) and your knives will pop off arm hairs without contacting the skin too, like this ESEE does now.
Re: Community Sharpening Journal, Part 2
Posted: Sun Oct 06, 2024 4:36 pm
by Silcox
The Spyderco Sharpmaker is awesome. I know nothing about sharpening and just don't want dull knives due to safety. I'm pretty blown away by how good this thing is. I even had my pocket knives professionally sharpened and they still weren't as sharp as when a 'know-nothing' like me used this. It feels like it's as sharp as it was when it came out of the factory. Just posting this incase anyone is like me and browsing the forum
Re: Community Sharpening Journal, Part 2
Posted: Mon Oct 07, 2024 4:28 pm
by Aladinsane
Silcox wrote: ↑Sun Oct 06, 2024 4:36 pm
The Spyderco Sharpmaker is awesome. I know nothing about sharpening and just don't want dull knives due to safety. I'm pretty blown away by how good this thing is. I even had my pocket knives professionally sharpened and they still weren't as sharp as when a 'know-nothing' like me used this. It feels like it's as sharp as it was when it came out of the factory. Just posting this incase anyone is like me and browsing the forum
I agree! I tried for years to learn how to sharpen my knives, had people show me, watched videos, bought stones, but I must have some kind of mental block about it! I got a Sharpmaker last year and have had perfectly sharp knives ever since! My kids even commented on the kitchen knives when they come to visit!
Re: Community Sharpening Journal, Part 2
Posted: Tue Oct 08, 2024 5:48 pm
by vivi
vivi wrote: ↑Tue Jul 16, 2024 10:37 pm
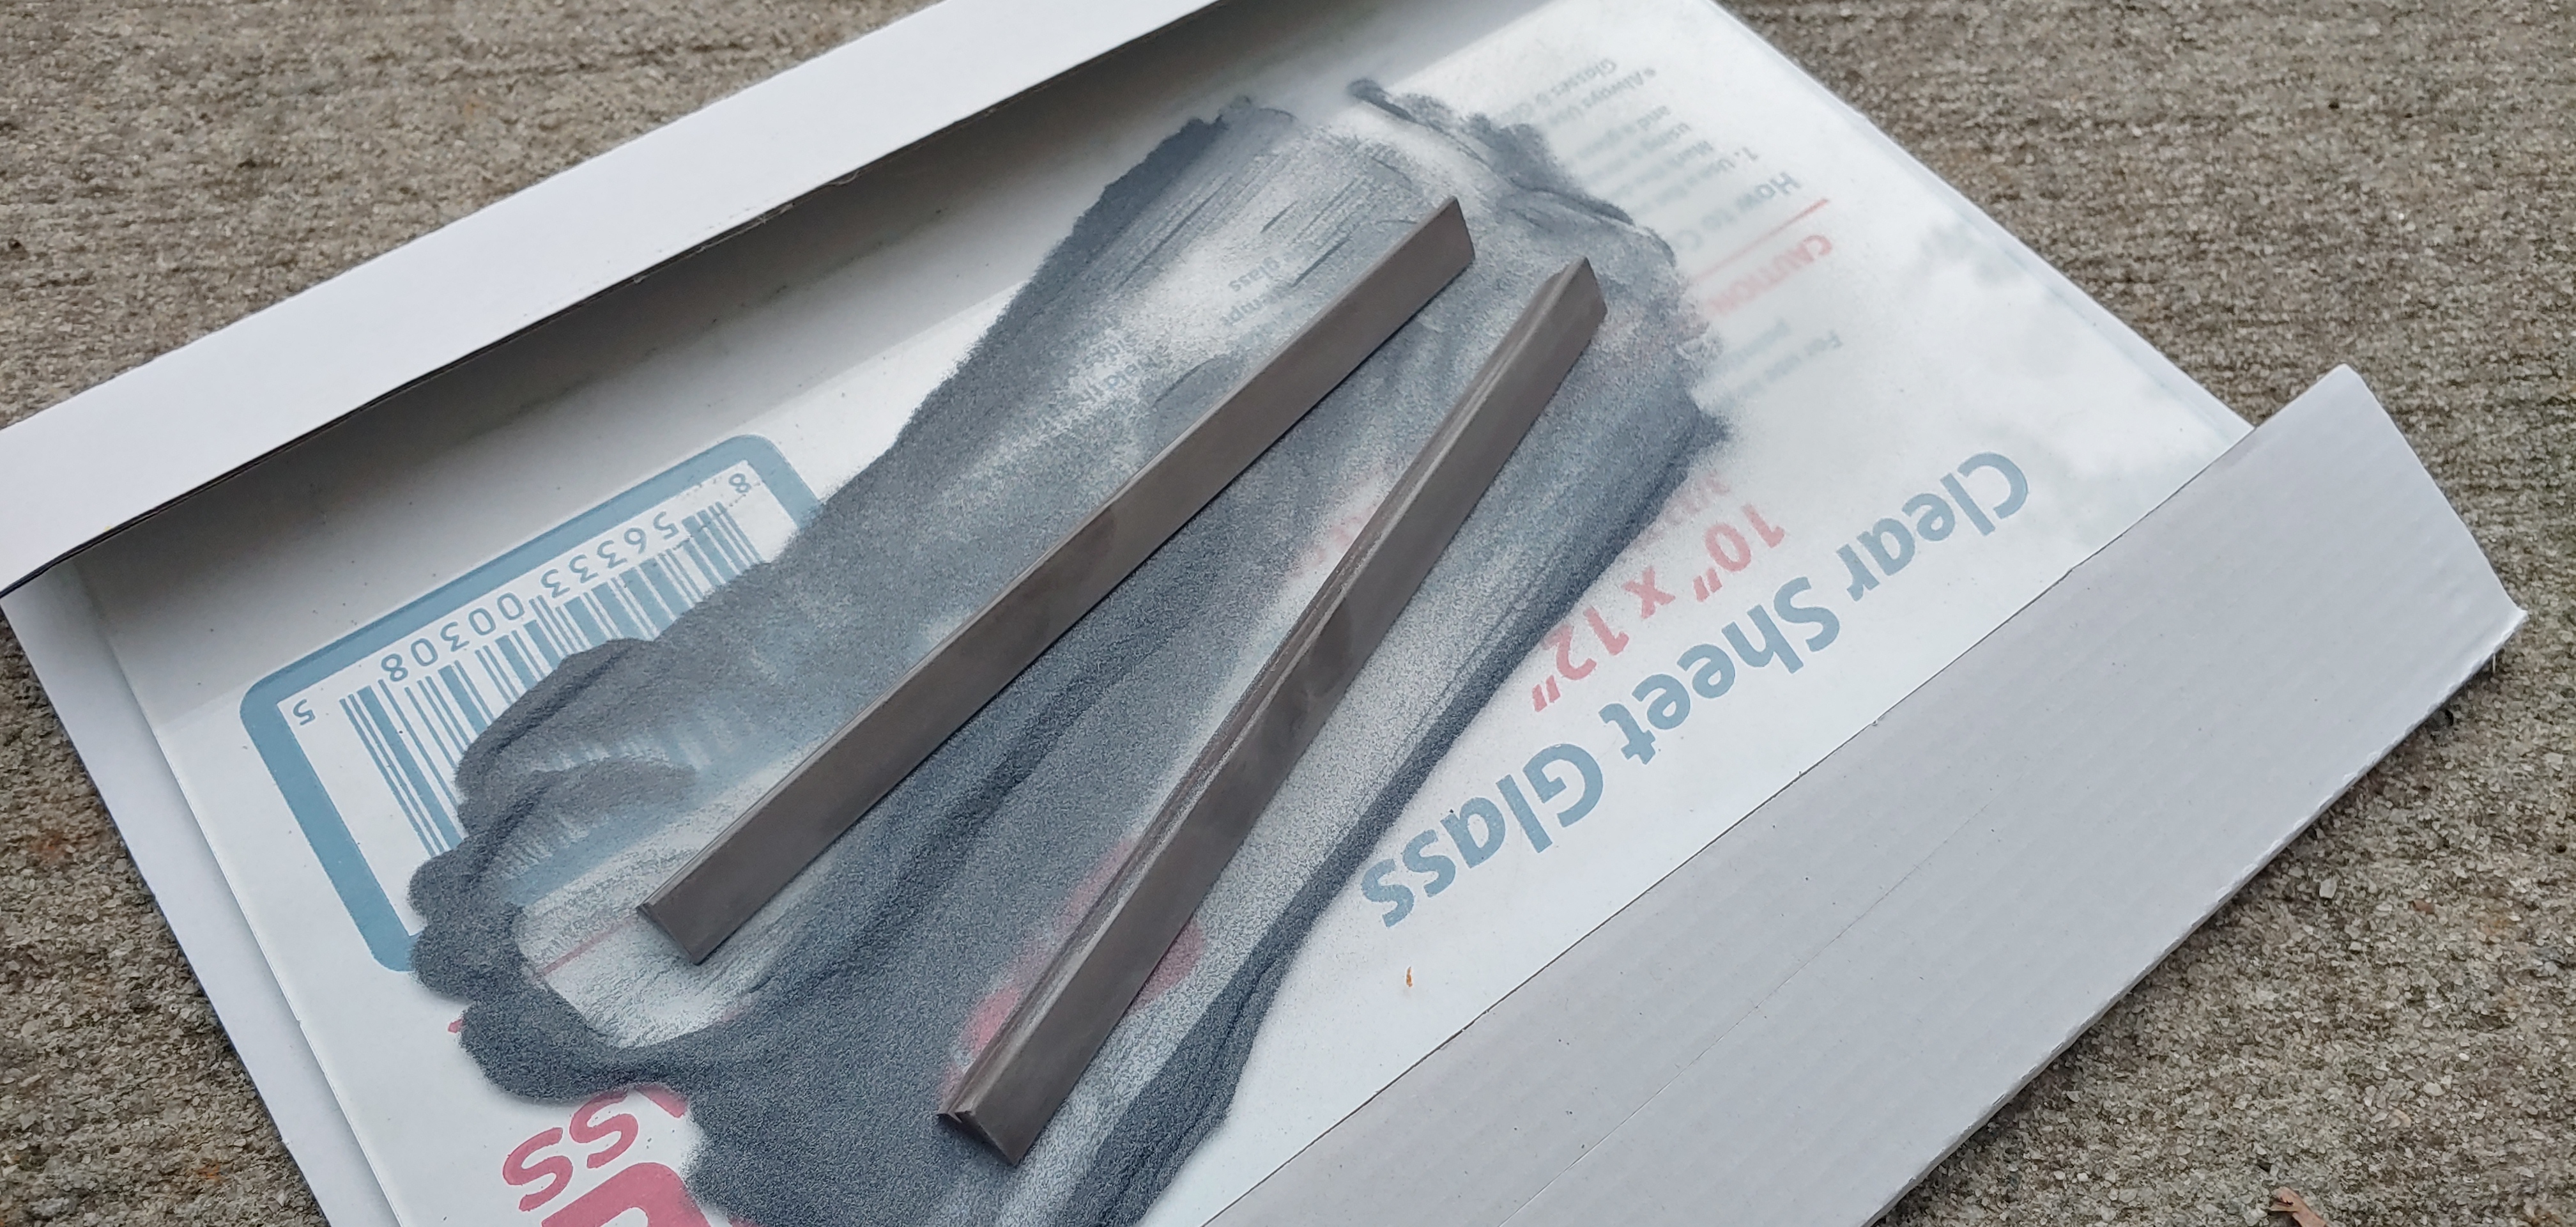
A while ago I also ordered some silicon carbide grit from CKTG, meant for flattening stones. As I don't really use stones that need flattening aside from a shapton 5k kuromaku, the plan was to use these on sharpmaker rods.

I finally got around to trying it out.
I have to say, for me this is a game changer.
While sharpmaker rods wear incredibly slowly, they do wear over time.
I bought a sharpmaker, then after five years bought a replacement set of both rods. Then I did the same thing five years later. Picked up a second sharpmaker ~20 years after getting the first.
Each time I noticed the same thing. The old rods felt much smoother to the touch, and they left a much more polished edge than the new ones.
My oldest brown rods leave a finish closer to new whites than new browns.
So I was hoping with a sheet of glass and some loose grit, I could bring them back to factory new aggression.
Taking it one step further, I hoped I'd be able to make a set of brown rods feel even coarser than a new set. I love the sharpmaker rods but always wanted something in between the diamond rods and brown rods for a finishing step on medium grit finished edges.
This did exactly what I hoped. I got a few grits of silicone carbide ranging from 80 to 320. The 80 brought the mediums down to a rougher feel than my newest set, just like I had hoped.
I'm really glad I held on to the old sets of rods, even though I stopped using them each time I got a new set. Now I'm going to have a wider variety of options when using my sharpmaker, ranging from diamond rods, to extra coarse finished mediums, regular mediums and fines, up to ultrafines.
After using these medium rods for a while I'm not wild about them. Maybe I need to re-do them, but the ends feel rougher than the middle, which gives odd feedback. Either the rods or my glass pane aren't flat.
Plus the edges I was getting off them weren't as good as I was hoping for.
I'm tried another old medium set with 220 grit silicon carbide today.

Much better results. The edges feel closer to a fresh set of medium rods, and the feedback is much better than with the 80 grit powder. Even though you can look at this set of rods and see they weren't perfectly flat either from the looks of it. That or my technique is off. Hard to keep the powder perfectly evenly dispersed while working the stones, so maybe it's my fault and not the stones.
I think I'm going to order something in the 400-600 grit range to try on my fine rods.
The advice I got was to use much coarser carbide powder the the stones finish, but based on my results the finer powder gave me much better results.
Re: Community Sharpening Journal, Part 2
Posted: Wed Oct 09, 2024 6:02 am
by u.w.
I know you didn't ask, and I'm not sure if this will be helpful to you with flattening your stones,
BUT it may be, so hopefully worth sharing
For some years (years ago now) I worked in a hydraulics/pneumatics shop. Among the things we did was manufacture high pressure hoses and lines. When making lines that need to be flared (single or double) we'd need to measure, cut, bend/clock/bend, deburr and then "finish", while keeping flat, the ends - prior to flaring. (and then of course pressure & leak test/check the finished product prior to issuing).
What was taught to me, and that I have done since, is: Move the piece (line end in my cases) in a Figure-8 motion for best results in keeping the end surface flat.
Do you have the room to do that on your pane of glass? and/or have you tried that?
u.w.
Re: Community Sharpening Journal, Part 2
Posted: Wed Oct 09, 2024 7:35 am
by vivi
u.w. wrote: ↑Wed Oct 09, 2024 6:02 am
I know you didn't ask, and I'm not sure if this will be helpful to you with flattening your stones,
BUT it may be, so hopefully worth sharing
For some years (years ago now) I worked in a hydraulics/pneumatics shop. Among the things we did was manufacture high pressure hoses and lines. When making lines that need to be flared (single or double) we'd need to measure, cut, bend/clock/bend, deburr and then "finish", while keeping flat, the ends - prior to flaring. (and then of course pressure & leak test/check the finished product prior to issuing).
What was taught to me, and that I have done since, is: Move the piece (line end in my cases) in a Figure-8 motion for best results in keeping the end surface flat.
Do you have the room to do that on your pane of glass? and/or have you tried that?
u.w.
Thank you for the advice. I tried circular motions but I will follow your suggestion next time I refresh some stones.
Re: Community Sharpening Journal, Part 2
Posted: Thu Oct 10, 2024 8:38 am
by RugerNurse
Practicing freehand after some time off with the salt. Scratch pattern looks ok and it cuts paper without any hangups but I can’t get it to the next level sharp. I tried to make sure the burr is gone
Re: Community Sharpening Journal, Part 2
Posted: Thu Oct 10, 2024 6:23 pm
by ChoilsChoilsChoils
vivi wrote: ↑Tue Oct 08, 2024 5:48 pm
vivi wrote: ↑Tue Jul 16, 2024 10:37 pm
A while ago I also ordered some silicon carbide grit from CKTG, meant for flattening stones. As I don't really use stones that need flattening aside from a shapton 5k kuromaku, the plan was to use these on sharpmaker rods.
I finally got around to trying it out.
I have to say, for me this is a game changer.
While sharpmaker rods wear incredibly slowly, they do wear over time.
I bought a sharpmaker, then after five years bought a replacement set of both rods. Then I did the same thing five years later. Picked up a second sharpmaker ~20 years after getting the first.
Each time I noticed the same thing. The old rods felt much smoother to the touch, and they left a much more polished edge than the new ones.
My oldest brown rods leave a finish closer to new whites than new browns.
So I was hoping with a sheet of glass and some loose grit, I could bring them back to factory new aggression.
Taking it one step further, I hoped I'd be able to make a set of brown rods feel even coarser than a new set. I love the sharpmaker rods but always wanted something in between the diamond rods and brown rods for a finishing step on medium grit finished edges.
This did exactly what I hoped. I got a few grits of silicone carbide ranging from 80 to 320. The 80 brought the mediums down to a rougher feel than my newest set, just like I had hoped.
I'm really glad I held on to the old sets of rods, even though I stopped using them each time I got a new set. Now I'm going to have a wider variety of options when using my sharpmaker, ranging from diamond rods, to extra coarse finished mediums, regular mediums and fines, up to ultrafines.
After using these medium rods for a while I'm not wild about them. Maybe I need to re-do them, but the ends feel rougher than the middle, which gives odd feedback. Either the rods or my glass pane aren't flat.
Plus the edges I was getting off them weren't as good as I was hoping for.
I'm tried another old medium set with 220 grit silicon carbide today.
Much better results. The edges feel closer to a fresh set of medium rods, and the feedback is much better than with the 80 grit powder. Even though you can look at this set of rods and see they weren't perfectly flat either from the looks of it. That or my technique is off. Hard to keep the powder perfectly evenly dispersed while working the stones, so maybe it's my fault and not the stones.
I think I'm going to order something in the 400-600 grit range to try on my fine rods.
The advice I got was to use much coarser carbide powder the the stones finish, but based on my results the finer powder gave me much better results.
It makes sense to me that the ends would be coarser than the middle if the middle was more worn, resulting in the ends being more deeply abraded by the flattening grit. But if the problem wasn't replicated with the finer grit (220) then I dunno...
Re: Community Sharpening Journal, Part 2
Posted: Thu Oct 10, 2024 7:56 pm
by vivi
RugerNurse wrote: ↑Thu Oct 10, 2024 8:38 am
Practicing freehand after some time off with the salt. Scratch pattern looks ok and it cuts paper without any hangups but I can’t get it to the next level sharp. I tried to make sure the burr is gone
what stones and method are you using? what level of sharpness are you trying to obtain?
Re: Community Sharpening Journal, Part 2
Posted: Fri Oct 11, 2024 3:25 am
by RugerNurse
vivi wrote: ↑Thu Oct 10, 2024 7:56 pm
what stones and method are you using? what level of sharpness are you trying to obtain?
Using diamond stones 300 and 600 freehand. Trying to get where I can slight a paper towel just holding it up. Practically, is that sharpness necessary? Probably not but it’s a goal. It’s better than it was though.
Re: Community Sharpening Journal, Part 2
Posted: Sun Oct 20, 2024 1:15 am
by vivi
sharpened up this trapper. planning to carry it tomorrow.
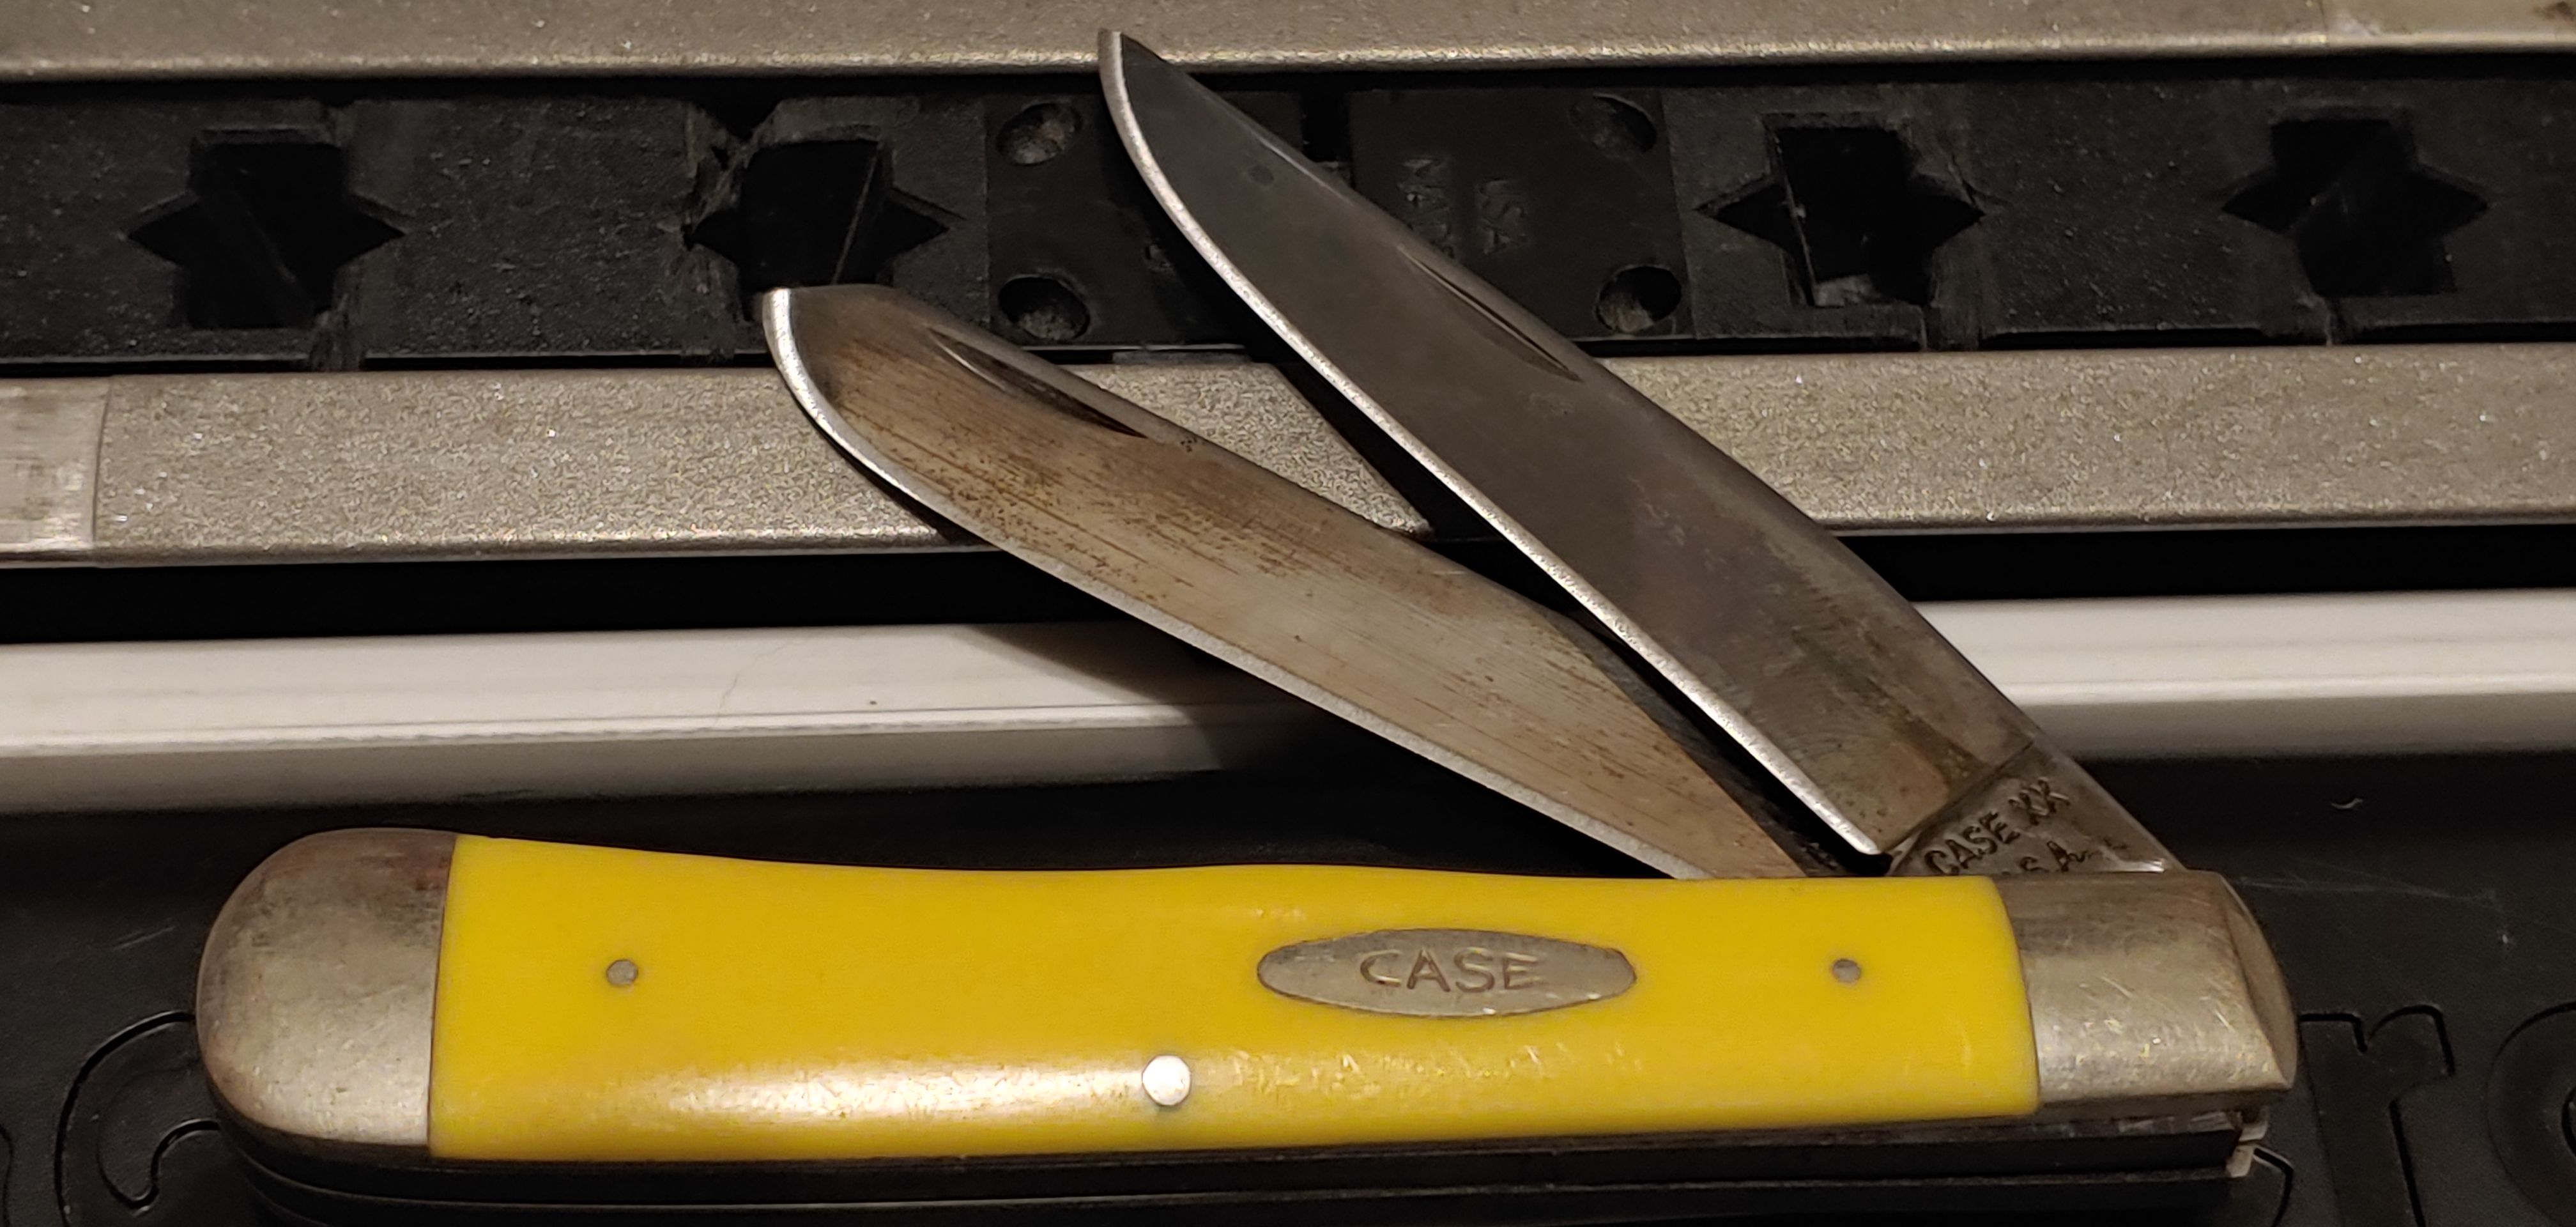
Clip blade sharpened on the fine rods. Spey blade sharpened on the diamond rods.
Both will shave. Love the sharpening response of Case's carbon V.
Re: Community Sharpening Journal, Part 2
Posted: Sun Oct 20, 2024 3:26 am
by RugerNurse
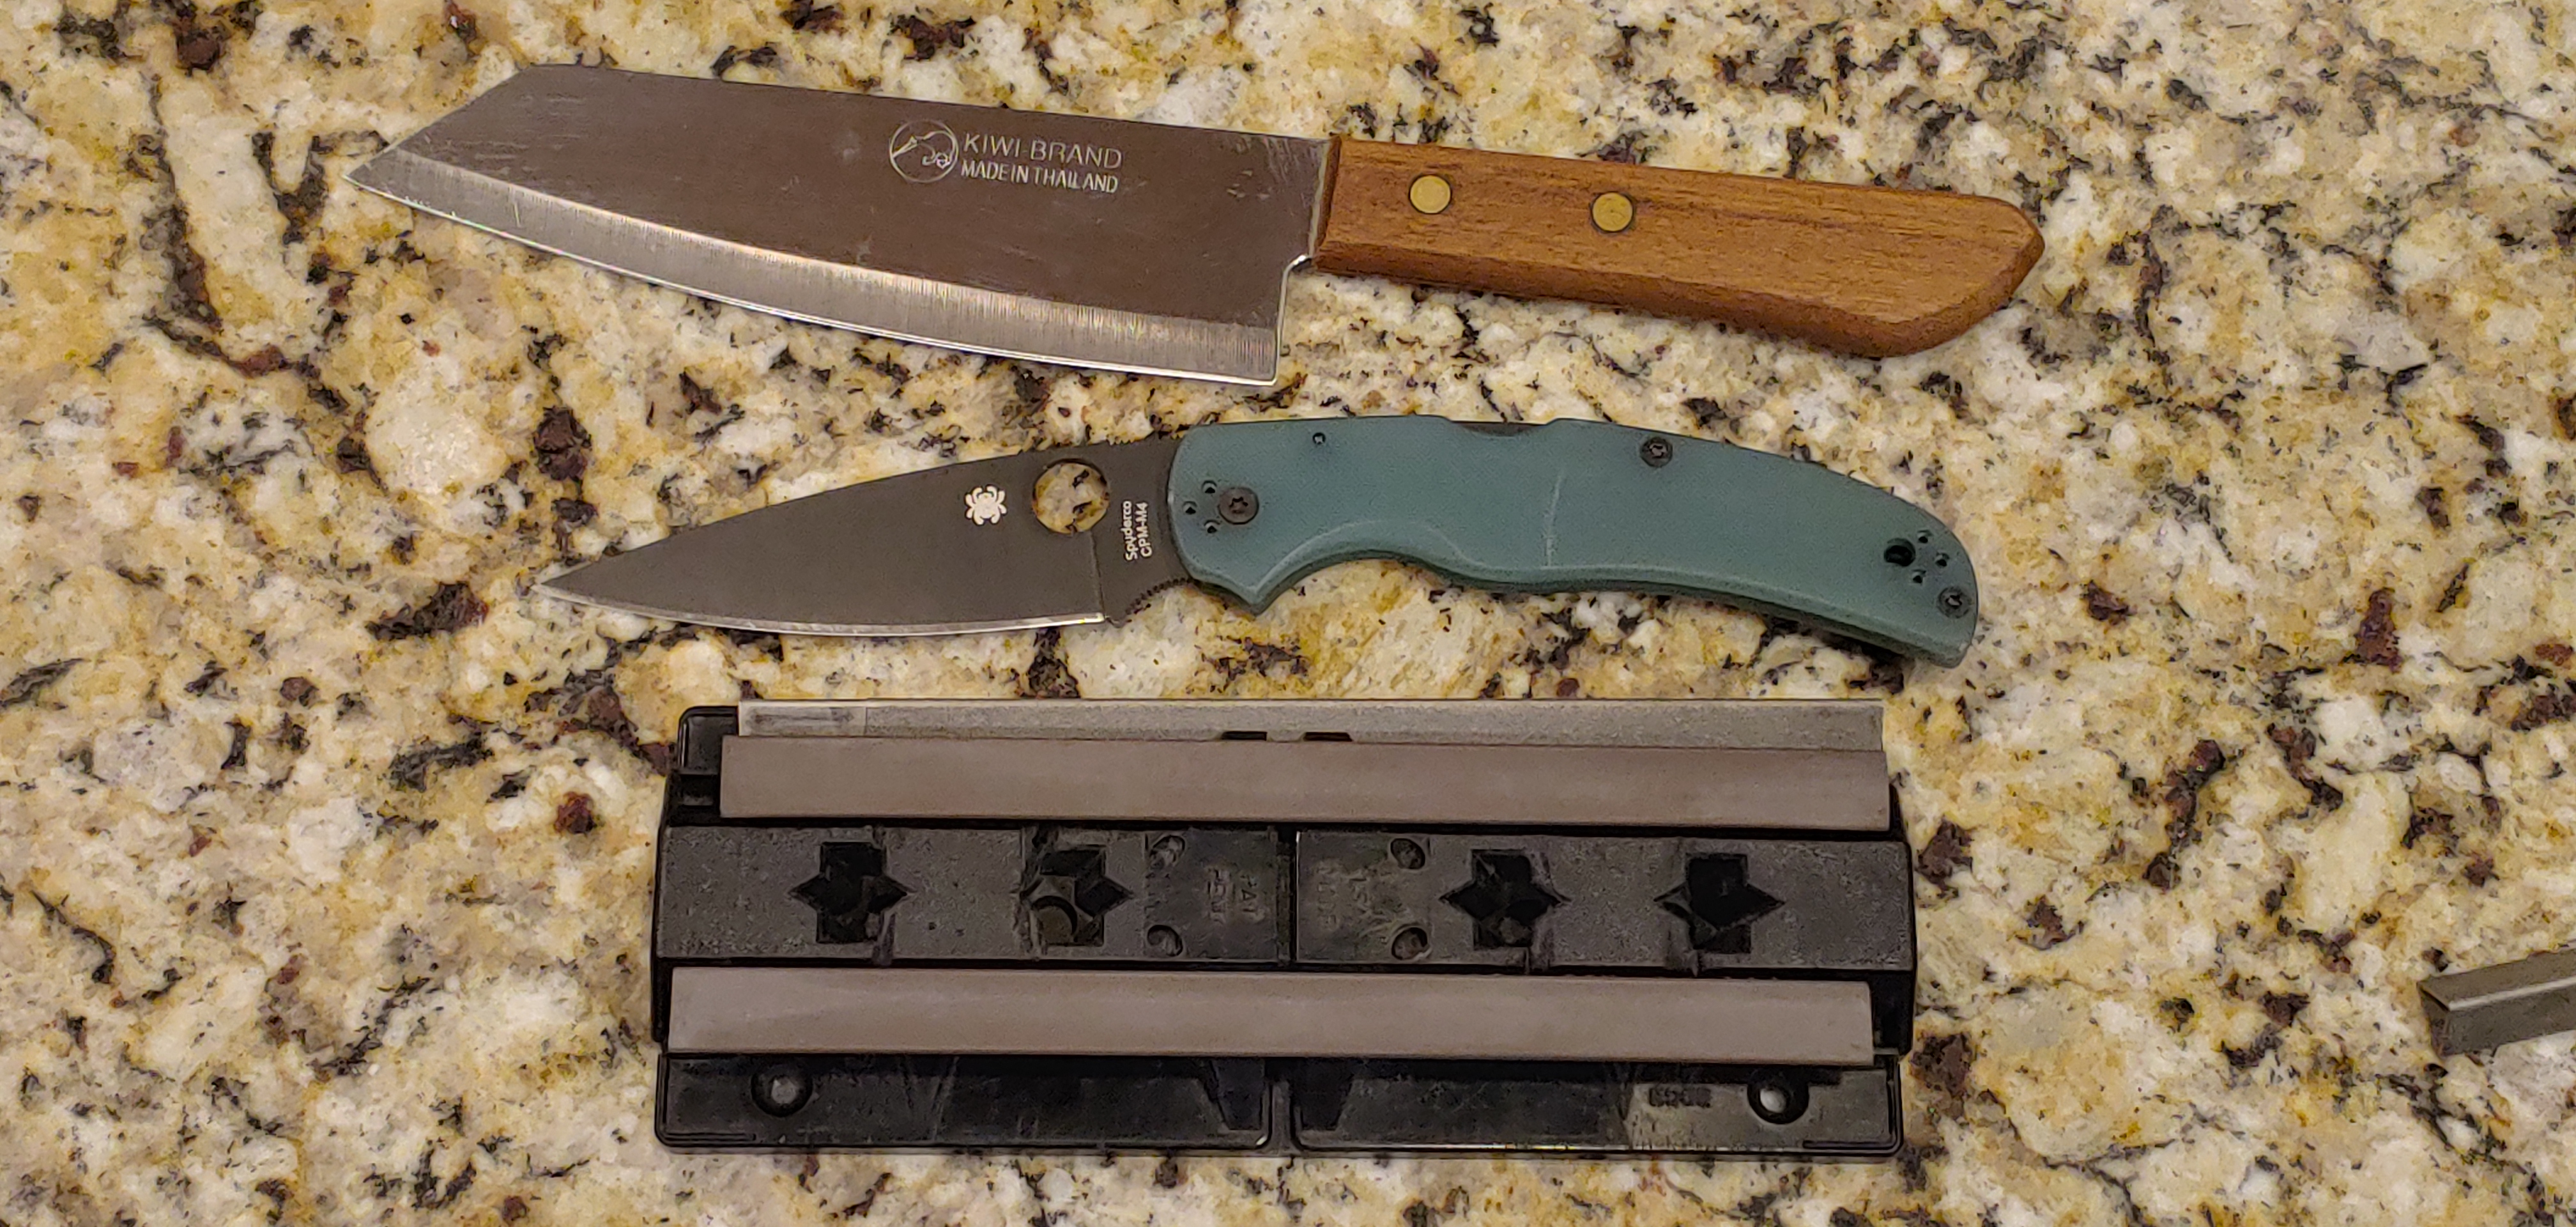
Sharpened my Magnacut native 5 for the first time. Trying to reprofile it to my usual angle on the stones. Surprised how easy it deburred, got very sharp quickly.
Also been using my Rex 45 manix a lot lately. Still has a super sharp factory edge. Trying to wear it down before sharpening. Been surprised at how stable it’s been. Even with some hard carving on wood.
Re: Community Sharpening Journal, Part 2
Posted: Sat Oct 26, 2024 12:55 pm
by vivi
touched up a few knives that have seen some carry & use this month.
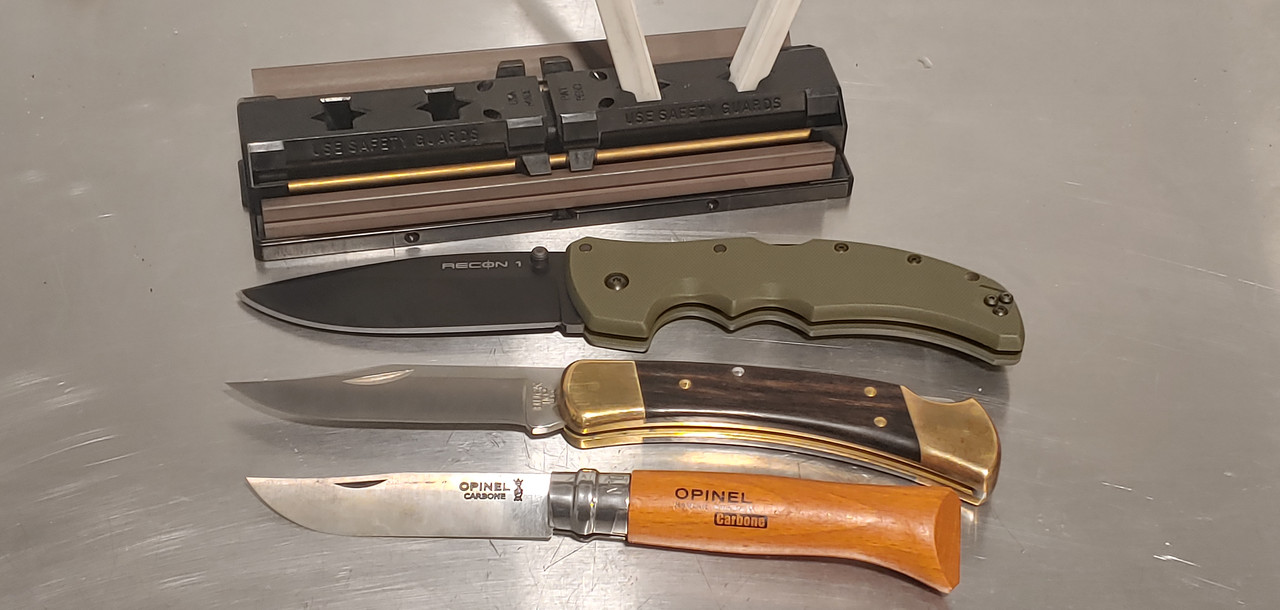
Recon 1 - 20 degree slots with medium rods. Haven't carried it in a while in favor of Buck 110's, but I sliced up a lot of cardboard with it last time I pocketed it. It came with me today just to touch up, I don't plan to use it. It'll stay in my backpack.
Buck 110 - just a couple strokes per side at 15 degrees with the whites. still really new but I knew I could make it a bit sharper.
Opinel #8 - Been carrying this one lately. 15 degree slots with medium rods for 50 strokes per side to establish a fresh bevel, then 20 degree slots with whites to get it hair popping sharp.
It's funny coming around full circle with knife collecting.
Today I have a Victorinox Classic and Buck 110 on me, the same EDC setup I had before I found Spyderco.
Opinel #8 stays in my backpack so I can use it to cut up oranges, apples etc. and work on the patina.
I see a new Opinel #10 in my near future. I got an 8 because I can buy them locally, but the #10 fits my hands better.
Re: Community Sharpening Journal, Part 2
Posted: Sat Oct 26, 2024 5:01 pm
by u.w.
I have long been a fan of the Opinel(s).
For me the No 9 and No 10 are the ones.
Since you mentioned you'd perhaps be looking for a No 10...
I picked up a No.10 Effilé Opinel over the summer, and I sure do like it a lot.
Very light, very thin, stainless..
Perhaps give it a glance to see if it meets any of your requirements.
Interestingly - the one I got came with no ground edge what so ever and a very small rounded tip. I'm guessing it somehow missed the sharpening part at the factory?
While I was surprised to see it, I was also pretty excited and happy. If it was indeed just an accidental miss, then I got a knife with little to no fatigued metal at it's edge - which suits me fine. I did of course sharpen it and have been using it since June? July?
u.w.
Re: Community Sharpening Journal, Part 2
Posted: Sat Oct 26, 2024 6:04 pm
by vivi
u.w. wrote: ↑Sat Oct 26, 2024 5:01 pm
I have long been a fan of the Opinel(s).
For me the No 9 and No 10 are the ones.
Since you mentioned you'd perhaps be looking for a No 10...
I picked up a No.10 Effilé Opinel over the summer, and I sure do like it a lot.
Very light, very thin, stainless..
Perhaps give it a glance to see if it meets any of your requirements.
Interestingly - the one I got came with no ground edge what so ever and a very small rounded tip. I'm guessing it somehow missed the sharpening part at the factory?
While I was surprised to see it, I was also pretty excited and happy. If it was indeed just an accidental miss, then I got a knife with little to no fatigued metal at it's edge - which suits me fine. I did of course sharpen it and have been using it since June? July?
u.w.
Thanks for the tip. I used to be fond of the garden knife with a similar handle shape. On a lot of my old opinels I'd sand down the top side of the rear end of the handle to make it more comfortable for me. The one you mentioned comes like that.
Browsing their site I see they make a $50 chef knife too. Might have to order one of those as well to test against my other budget chef knives.
Re: Community Sharpening Journal, Part 2
Posted: Sun Oct 27, 2024 11:29 pm
by Manifestgtr
Recently purchased an extra coarse DMT plate (I believe it’s 220 grit?)
I’ve been sharpening a lot of maxamet/rex 121 caliber steels lately. I’m sure this phenomenon applies to almost everyone but the longer I have to grind away on one of my well-worn coarse plates, the more my results seem to suffer. I’m going to try and add an even coarser plate down the road if anyone has any recommendations.
So now I have a nice little progression for my high speed steels, etc. Extra coarse, well-worn coarse, fine (if I wanna take it higher) on up to my 8000 grit DMT. As a rule, the more extreme the steel, the coarser I like to keep it…but it’s nice to have a wide range of diamond plates for experimentation.
Re: Community Sharpening Journal, Part 2
Posted: Mon Oct 28, 2024 12:43 am
by jwbnyc
DMT does an extra extra course at 120 grit.
I don’t know if they make it in a size plate that you would want.
I use their pocket slips mostly. I sharpen edge to spine so small plates don’t bother me much.
Re: Community Sharpening Journal, Part 2
Posted: Mon Oct 28, 2024 5:22 am
by vivi
Manifestgtr wrote: ↑Sun Oct 27, 2024 11:29 pm
Recently purchased an extra coarse DMT plate (I believe it’s 220 grit?)
I’ve been sharpening a lot of maxamet/rex 121 caliber steels lately. I’m sure this phenomenon applies to almost everyone but the longer I have to grind away on one of my well-worn coarse plates, the more my results seem to suffer. I’m going to try and add an even coarser plate down the road if anyone has any recommendations.
So now I have a nice little progression for my high speed steels, etc. Extra coarse, well-worn coarse, fine (if I wanna take it higher) on up to my 8000 grit DMT. As a rule, the more extreme the steel, the coarser I like to keep it…but it’s nice to have a wide range of diamond plates for experimentation.
https://www.chefknivestogo.com/ck80grdipl.html
that's what I use. Much faster than a dmt xc.
Re: Community Sharpening Journal, Part 2
Posted: Mon Oct 28, 2024 10:37 pm
by Manifestgtr
vivi wrote: ↑Mon Oct 28, 2024 5:22 am
Manifestgtr wrote: ↑Sun Oct 27, 2024 11:29 pm
Recently purchased an extra coarse DMT plate (I believe it’s 220 grit?)
I’ve been sharpening a lot of maxamet/rex 121 caliber steels lately. I’m sure this phenomenon applies to almost everyone but the longer I have to grind away on one of my well-worn coarse plates, the more my results seem to suffer. I’m going to try and add an even coarser plate down the road if anyone has any recommendations.
So now I have a nice little progression for my high speed steels, etc. Extra coarse, well-worn coarse, fine (if I wanna take it higher) on up to my 8000 grit DMT. As a rule, the more extreme the steel, the coarser I like to keep it…but it’s nice to have a wide range of diamond plates for experimentation.
https://www.chefknivestogo.com/ck80grdipl.html
that's what I use. Much faster than a dmt xc.
$30?
I’ll take one right this minute…why not?
Re: Community Sharpening Journal, Part 2
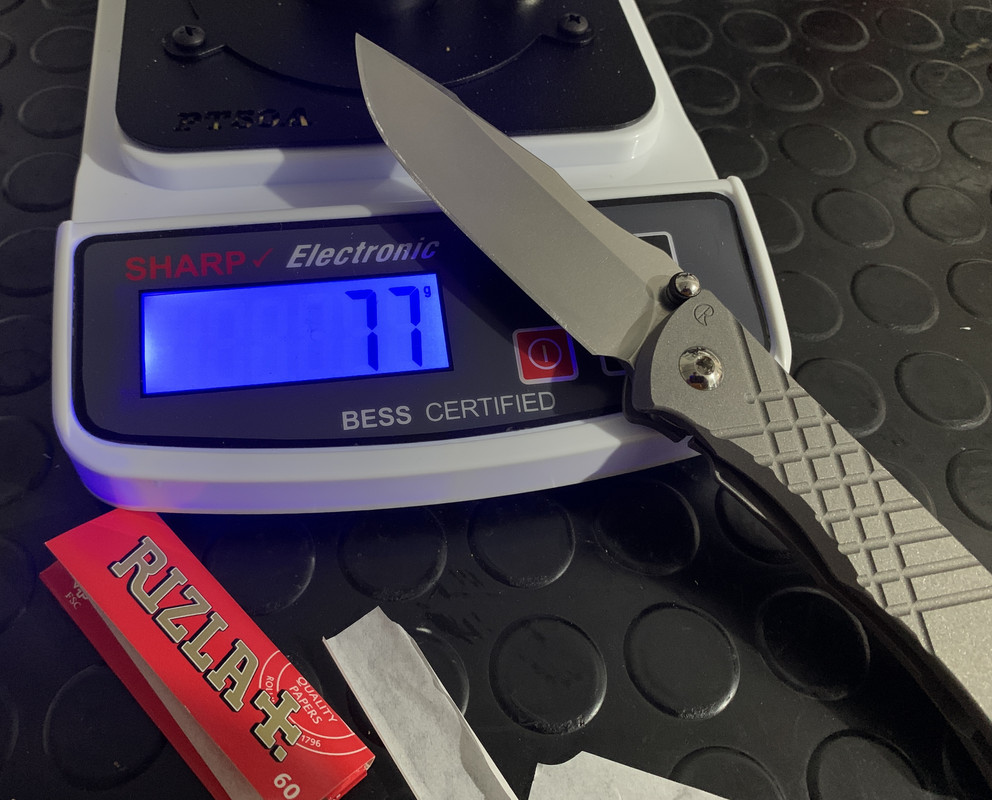
Posted: Tue Oct 29, 2024 5:45 am
by Brock O Lee
Touched up a Sebenza and Umnumzaan recently, both Magnacut.
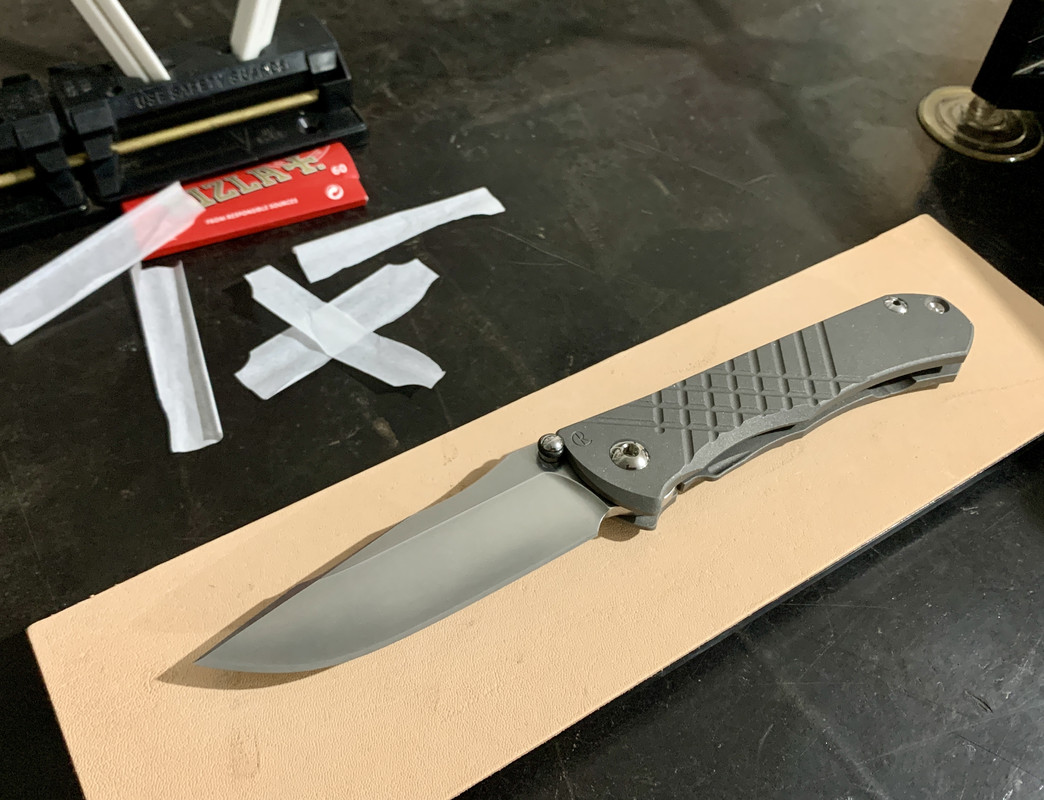
Fresh DMT fine micro bevels, a few strokes on Spyderco UF to minimise the burr, a few stropping strokes on 1 micron diamond spray on basswood to deburr completely. Few strokes on clean kangaroo leather. Slices cigarette paper lengthwise effortlessly.
Slicing Rizla cigarette paper has become my go-to test for final sharpness over the last few months. Any remaining burr will cause a snaggy cut. If I can get a smooth cut over the whole edge with this fine paper, the edge measures between 80-100 BESS in my experience, and is good to go.