Page 31 of 101
Posted: Sat Sep 01, 2012 1:17 pm
by phillipsted
Posted: Sat Sep 01, 2012 10:04 pm
by eitenbuffalo34
DCDesigns wrote:That is way too much to explain here. What you basically are asking for is a beginners crash course on knife making. I will explain the basics, but you have more research to do, books to read, websites to find, forums to peruse. The skill and information it takes to make and fit handles correctly is not likely something that can be learned just through one post. There is no one correct way to do it, so most likely you will develope your on technique based on your skills and whats available to you. What I use are three main tools to do just about everything when Im making handles. 1- Bandsaw- to rough out the handle shape - 2 Drill Press, to drill holes (as well as to use with a spindle sanding attatchment to do inside radii) 3- Belt/circular combination stand alone sanding machine- to do the rough shaping on outter radii. However, thats a couple grand worth of equipment, so if you arent a wood worker already, it is not likely you will have access to all of these. The one thing I would say you need access to out of these is a bandsaw (or scroll saw, even a jigsaw, something you can get a rough shape out of wood scales with) . However the most useful of the three, and if you were to BUY one, I would say get a drill press. Many attatchments exist that can turn it into several different tools. Also, it is MUCH MUCH more precise than trying to clamp things and use a hand drill. Its also the cheapest. You can find a decent Delta bench mounted drill press for $200 (dont bother with anything cheaper. Just as I would say dont bother with cheap bench mounted bandsaws. If all you are doing is shaping .3" thick wood, then I guess its ok, but it really cannot handle much thicker. for that you need at least 1 hp) The bare minimum saw I would say that is worth buying is a 14" 1hp+ bandsaw. They start at around $500 when you figure in shipping the 250lb thing and go up to a grand or more with all the bells and whistles or if it has a prestigious badge.
to answer some of your more specific questions. Where do you get handle material: personally, I sell figured woods for a living, so I fire up a chainsaw and walk into the forrest. But there are too many options to list for that aswer. Any knife supply website will have handle material, not necessarily at a value price, but they have it. Also many websites exist specifically to sell pre cut knife scales. The finish: again, no right anwer. Hundreds of products exist out there for finishing wood. You want one that is easy to apply evenly, that will not rub off after a lot of handling. You want durable. I have used everythign from CA (superglue) to automotive clear coat). Pin material - There are many options from screws to corbys to regular pin stock. I use regular old pins, solid metal rounds. And for your last question, how you figure where the holes go, you use the knife itself as your template. And I dont mean mark it, through it then drill, odds are you will screw up. I mean clamp the bloody thing to the handle material, and drill through it! Once you have one hole drilled, slide a pin the same size as the hole through the knife into the handle material to hold it still, and then drill the other holes, repeating the steps with the pins... Pro tip- you want a perfectly flat piece of material at least a half inch thick (High density particle board works well, but you can use any perfectly flat piece of hardwood), that you use as a sacrifical piece under your project. SInce you will drill through the handle material anyway, you want whatever is under it to be unimportant but perfectly flat. It will also help when you slide the pins through if you can also slide it into the sacrificial piece to keep the whole thing still. Do the same for the other side, then put it together. Take it to a sander and make the handle flush up to the steel tang and start shaping. There is your crash course. Hope it helps!
Thank you.
Posted: Tue Sep 04, 2012 1:28 pm
by Stew

Bit of Horse Chestnut Burr and some mosaic pins. :D
Posted: Tue Sep 04, 2012 3:29 pm
by phillipsted
Your Elmax Mule looks really beautiful - especially with those pins. Nicely done, Stew.
Just curious... How is chestnut to work with? I've seen burl on the web sites, but never handled it. Were your slabs stabilized? It chestnut dense? Hard? Chippy?
TedP
Posted: Tue Sep 04, 2012 4:32 pm
by rodloos
Yes Stew that is beautiful! Do you have a sheath to go with it yet?
I only have one Mule I've made scales for so far, comfortable but not real pretty. Several of my other Mules I have used one variety or another of the Halpern Titanium scales. They are pretty good for the price, especially since they include the mounting hardware, but I hope to make some more of my own scales.
Posted: Fri Sep 07, 2012 7:34 pm
by Bladekeeper
Nice job mate love it
Posted: Wed Sep 12, 2012 8:40 pm
by farns
Well I finally finished it. In general it came out pretty nice but the blade meets handle needs a little cleanup in a couple spots. Learned some good things that I hopefully can improve upon for MT15P. Besides the handle, the CRUWEAR turned out to be a very nice performer in light to medium tasks (although I'm sure it could handle much more). Cardboard, blister packs, etc were no problem and worked well in the yard. Very happy with this and had a great time completing the project.
[ATTACH]20851[/ATTACH]
Posted: Wed Sep 12, 2012 8:53 pm
by xceptnl
farns wrote:...Very happy with this and had a great time completing the project
farns, that is a beautiful custom handle. Thanks for sharing and welcome to the forum.
Posted: Wed Sep 12, 2012 10:24 pm
by Bladekeeper
Philipstead that mod with the large choil hole is great you have a clan of mules there bud , farns that is very smart reminds me of machline wear antique boxes, also gives me an idea to lay some mop in like that although I would have to ask somebody to handle it my skills are ...well limited tbh but I can still put together the concept .
Posted: Sun Sep 16, 2012 9:25 am
by phillipsted
Posted: Sun Sep 16, 2012 10:52 am
by Pockets
I need a Mule now...
H1, maybe :rolleyes:
Posted: Fri Sep 28, 2012 6:58 pm
by Let Us Slay !
Just got my 2 MT-15s in :D
One is going to be cocobolo and the other pink and orange g-10 (for the ladyfriend).

B75P Mule in Ironwood burl
Posted: Sun Oct 07, 2012 10:06 am
by phillipsted
Posted: Mon Oct 08, 2012 4:06 pm
by jabba359
Beautiful work as always Ted.
Posted: Sat Oct 13, 2012 10:51 am
by Dietz
Posted: Sun Oct 14, 2012 5:57 pm
by phillipsted
Dietz - First off, welcome to the Forum!
Beautiful first Mule! Nothing really beats the natural canvas micarta look and feel. Your shaping looks great for a user blade, and I bet the micarta feels warm and solid in hand. Love it!
TedP
Posted: Tue Oct 16, 2012 12:51 pm
by Rwb1500
phillipsted wrote:Sorry for the tease, guys. I was just so excited about this one, I couldn't wait to share the results. This is my Super Blue Mule shod in some Cocobolo purchased off the 'bay. The Cocobolo was a bit softer and than other cocobolo I've worked with in the past and had more of an open grain - it might be an alternate species. But the color and contrasts are very fetching. I'll probably end up sealing it with TruOil sometime soon.
As I noted in the previous post, I used the washers under the screws to provide a more secure attachment. The scales are just screwed on at this point - they aren't expoxied. There are good points and bad points to that, I know. But I wanted to be able to take off the scales and check the scales for discoloration/rust periodically.
TedP

Hey Ted, incredible work, as usual.
I had a couple questions about finishing with Tru-oil.
Do you sand up through grits, buff, then simply apply the oil in a few thin coats?
Or do you use another oil like Danish oil to finish first? What advantages do you see in the Tru-oil vs something like tung oil or Danish oil?
I've got a coco bolo Cruwear mule that is reaching completion.
Posted: Tue Oct 16, 2012 2:42 pm
by Rwb1500
Speaking of which;
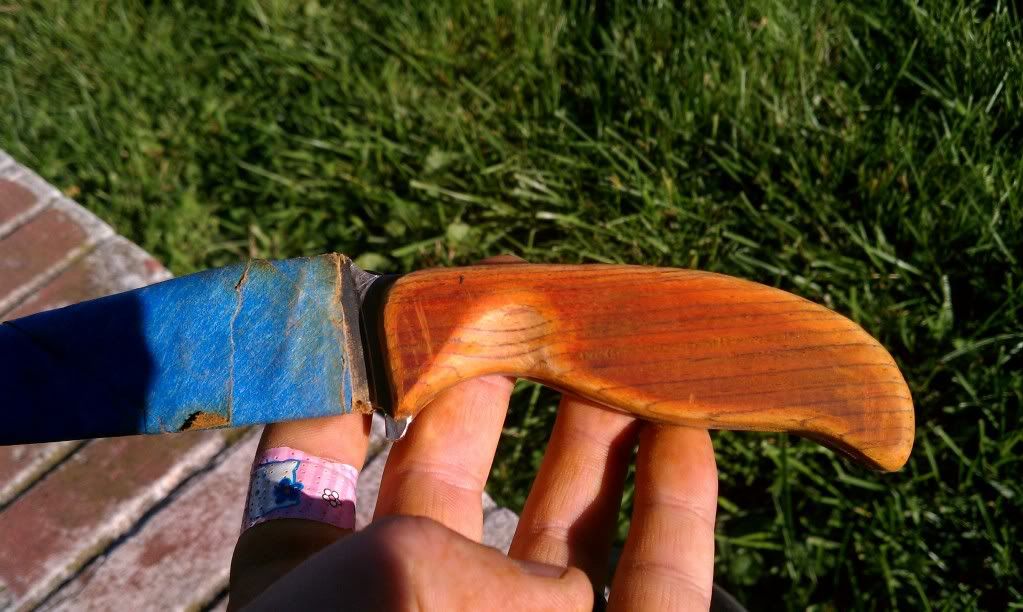
Complete with Hello Kitty band aid. I ran a coping saw across my knuckle. :eek:
Posted: Tue Oct 16, 2012 3:29 pm
by Dietz
phillipsted wrote:Dietz - First off, welcome to the Forum!
Beautiful first Mule! Nothing really beats the natural canvas micarta look and feel. Your shaping looks great for a user blade, and I bet the micarta feels warm and solid in hand. Love it!
TedP
Thanks. I did it all with hand tools.
Here's the sheath I made this weekend, my first one too. Blade got scratched up from leftover kydex residue in the sheath but that's to be expected.


Posted: Tue Oct 16, 2012 3:52 pm
by phillipsted
Rwb1500 wrote:Hey Ted, incredible work, as usual.
I had a couple questions about finishing with Tru-oil.
Do you sand up through grits, buff, then simply apply the oil in a few thin coats?
Or do you use another oil like Danish oil to finish first? What advantages do you see in the Tru-oil vs something like tung oil or Danish oil?
Thanks, RWB.
Tru-Oil is actually a polymerized tung oil - not unlike Danish Oil. The nice thing about Tru-Oil is that it cures hard and waterproof, without that plasticky feeling you can get from urethane finishes. Here's how I do it:
1. Using my finger, I wipe on a very thin coat of Tru-Oil. For the first coat, you might need to lay it on a bit thicker because some of it is soaking into the wood.
2. Let the knife sit for 10 minutes, then wipe off the excess oil with a soft cloth.
3. Let the finish cure for at least 4 hours, or until it isn't tacky any more.
4. Buff the finish with 0000 steel wool. You'll take off a little of the finish, but it makes the surface smooth enough to accept the next coat.
5. Repeat steps 1-4 as many times as you like. Many of my knife scales get up to 10 very thin coats of Tru-Oil. The trick is to keep the individual coats very very very thin.
6. When you get to the last coat, buff the cured scales with a muslin buff to polish it up.
7. Finish it with a top coat of Renaissance wax to give it that "new car shine." Just rub in and polish it with a soft cloth.
TedP


