Show your mods!

A place for you to post your pictures of Spyderco knives. Read Announcement before posting!
RoBoTech
Member
Posts: 319
Joined: Wed Jun 29, 2011 1:41 pm

#501

Post by RoBoTech »

GRIFFIN HAWKS wrote:I like what your doing very much ,0 What is the difference between G10 and G11 ?
Is it hardness ? If so which is which ?
I just started working with G10 and I'm impressed with how strong it is,
For a loss of a better term ,)
From the pieces I have worked with, G-11 is translucent, more of a "ghost" look.
You can get G-10 like that, but it's natural in G-11.
RoBoTech
Member
Posts: 319
Joined: Wed Jun 29, 2011 1:41 pm

#502

Post by RoBoTech »

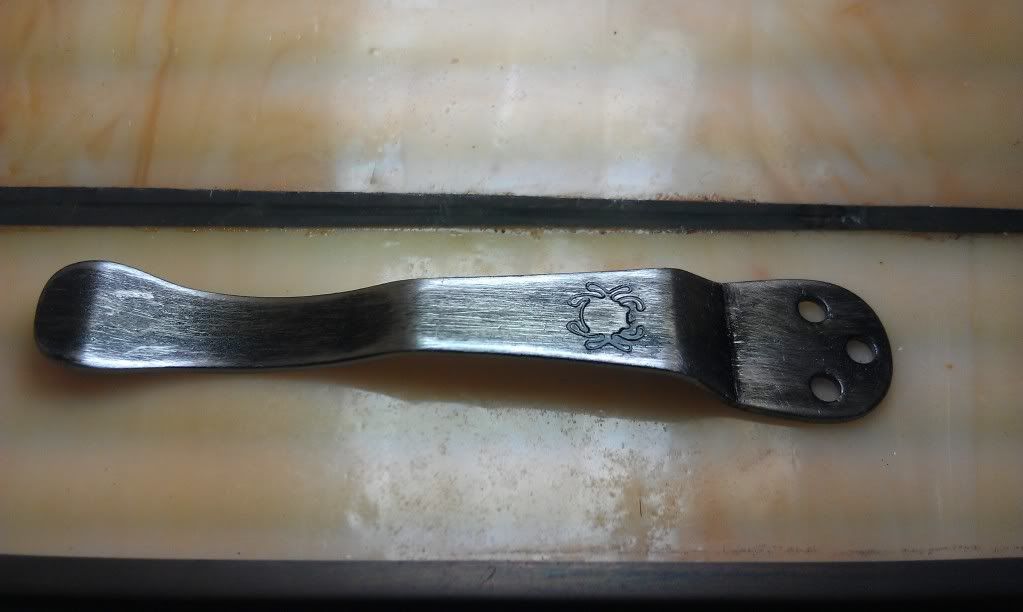
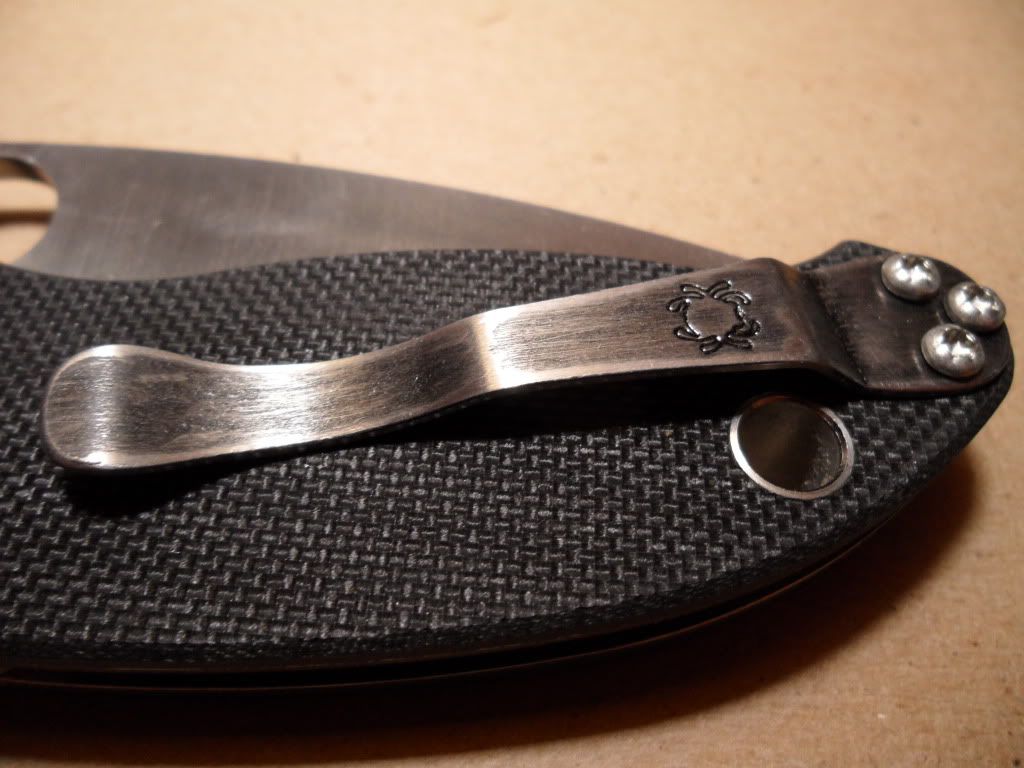
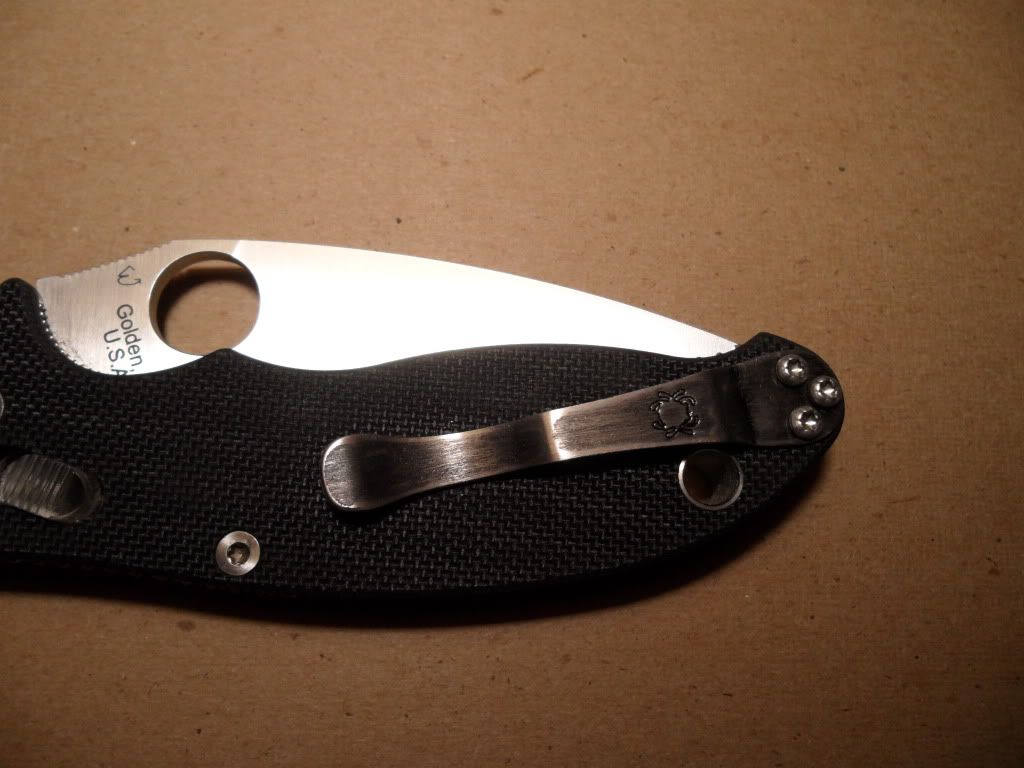
GRIFFIN HAWKS wrote:To finish I used various micro-files [to smooth the holes],
150-600 sandpaper[to remove edges and make a rough polish],
and good old French's Golden Mustard ,)
Image
I made my own formula for a Mustard etch.
Mix 4oz of COKE, 2 teaspoons of gun bluing paste (can get it in a tube, but the liquid can be used. May have to experiment with that, tho. Maybe start with a tablespoon), and two tablespoons of plain old yellow mustard. Depending on the steel, and how deep you want the etch to be, 2-5 coats.
Be sure to degrease the steel. Even alcohol will work for that, or brake cleaner.
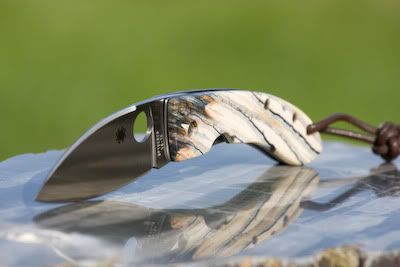
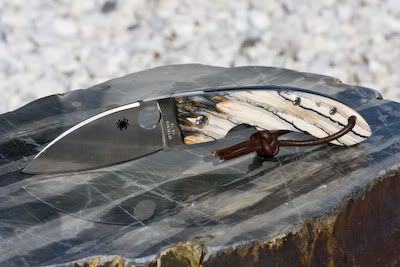
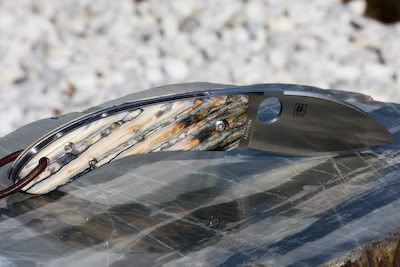
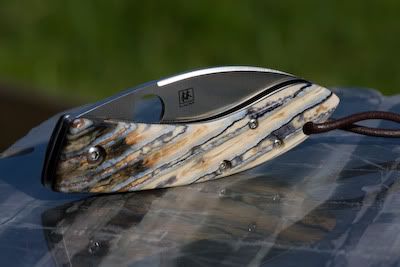
Apply each coat with a SPONGE, don't rub, blot. Let sit until dry. Then just clean off the junk with some 000 steel wool and hot water. Use the steel wool VERY lightly as you don't want to buff the finish, just get the junk off. Dry the steel, then repeat until you get the desired etch. Then let sit, not touching anything, overnight, then lightly buff with the steel wool. Here is a pic. The blade is actually 440C Stainless! So when people tell you you cant etch Stainless, here's the proof.
Image

Gotta remember that this is a RUST (oxidation) finish, but when it's done, it actually makes the finish even MORE rust resistant (like bluing does for gun steel). But until it's finished... well let the steel wool sit a while and you will see what I mean.
RoBoTech
Member
Posts: 319
Joined: Wed Jun 29, 2011 1:41 pm

#503

Post by RoBoTech »

sharpguitarist wrote:hey guys,
just got it but the only thing i didn't like was the ss handle.
so here's my fix.
Image
Image

thanks for looking!
later,
don
So, just epoxy holding it on?
I scale a lot of fixed blade knives and use Gorilla Glue. Holds like crazy. BUT, I also pin the scales.
Tests I have seen shows a good bit of side shear to break Gorilla. Usually breaks the wood scales 1st.
But, I have never been brave enough to try it.
User avatar
sharpguitarist
Member
Posts: 1179
Joined: Sat Mar 13, 2010 11:34 am
Location: east tn.

#504

Post by sharpguitarist »

hey dude,
i just used epoxy to attach the scales.
this was a spur of the moment project, and i just used what i had on hand.
i know pins or screws would have been better, but i figure on such a small, light duty knife like the kiwi 3, epoxy would work just fine.
and, i like the uninterupted look of the ebony.
just be sure to use a slow setting epoxy so you have plenty of time to possition the scales and clean up any squeeze out that might occur.
btw, your mods look great!
good luck with your future projects!
later,
don
Everyone's entitled to their own opinion, even if it is wrong.:rolleyes:
User avatar
Jazz
Member
Posts: 7678
Joined: Sun Jul 01, 2007 7:46 pm
Location: Alberta, Canada

#505

Post by Jazz »

korbiaka - I love the shiny G10! Is it slippery?

- best wishes, Jazz.
LongRider
Member
Posts: 1
Joined: Sat Aug 27, 2011 1:55 pm

#506

Post by LongRider »

stoo24 wrote:Hi, just completed this as a gift for my dad's retirement. Took off the original carbon fibre scales and added mammoth tooth.

Image

Image

Image

Image
This thread got me interested. This post compelled me to register. Your work is nothing short of outstanding. The work others have done here is great, definitely inspiring but your work is by far the most stunning. You have created the most breathtakingly beautiful production knife I have ever seen bar none. You picked the perfect blade shape and design to compliment with the most excellent mammoth tooth scales. One question did you need to have the mammoth tooth stabilized? If so can you share how or who did that?
User avatar
powernoodle
Member
Posts: 40
Joined: Sat Sep 26, 2009 10:41 am

#507

Post by powernoodle »

Scale and liner relieved by Tom Krein to make liner lock and Spydie hole accessible. Big improvement, IMO. :)

Image
Gayle Bradley.

Image
User avatar
Orion's Belt
Member
Posts: 332
Joined: Tue Dec 28, 2010 9:02 pm
Location: Pittsburgh, Pa

#508

Post by Orion's Belt »

Nothing huge here, but I wanted to try something different for the clip on my BD30P Manix.
Image
It started as a hand rubbed finish with 600 grit sand paper. I liked it, but thought I'd try for an antiqued look. I sanded it more but this time with 240 grit then applied a thin coat of black spray paint with a cotton swab. After it dried, I went back over it with the 240 grit until I was happy with the finish.
User avatar
Jazz
Member
Posts: 7678
Joined: Sun Jul 01, 2007 7:46 pm
Location: Alberta, Canada

#509

Post by Jazz »

Orion's Belt - I really like the look of your clip. Kind of a worn in look - not shiny or solid black. Nice. Can we see it on the knife, please? :)

- best wishes, Jazz.
User avatar
Orion's Belt
Member
Posts: 332
Joined: Tue Dec 28, 2010 9:02 pm
Location: Pittsburgh, Pa

#510

Post by Orion's Belt »

Ask and ye shall recieve!
Image
Image
User avatar
razorback1595
Member
Posts: 138
Joined: Sun Aug 02, 2009 6:00 am
Location: Belgium

#511

Post by razorback1595 »

looks nice on that manix :)
Pim

:D:spyder:
User avatar
Orion's Belt
Member
Posts: 332
Joined: Tue Dec 28, 2010 9:02 pm
Location: Pittsburgh, Pa

#512

Post by Orion's Belt »

razorback1595 wrote:looks nice on that manix :)
Thanks! I think it goes well with the "rough and tumble" look of the Manix 2. I might try the same thing with my spare Para 2 clip.
-Ryan
User avatar
Jazz
Member
Posts: 7678
Joined: Sun Jul 01, 2007 7:46 pm
Location: Alberta, Canada

#513

Post by Jazz »

Yep - it looks real nice. Thanks for the pics. :)

- best wishes, Jazz.
stoo24
Member
Posts: 3
Joined: Tue Apr 26, 2011 2:43 am
Location: Scotland

#514

Post by stoo24 »

LongRider wrote:This thread got me interested. This post compelled me to register. Your work is nothing short of outstanding. The work others have done here is great, definitely inspiring but your work is by far the most stunning. You have created the most breathtakingly beautiful production knife I have ever seen bar none. You picked the perfect blade shape and design to compliment with the most excellent mammoth tooth scales. One question did you need to have the mammoth tooth stabilized? If so can you share how or who did that?
Wow, glad you like it!

I got my mammoth tooth from here https://www.fineturnage.com/shop/home.php?cat=257 . Not sure if the guy does any stabilization, although one side of each scale certainly had some sort of lacquer or something on it. When I sanded the scales down a few holes appeared in a few different areas. I carefully filled these with superglue and left them overnight before working on it again.

I experimented drilling through some off-cuts of tooth before tackling the scales but every single one either split in two, or shattered into many pieces. You need a lot of time, patience and a bit of luck to work with this stuff. Hope you give it a try and all the best.

Cheers,
Stoo
User avatar
justinrose40
Member
Posts: 23
Joined: Mon Aug 29, 2011 11:07 pm
Location: Corbin, KY

#515

Post by justinrose40 »

I have a Salt 1 that I always have with me, I work around water all the time so I like the H1 steel and that I don't have to clean it so often, but I would like to reshape the blade and get rid of the rescue tip and shape it more like the Delica. I've seen several post on this thread where people have done that, but I have no experience with a project like this. I was just wanting some tips from some of the guys that did this, so I don't mess up the blade.
User avatar
Jazz
Member
Posts: 7678
Joined: Sun Jul 01, 2007 7:46 pm
Location: Alberta, Canada

#516

Post by Jazz »

justinrose40 wrote:I have a Salt 1 that I always have with me, I work around water all the time so I like the H1 steel and that I don't have to clean it so often, but I would like to reshape the blade and get rid of the rescue tip and shape it more like the Delica. I've seen several post on this thread where people have done that, but I have no experience with a project like this. I was just wanting some tips from some of the guys that did this, so I don't mess up the blade.
I used a Dremel tool with a diamond disk to remove most of the metal, then finer files, then 3 different sandpapers, ending with 1500 grit, then polished with the Dremel with a felt wheel loaded with polishing compound. Be sure to dip the blade regularly in water to cool it. I don't know if you can ruin H1 since it isn't heat treated, but if the blade gets too hot, you'll burn yourself or melt the handle. I hope this helps. I'm sure diamond hand files will work fine - just take longer.

- best wishes, Jazz.
User avatar
DCDesigns
Member
Posts: 1015
Joined: Fri Aug 05, 2011 5:50 pm
Location: ATL, Ga.
Contact:

#517

Post by DCDesigns »

Jazz wrote:I used a Dremel tool with a diamond disk to remove most of the metal, then finer files, then 3 different sandpapers, ending with 1500 grit, then polished with the Dremel with a felt wheel loaded with polishing compound. Be sure to dip the blade regularly in water to cool it. I don't know if you can ruin H1 since it isn't heat treated, but if the blade gets too hot, you'll burn yourself or melt the handle. I hope this helps. I'm sure diamond hand files will work fine - just take longer.

- best wishes, Jazz.
h1 isnt heat treated? are you sure?
User avatar
unit
Member
Posts: 1831
Joined: Sat Nov 28, 2009 11:47 am
Location: Missouri, USA

#518

Post by unit »

DCDesigns wrote:h1 isnt heat treated? are you sure?
It is work hardened. Not heat treated.
Thanks,
Ken (my real name)

...learning something new all the time.
User avatar
DCDesigns
Member
Posts: 1015
Joined: Fri Aug 05, 2011 5:50 pm
Location: ATL, Ga.
Contact:

#519

Post by DCDesigns »

unit wrote:It is work hardened. Not heat treated.
Didnt know that, pretty interesting. Very impressive now knowing this, Thanks!
User avatar
justinrose40
Member
Posts: 23
Joined: Mon Aug 29, 2011 11:07 pm
Location: Corbin, KY

#520

Post by justinrose40 »

Thanks, I thought this was the case with H1 but I just wanted to make sure with someone who had done it, before I went to hacking on my knife. I plan on taking the bulk of the metal off with a table belt sander, and then finishing it with hand files and sandpaper. If this goes well I'm going to try and squeeze a wave in above or infront of the H1 Logo, I don't know yet if there is room or not.
Post Reply