Under the microscope

-
SolidState

- Member
- Posts: 1758
- Joined: Fri Jan 29, 2010 2:37 pm
- Location: Oregon

Here's the next! You don't know how hard it was for me to not cut anything until I got the pictures :)
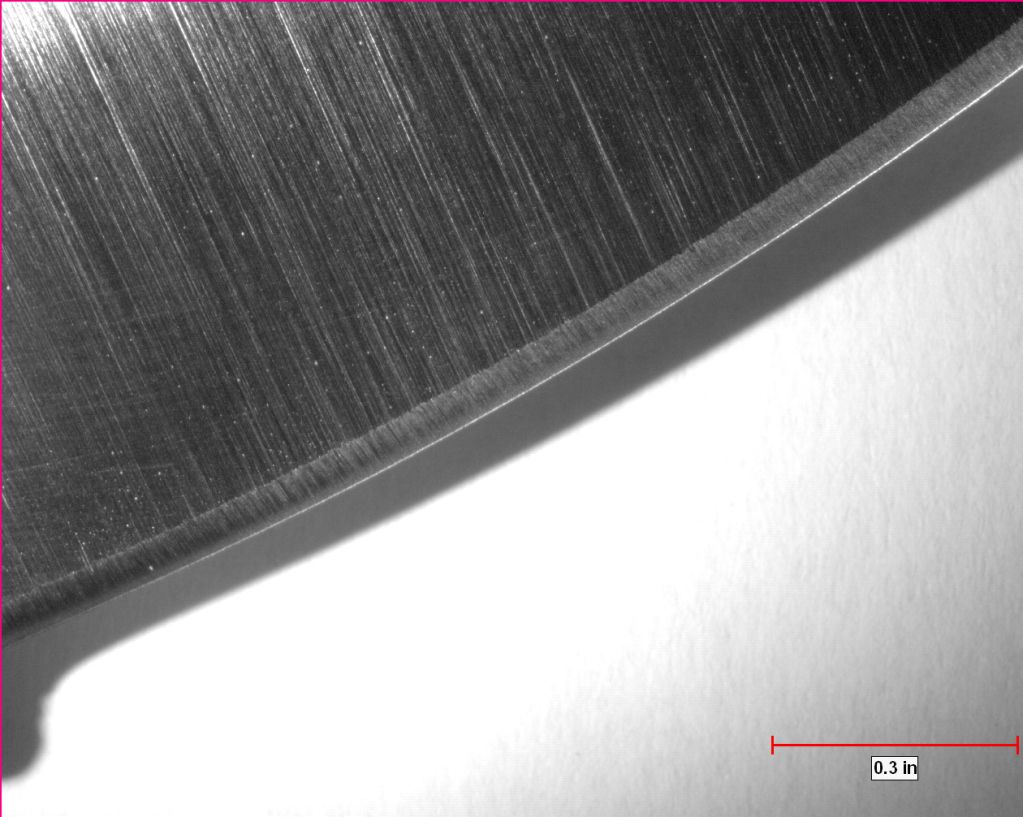
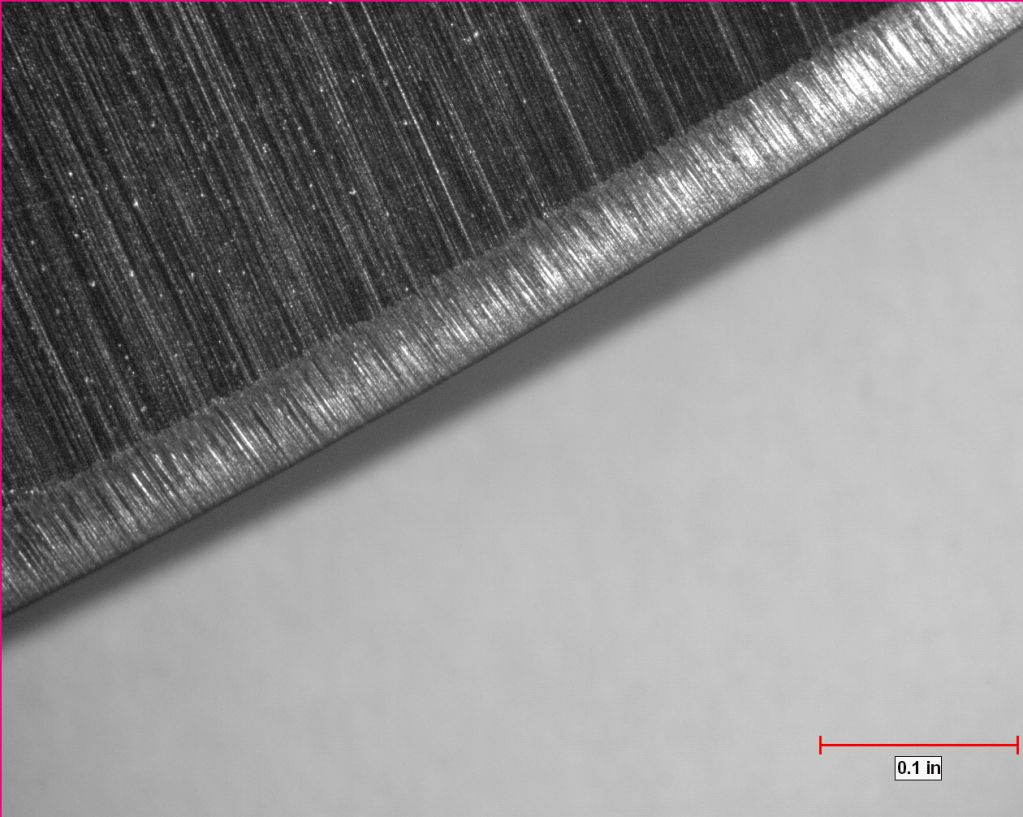
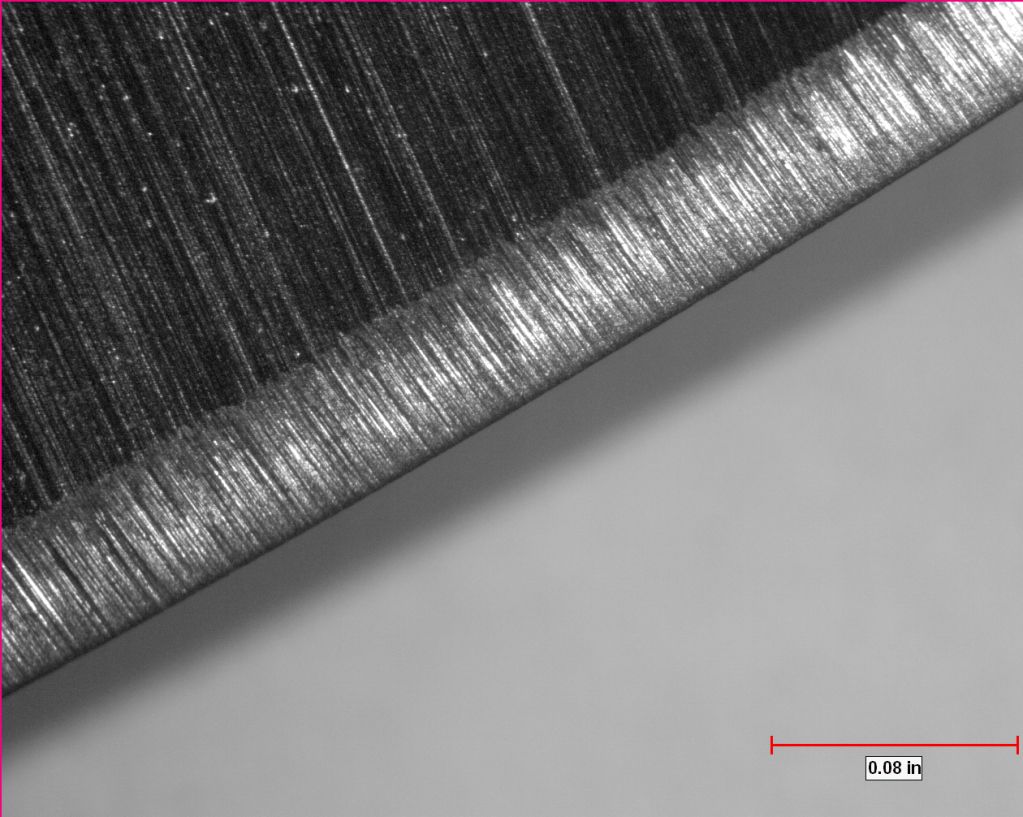
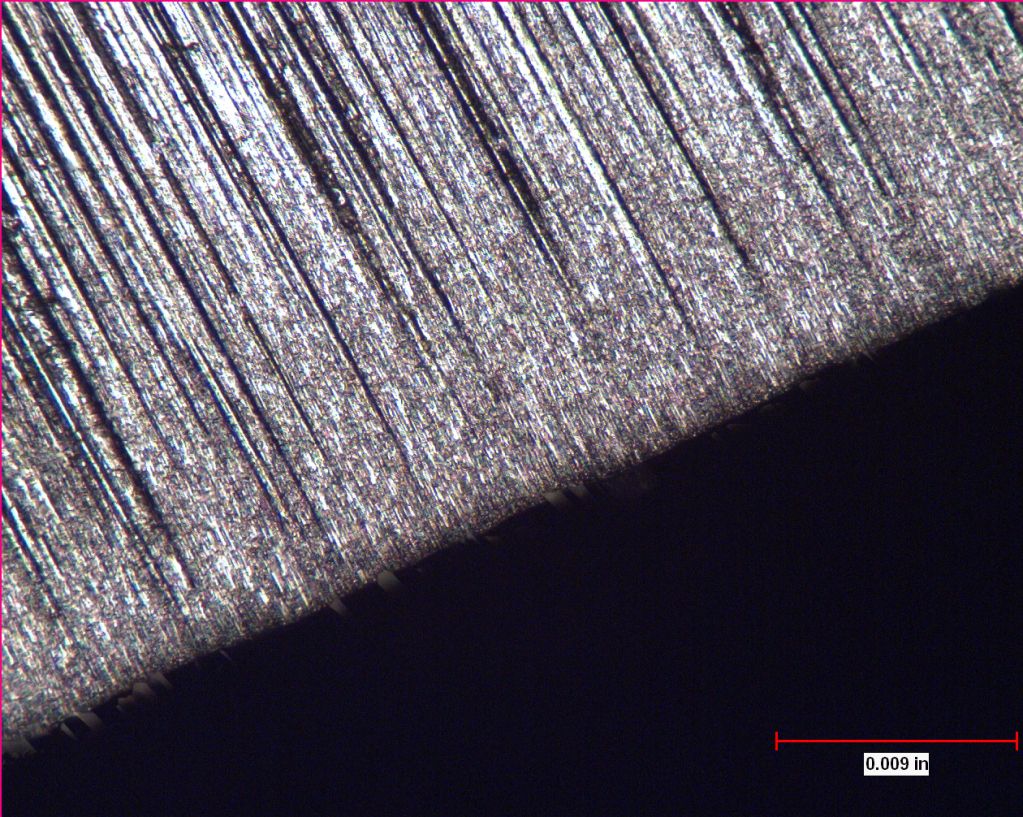
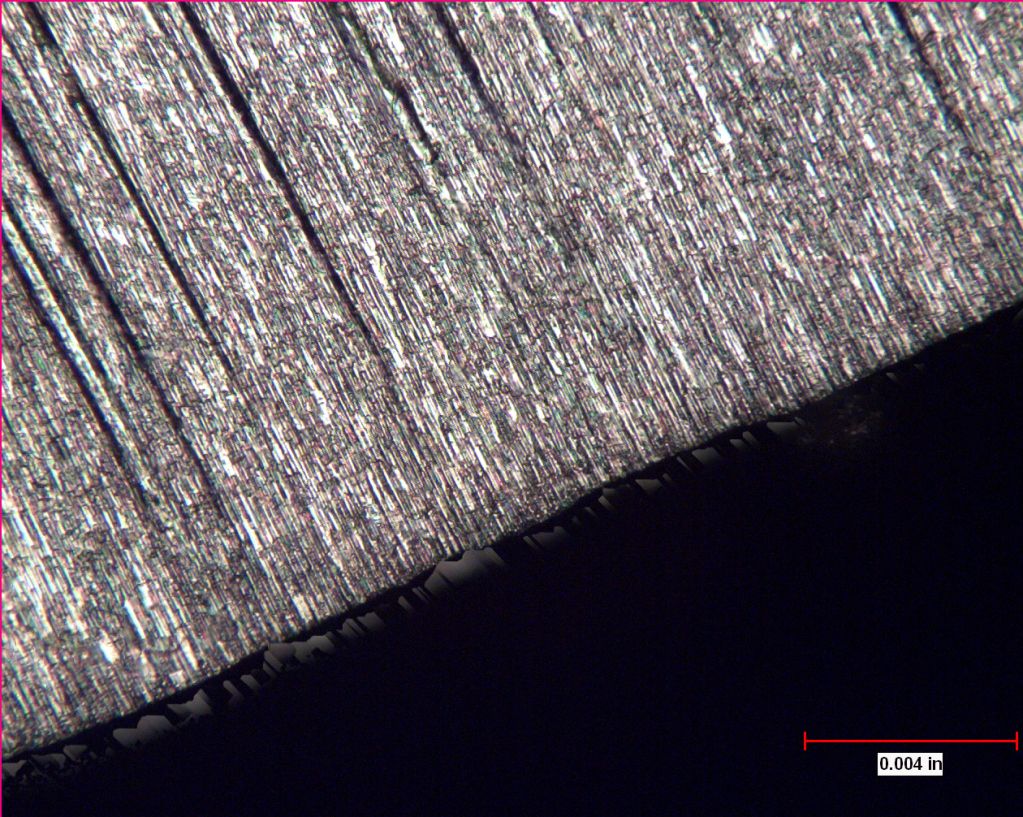
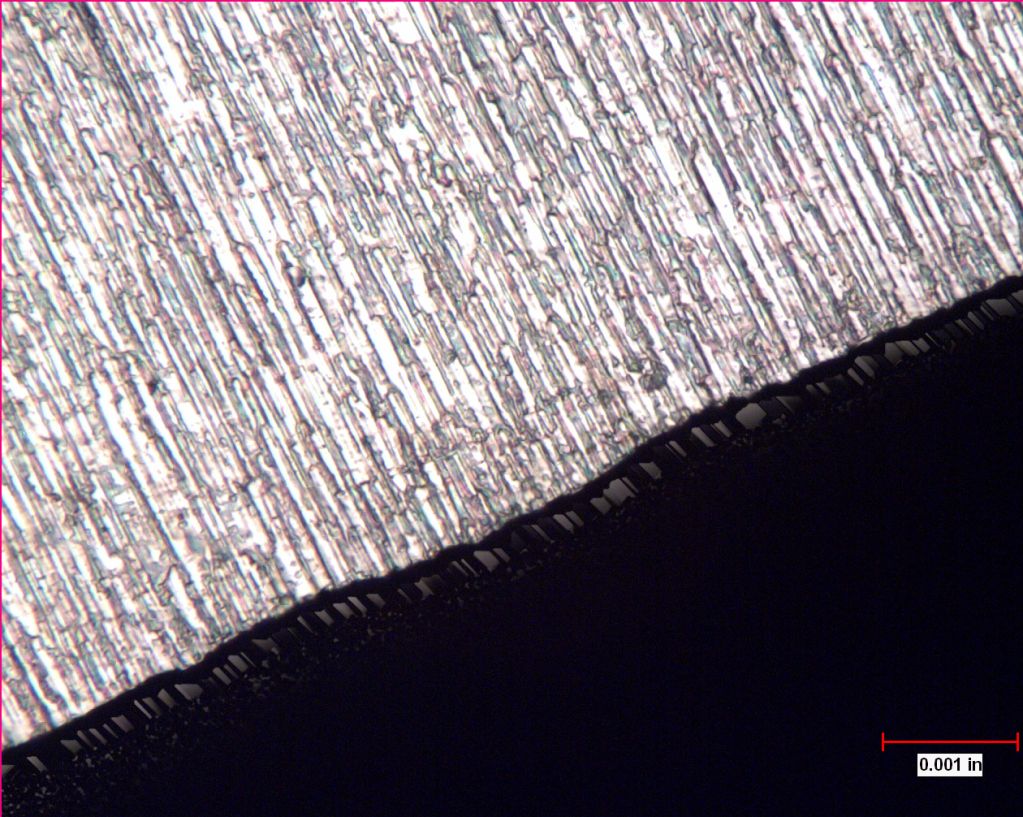
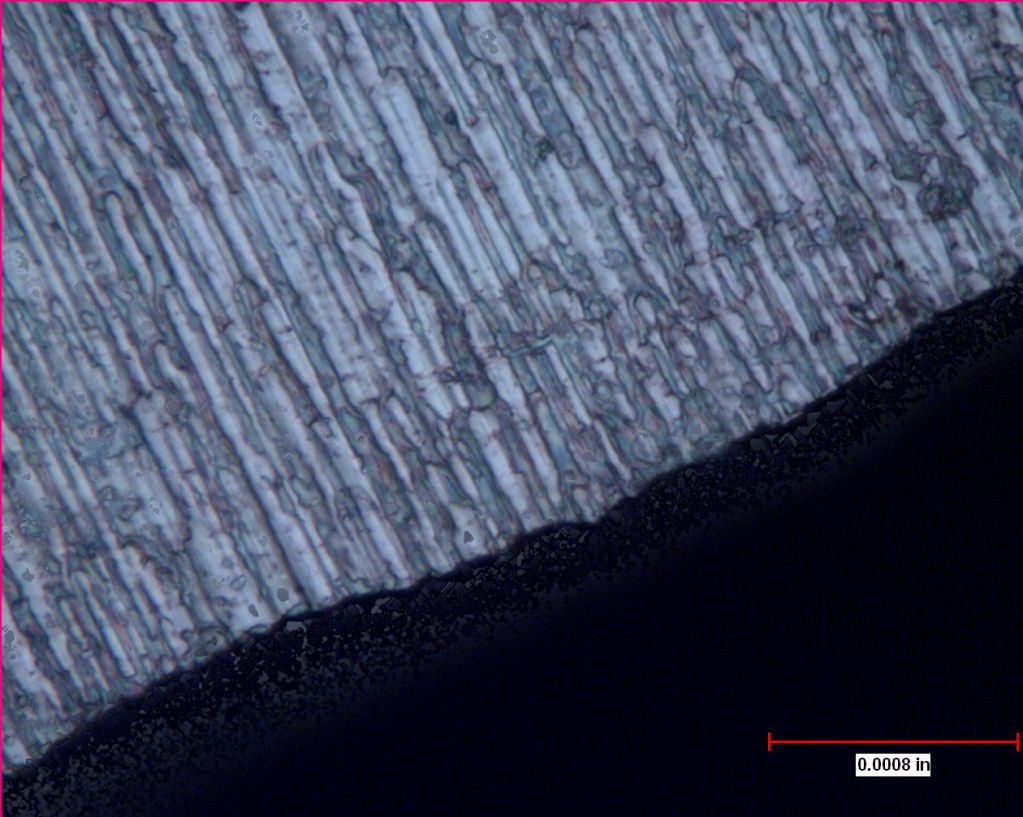
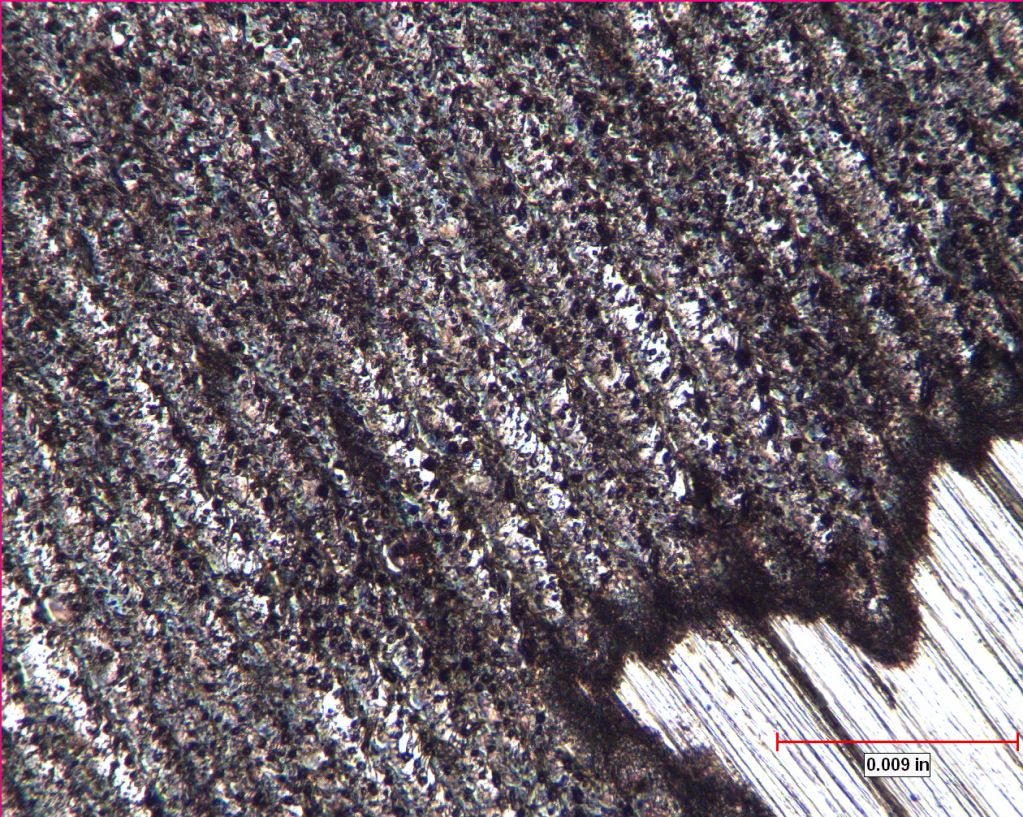
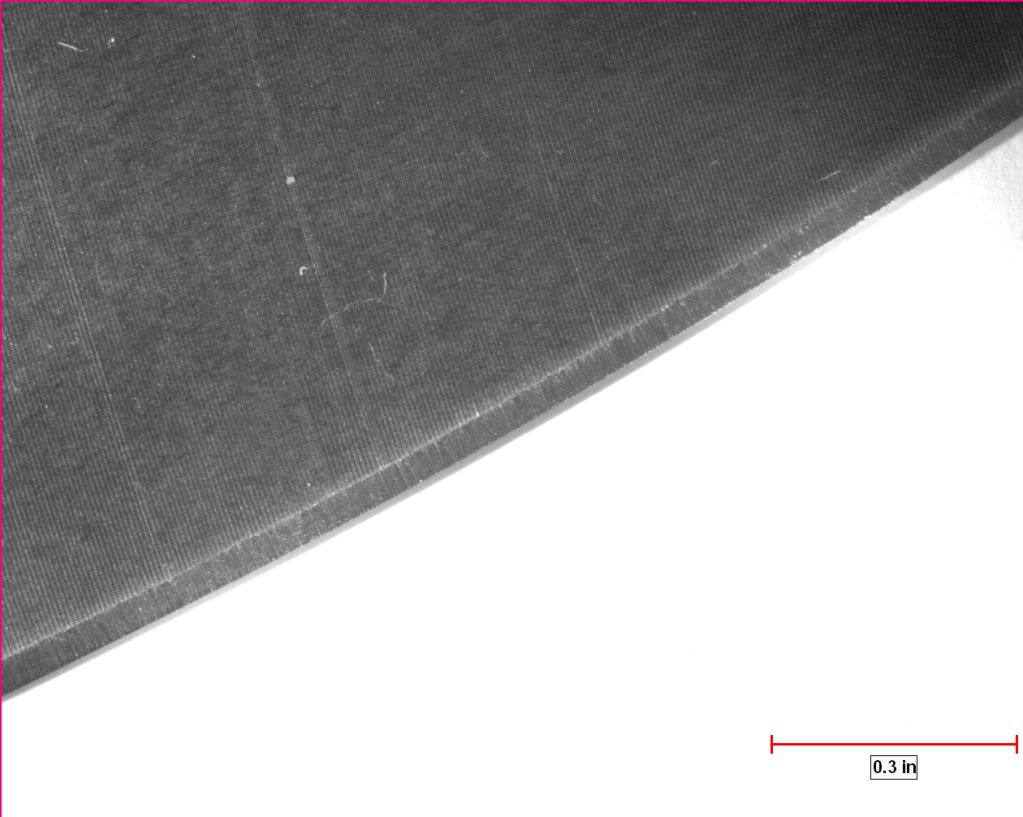
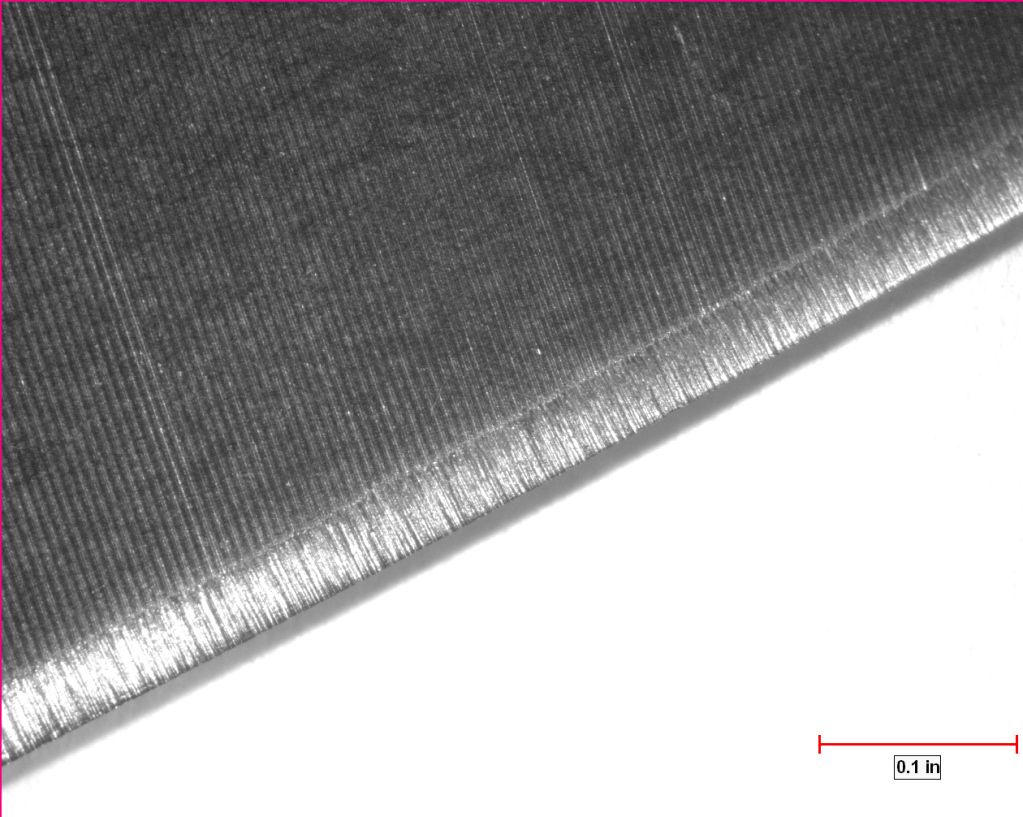
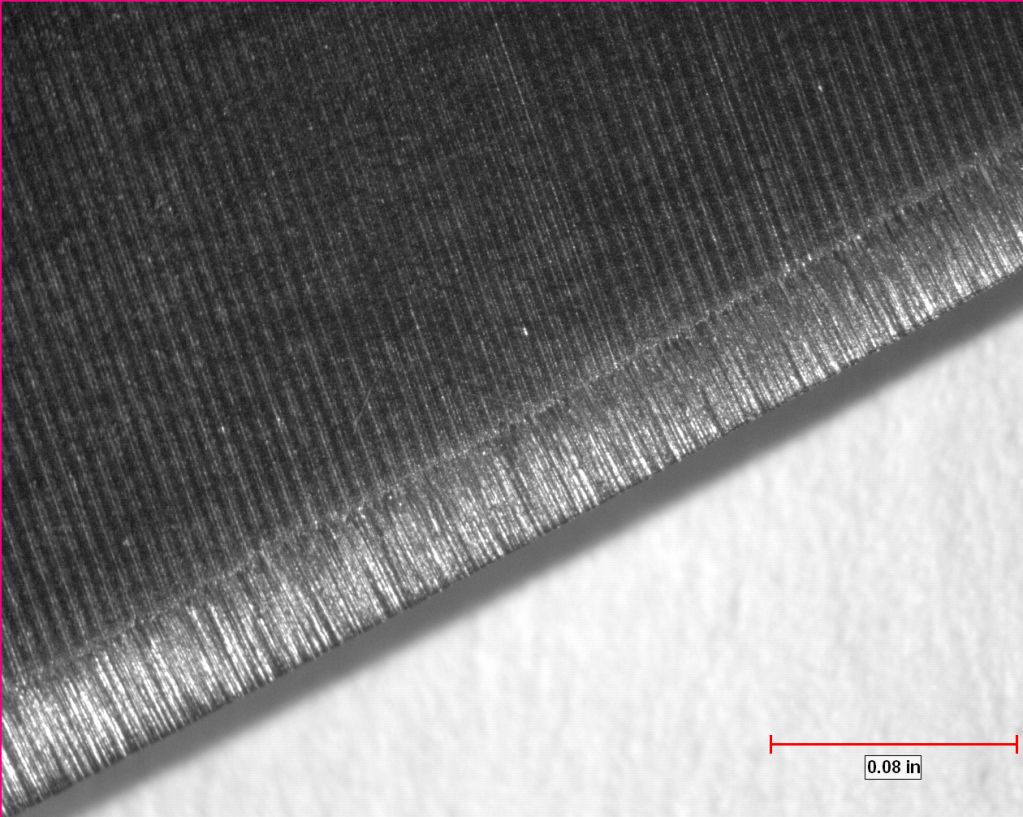
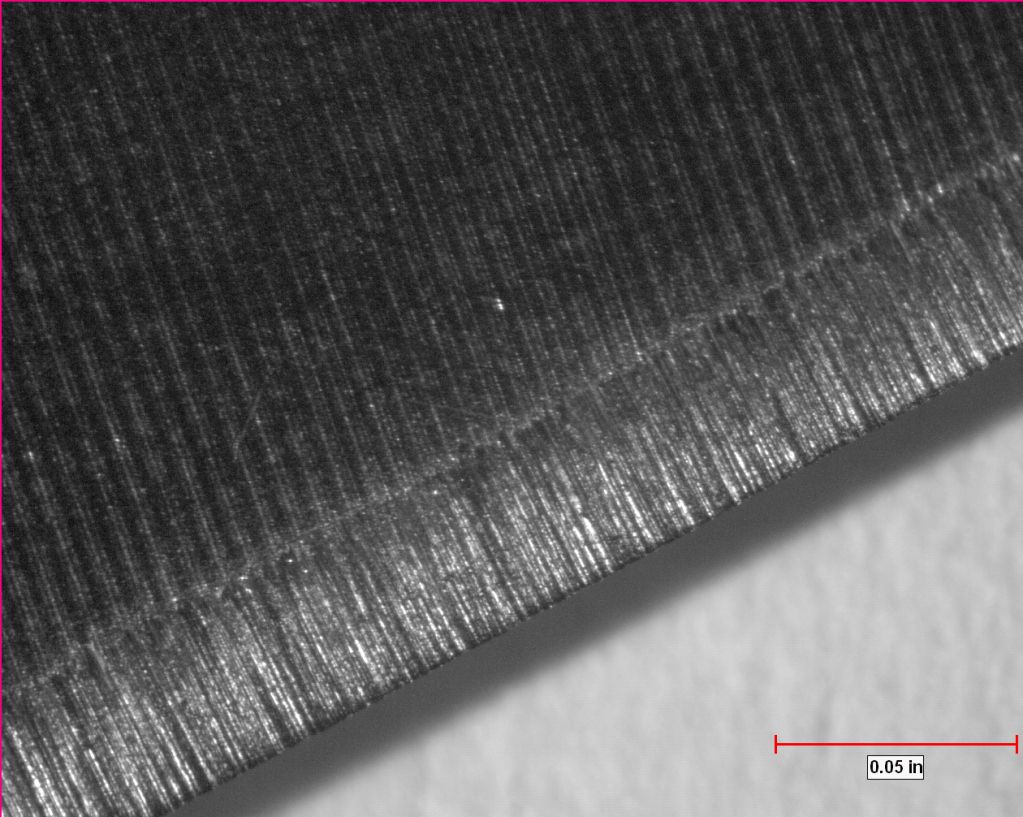
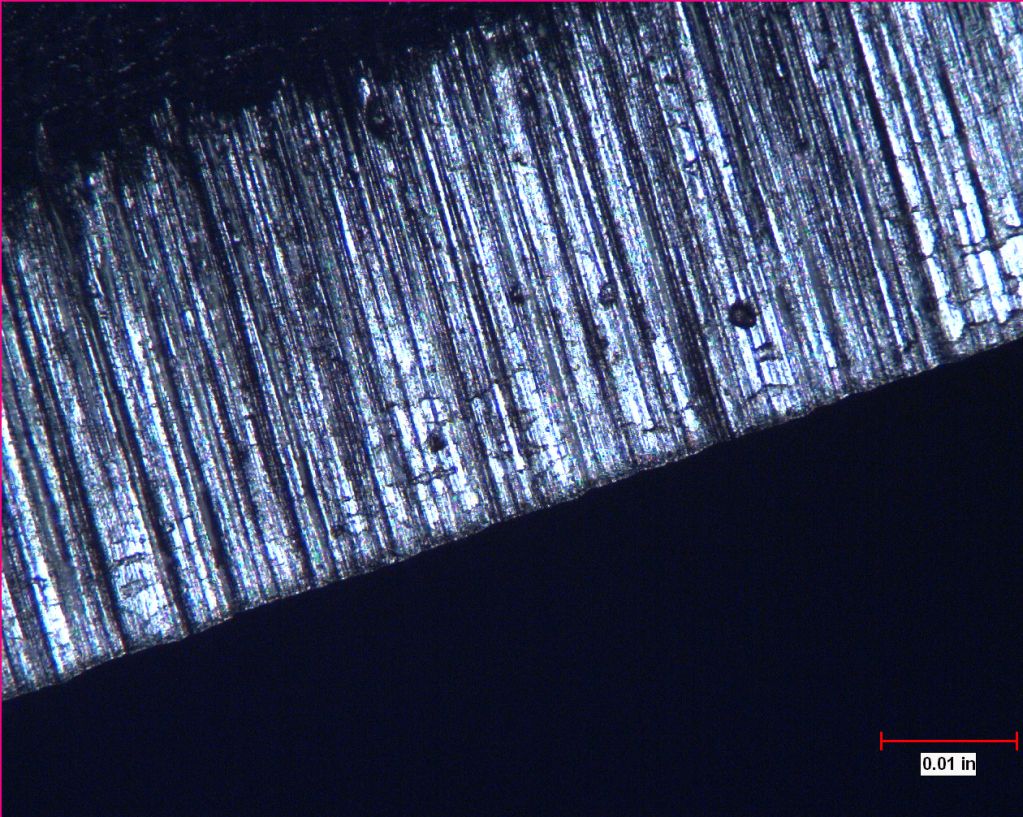
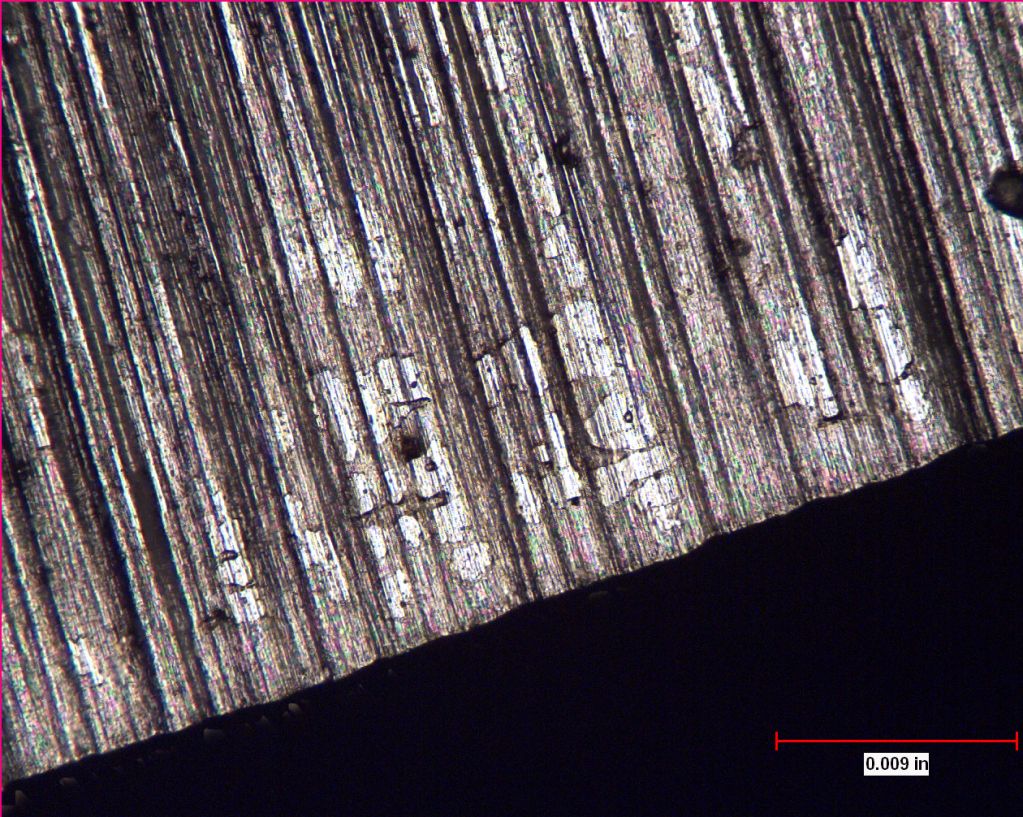
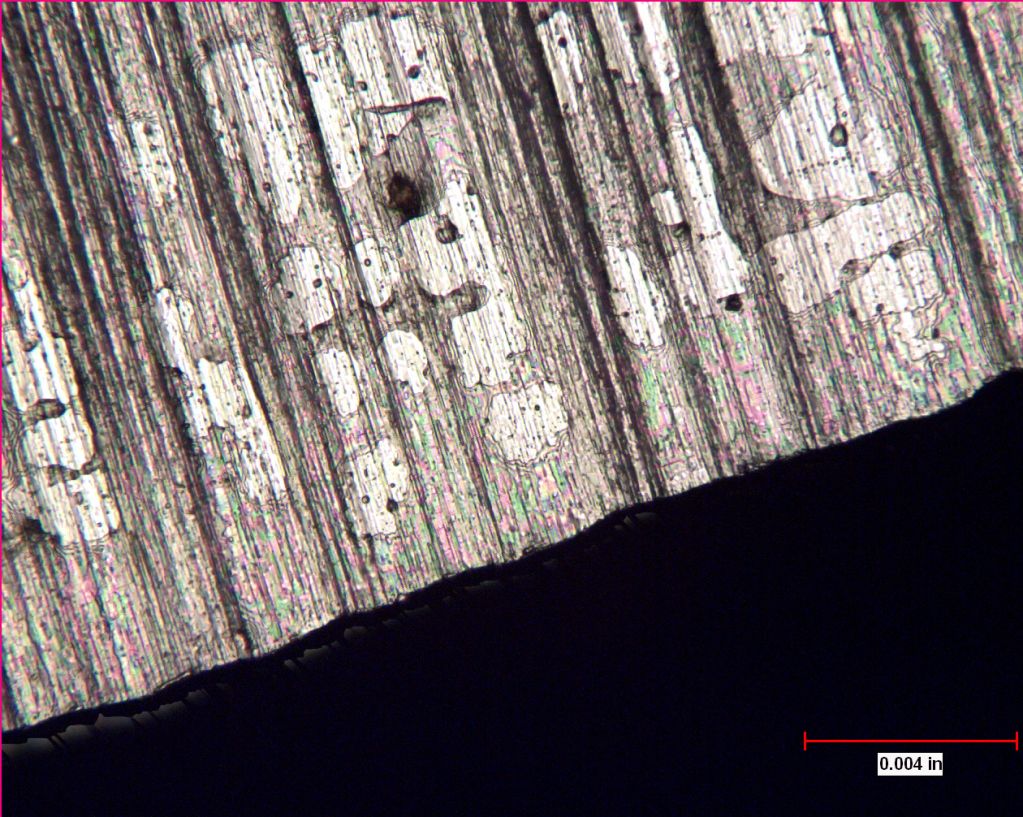
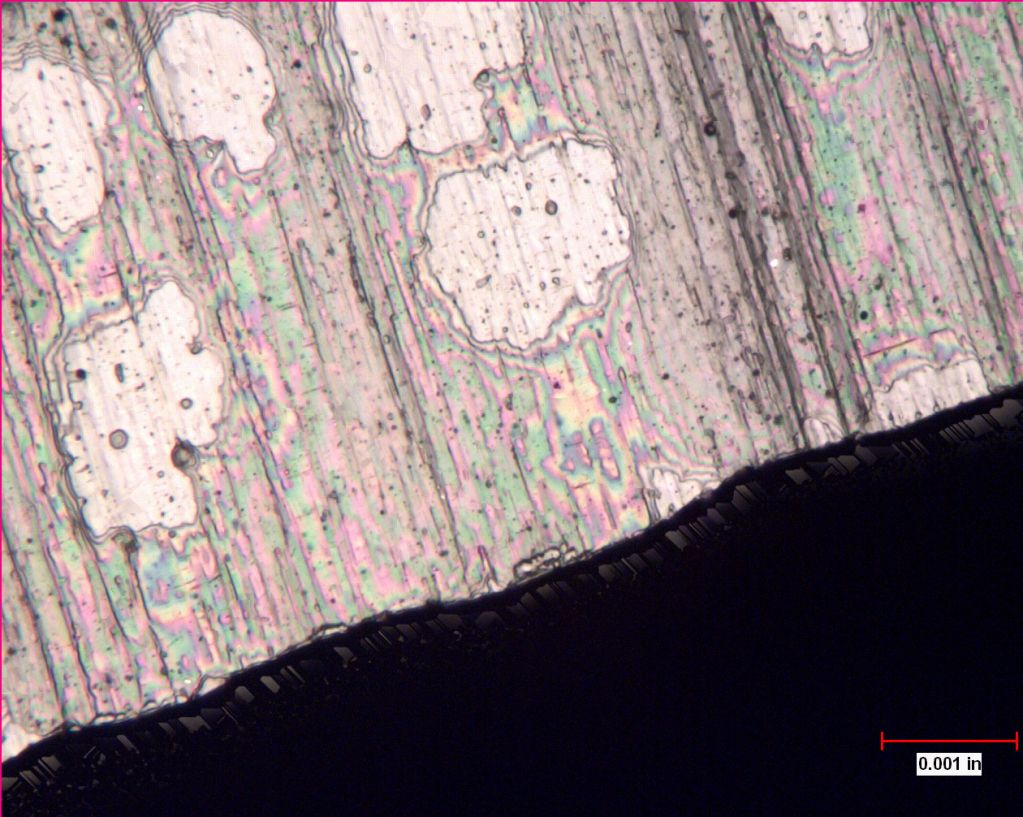
Factory edge M4 Manix 2, FFG.
10x
25x
40x
63x
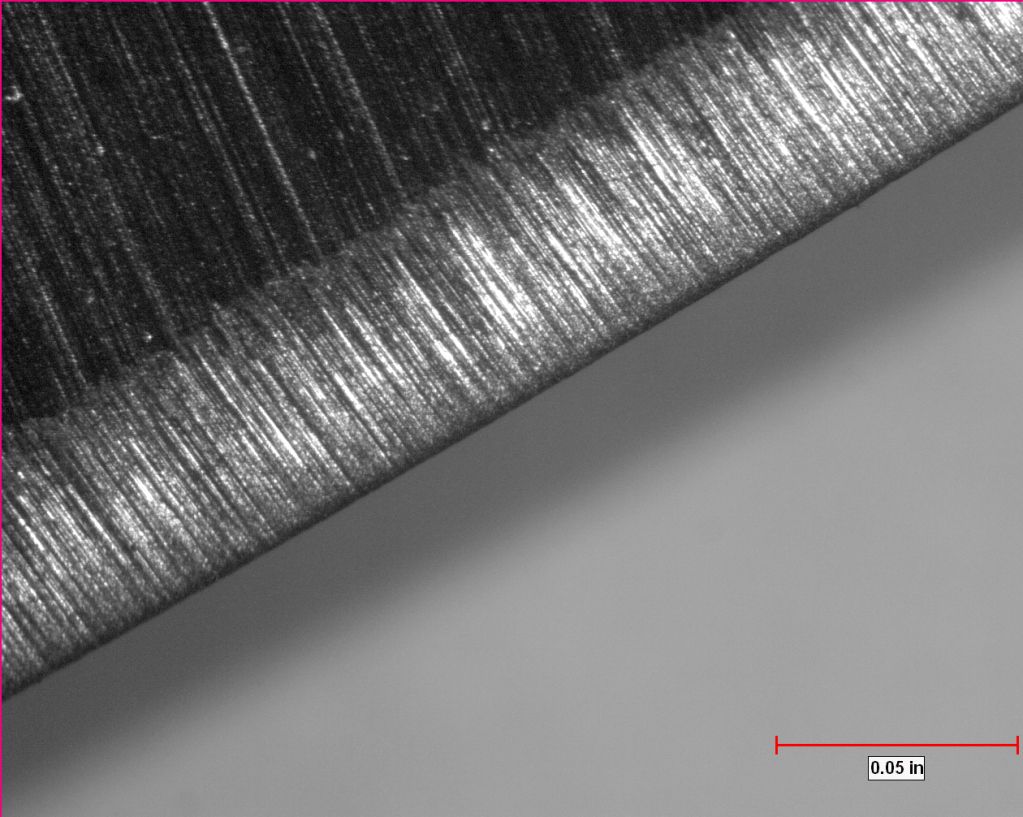
50x
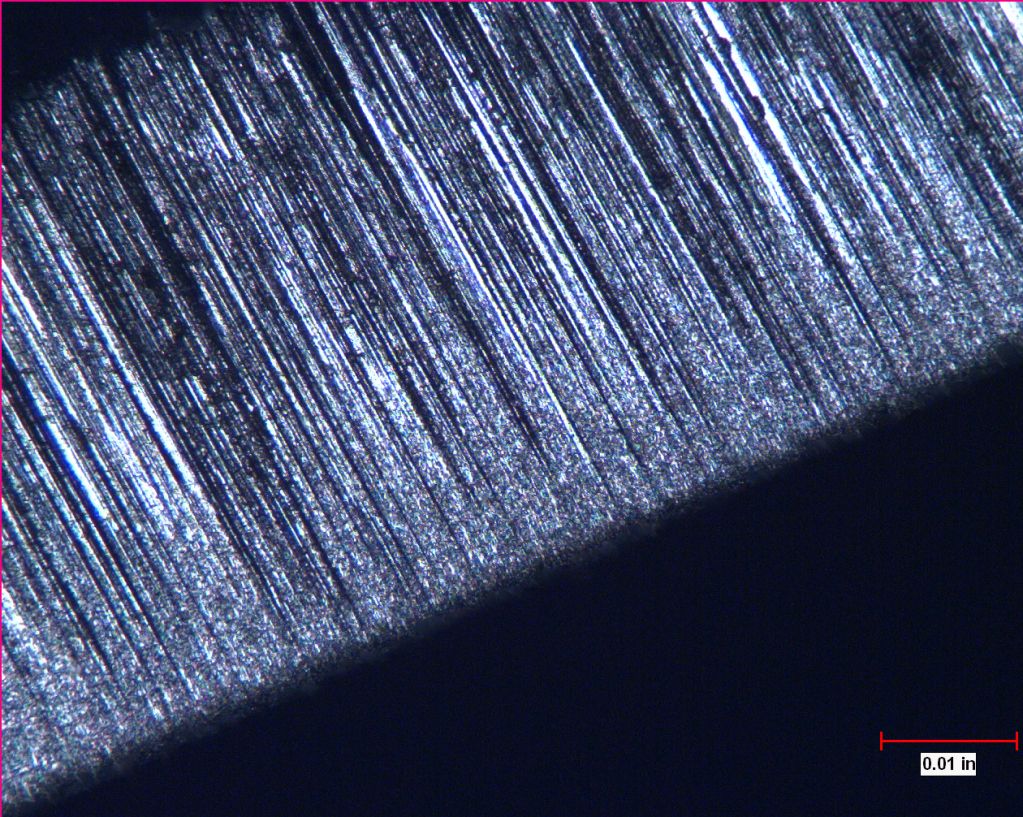
100x
200x
500x
1000x
Factory edge M4 Manix 2, FFG.
10x
25x
40x
63x
50x
100x
200x
500x
1000x
Click here to zoom: Under the Microscope
Manix2, Elmax MT13, M4 Manix2, ZDP Caly Jr, SB Caly3.5, Cruwear MT12, XHP MT16, South Fork, SB Caly3, 20CP Para2, Military Left Hand, Perrin PPT, Squeak, Manix 83mm, Swick3, Lil' Temperance, VG10 Jester, Dfly2 Salt, Tasman Salt
Chris
Manix2, Elmax MT13, M4 Manix2, ZDP Caly Jr, SB Caly3.5, Cruwear MT12, XHP MT16, South Fork, SB Caly3, 20CP Para2, Military Left Hand, Perrin PPT, Squeak, Manix 83mm, Swick3, Lil' Temperance, VG10 Jester, Dfly2 Salt, Tasman Salt
Chris
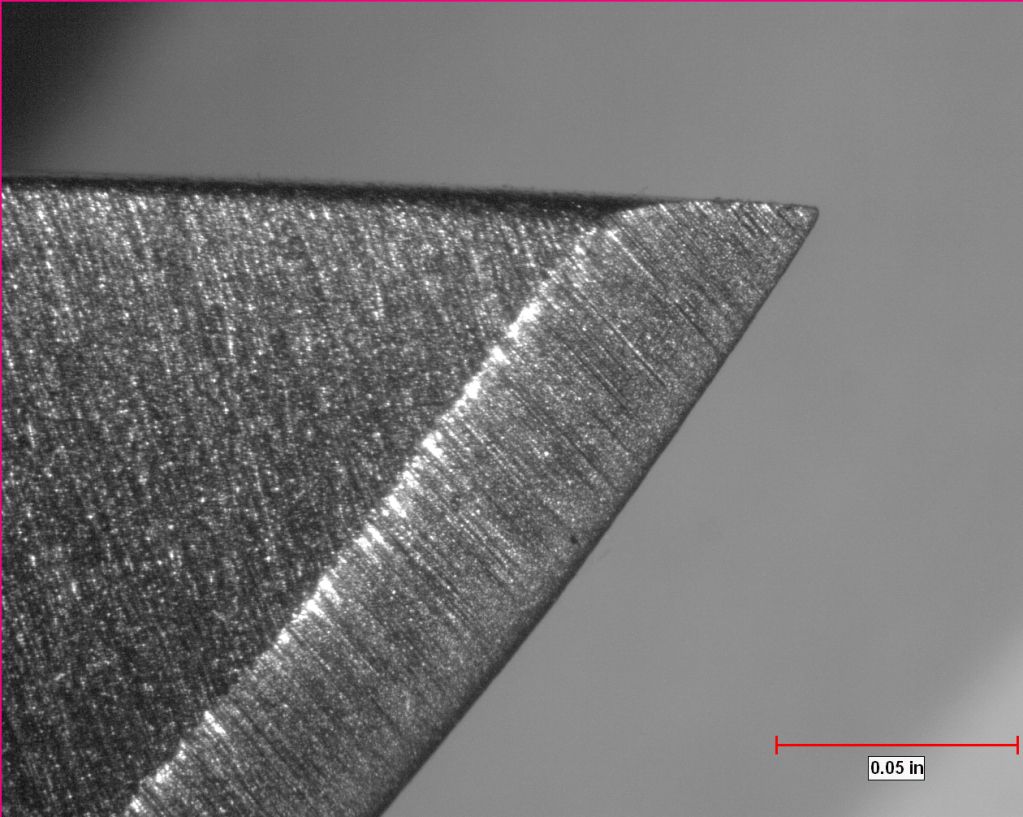
Factory edge M4 Manix 2, FFG
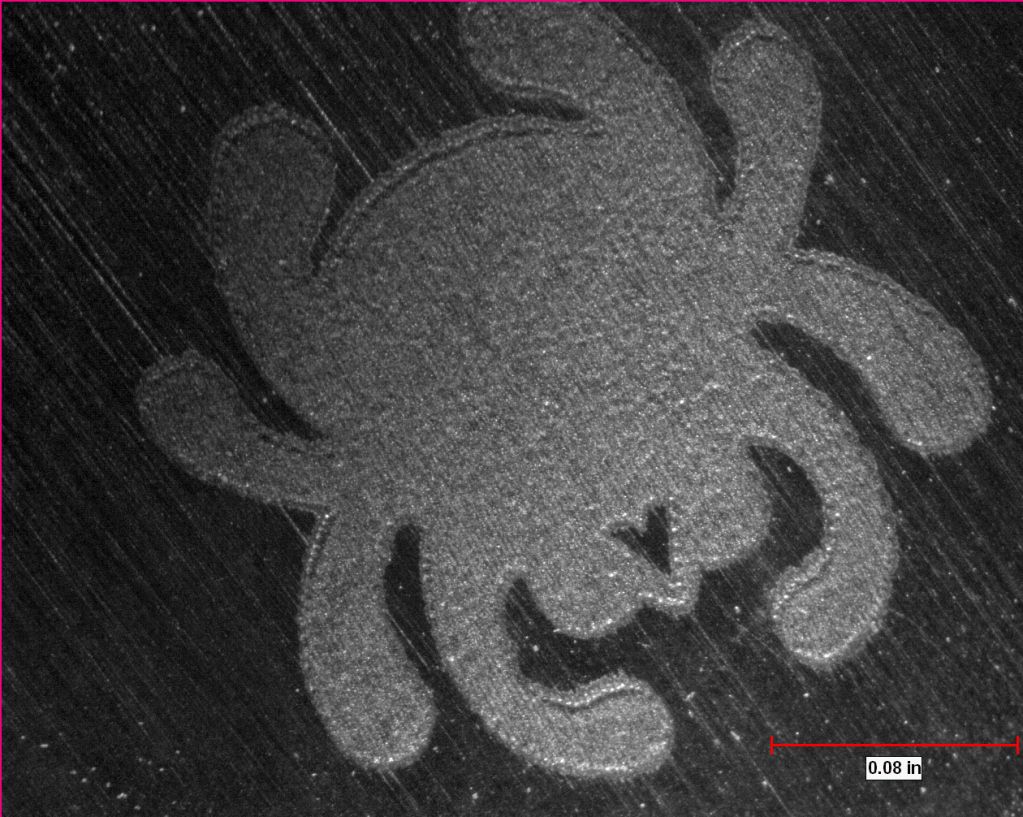
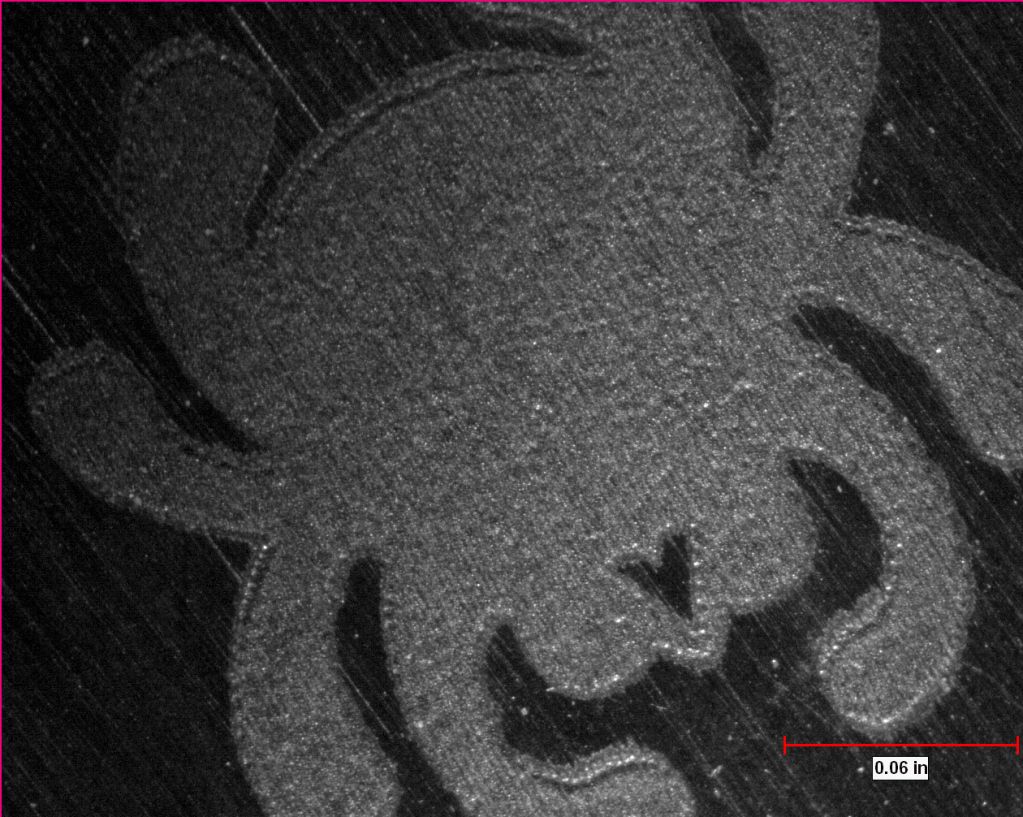
Also pictures of the tip at 63x and requested pictures of the bug engraving at 40x, 50x and 100x
63x
40x - tried to get it at an angle but the texture is so fine it tried to disappear
50x
100x - looks like a different color than the first two because of the reflected light, but same blade
Also pictures of the tip at 63x and requested pictures of the bug engraving at 40x, 50x and 100x
63x
40x - tried to get it at an angle but the texture is so fine it tried to disappear
50x
100x - looks like a different color than the first two because of the reflected light, but same blade
Click here to zoom: Under the Microscope
Manix2, Elmax MT13, M4 Manix2, ZDP Caly Jr, SB Caly3.5, Cruwear MT12, XHP MT16, South Fork, SB Caly3, 20CP Para2, Military Left Hand, Perrin PPT, Squeak, Manix 83mm, Swick3, Lil' Temperance, VG10 Jester, Dfly2 Salt, Tasman Salt
Chris
Manix2, Elmax MT13, M4 Manix2, ZDP Caly Jr, SB Caly3.5, Cruwear MT12, XHP MT16, South Fork, SB Caly3, 20CP Para2, Military Left Hand, Perrin PPT, Squeak, Manix 83mm, Swick3, Lil' Temperance, VG10 Jester, Dfly2 Salt, Tasman Salt
Chris
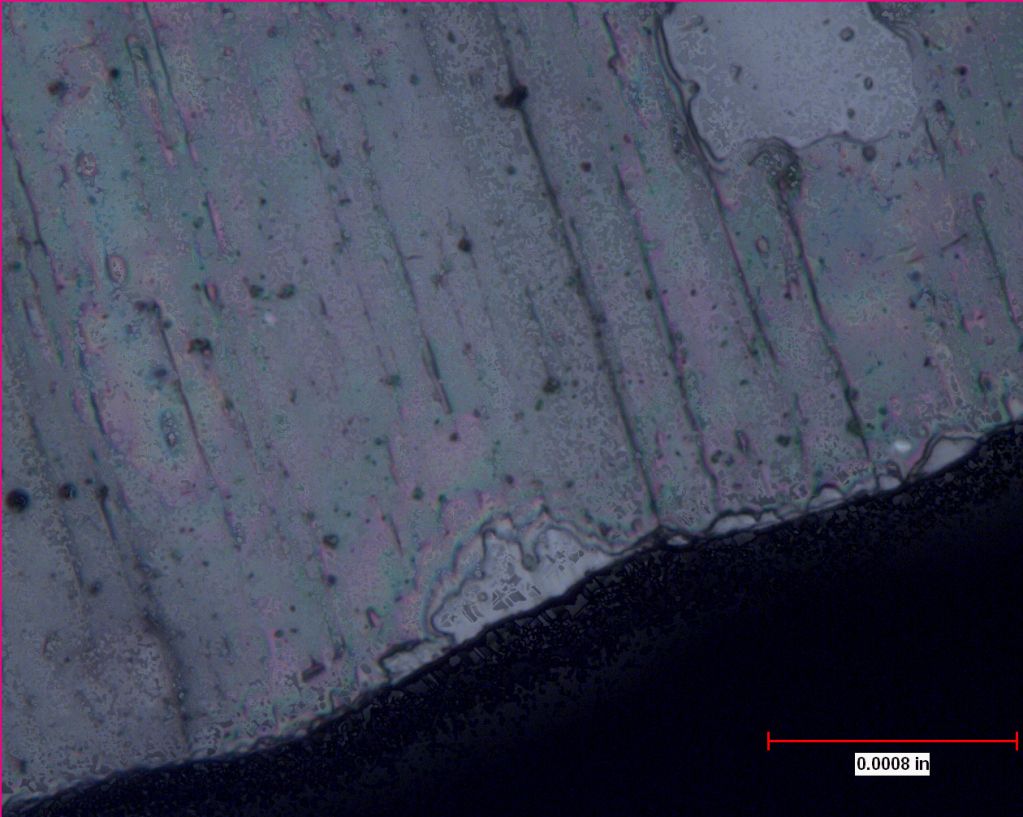
Next up is the factory edge MT13 Elmax Mule. Same routine as before, I can take pictures of the knife in about ten minutes now that I've got my technique down :)
10x
25x
40x
63x
50x
100x
200x
500x
1000x
10x
25x
40x
63x
50x
100x
200x
500x
1000x
Click here to zoom: Under the Microscope
Manix2, Elmax MT13, M4 Manix2, ZDP Caly Jr, SB Caly3.5, Cruwear MT12, XHP MT16, South Fork, SB Caly3, 20CP Para2, Military Left Hand, Perrin PPT, Squeak, Manix 83mm, Swick3, Lil' Temperance, VG10 Jester, Dfly2 Salt, Tasman Salt
Chris
Manix2, Elmax MT13, M4 Manix2, ZDP Caly Jr, SB Caly3.5, Cruwear MT12, XHP MT16, South Fork, SB Caly3, 20CP Para2, Military Left Hand, Perrin PPT, Squeak, Manix 83mm, Swick3, Lil' Temperance, VG10 Jester, Dfly2 Salt, Tasman Salt
Chris
C.L.L 97 said:
"I have a question about loupes, what is the best ones to get, and how much do they go for?? "
I've tried many styles and many different magnifications and my favorite is:
Super Mini 60X Microscope with 2-LED Illumination + Money/Currency Detecting UV Light (3*LR1130)
Item ID #00160982 for only $8.39 plus shipping.
I got it at http://www.lightinthebox.com for only $8.39 + shipping (it arrived in only two days)

That is seriously cool, thanks for the photos! And definitely keep them coming :)
Also, what can be taking from this is Spyderco sharpens their knifes like absolutely none other, looks amazing, even at 1000x.
I do wonder what the edge of a different brand folder would look like, like a budget folder then something of equal price to compare to the Spyderco factory edge. If you have some, give it a try, if not someone might even be willing to let you borrow theirs.

Very cool reading, and I definitely agree with them that optical microscopy is really limited by depth of field. I've tried to alleviate that (and I think it's actually done a decent job for being a computer-generated process) by using a multi-layer grab technique. I'd estimate that the computer took 20-30 frames as I moved the platform up and down the z-axis, moving the depth of field from one side to the other.mandrake wrote:Try this:
http://www.bushcraftuk.com/downloads/pd ... shexps.pdf
Thanks for the link! Next I've got to buy a strop and some compounds to get my edges more refined, then more micros.
Click here to zoom: Under the Microscope
Manix2, Elmax MT13, M4 Manix2, ZDP Caly Jr, SB Caly3.5, Cruwear MT12, XHP MT16, South Fork, SB Caly3, 20CP Para2, Military Left Hand, Perrin PPT, Squeak, Manix 83mm, Swick3, Lil' Temperance, VG10 Jester, Dfly2 Salt, Tasman Salt
Chris
Manix2, Elmax MT13, M4 Manix2, ZDP Caly Jr, SB Caly3.5, Cruwear MT12, XHP MT16, South Fork, SB Caly3, 20CP Para2, Military Left Hand, Perrin PPT, Squeak, Manix 83mm, Swick3, Lil' Temperance, VG10 Jester, Dfly2 Salt, Tasman Salt
Chris
-
jackknifeh

- Member
- Posts: 8412
- Joined: Fri Jul 09, 2010 6:01 am
- Location: Florida panhandle
If you haven't decided on what strop or compounds you will get there is info about very coarse grit diamond pastes in a thread about using 14u (micron) diamond paste in off-topic that Chuck started. I learned quite a bit on that one, and yes it cost me a little money. :) Not really very much actually. Got some great stuff for the money.Clip wrote:Very cool reading, and I definitely agree with them that optical microscopy is really limited by depth of field. I've tried to alleviate that (and I think it's actually done a decent job for being a computer-generated process) by using a multi-layer grab technique. I'd estimate that the computer took 20-30 frames as I moved the platform up and down the z-axis, moving the depth of field from one side to the other.
Thanks for the link! Next I've got to buy a strop and some compounds to get my edges more refined, then more micros.
Jack
I forgot, welcome to the forum mandrake. Thanks for the article. From the little I read it looks interesting. Lots of in-depth information.
I think that your photos are great. I have been messing with a cheap Veho at.. supposedly 400X and getting the lighting and angles correct is a real pain. What you have here is orders of magnitude better than anything that I have achieved.Clip wrote:Very cool reading, and I definitely agree with them that optical microscopy is really limited by depth of field. I've tried to alleviate that (and I think it's actually done a decent job for being a computer-generated process) by using a multi-layer grab technique. I'd estimate that the computer took 20-30 frames as I moved the platform up and down the z-axis, moving the depth of field from one side to the other.
Thanks for the link! Next I've got to buy a strop and some compounds to get my edges more refined, then more micros.
Great stuff.
That PDF was recomended to me a while back and I thought it rather amazing... except sometimes it took me a long time just to figure out what I was looking at.
Phil
-
xceptnl

- Member
- Posts: 8594
- Joined: Mon Feb 21, 2011 7:48 pm
- Location: Tobacco Country, Virginia
- Contact:
Clip, that 200x pic of the M4 Manix is out of this world. I think that is going to become my new desktop for a while! Thanks for the efforts and I'm sure we would all love to see them keep coming. About the strops... I purchased a Large double sided strop from Stropman a few weeks ago along with the black & green compounds and could not have been happier with the value. I'm almost as happy as when I got my profile stones. I lightly touch up my edges after a days use and all my blades; VG-10, S30V, M4, Cruwear, Elmax, H1 and especially Superblue. They all come to life with just a little work. The total package with 2 of each of the compounds and the strop was like $32 shipped. He has tons more strops to choose from too. I have been using the edge of the strop to work on my Spyderhawk, but I think I am going to order one of his round strops too. Should work for the Dodo too.
If you happen to get into stropping, we all need to see some before & after shots please!
If you happen to get into stropping, we all need to see some before & after shots please!

*Landon*sal wrote: .... even today, we design a knife from the edge out!
Thanks! Usually this setup is finicky with light and angles but I've got enough range where I can crank the light levels up to around double what we use for normal micrographs and the blade catches enough to give a usable image.mandrake wrote:I think that your photos are great. I have been messing with a cheap Veho at.. supposedly 400X and getting the lighting and angles correct is a real pain. What you have here is orders of magnitude better than anything that I have achieved.
Great stuff.
That PDF was recomended to me a while back and I thought it rather amazing... except sometimes it took me a long time just to figure out what I was looking at.
Phil
I think you've just sold me on those strops. I didn't look too closely but had thought I needed three or four for the different compounds. Looks like I'll be taking a closer look at it tonight! Good idea getting a round one for the Dodo as well. I wonder if I could wrap some leather around a large dowel or piece of PVC and get the same results.xceptnl wrote:The total package with 2 of each of the compounds and the strop was like $32 shipped. He has tons more strops to choose from too. I have been using the edge of the strop to work on my Spyderhawk, but I think I am going to order one of his round strops too. Should work for the Dodo too.
If you happen to get into stropping, we all need to see some before & after shots please!
Click here to zoom: Under the Microscope
Manix2, Elmax MT13, M4 Manix2, ZDP Caly Jr, SB Caly3.5, Cruwear MT12, XHP MT16, South Fork, SB Caly3, 20CP Para2, Military Left Hand, Perrin PPT, Squeak, Manix 83mm, Swick3, Lil' Temperance, VG10 Jester, Dfly2 Salt, Tasman Salt
Chris
Manix2, Elmax MT13, M4 Manix2, ZDP Caly Jr, SB Caly3.5, Cruwear MT12, XHP MT16, South Fork, SB Caly3, 20CP Para2, Military Left Hand, Perrin PPT, Squeak, Manix 83mm, Swick3, Lil' Temperance, VG10 Jester, Dfly2 Salt, Tasman Salt
Chris
Oh, get some pics of carbon fiber at 1000x and compare it with G-10. Specifically I like the frayed fiber ends at the side of the scale, but the flat texture should be interesting too (good luck cleaning all the skin flakes off, I always have trouble getting macro shots of handle material without the fleshy blobs).Clip wrote:Thanks! The DOF issue was killing me until I dug out the manual and found some more functionality with the program. On my Canon I would've just cranked the aperture up and dragged the shutter to compensate for reduced light.
Requests:
I'd love for you guys to throw ideas out there, and I wouldn't mind trying them if they sound reasonable and I've got some spare time to use the equipment. I think it'd be neat to try apples-to-apples comparisons. Gimme some suggestions!
As for taking pictures of knives you guys lend: Again, wouldn't mind doing this at all. I think it'd be a great way to test way more steels, grinds, and sharpening techniques than I could ever get my hands on. I'd like input from members more experienced in shipping and receiving to chime in with a process that works for them and keeps everyone happy.
So yes to both!
I wouldn't mind seeing a mirror polish finish VS bead blast too.
Can't do anything that's non-reflective like CF/G10 on the 50-1000x setup, since the light has to reflect from the metal and back through the lens to get a picture.
However, the mirror polish vs bead blast should definitely be doable! When I get a hold of each of them I'll get pictures.
However, the mirror polish vs bead blast should definitely be doable! When I get a hold of each of them I'll get pictures.
Click here to zoom: Under the Microscope
Manix2, Elmax MT13, M4 Manix2, ZDP Caly Jr, SB Caly3.5, Cruwear MT12, XHP MT16, South Fork, SB Caly3, 20CP Para2, Military Left Hand, Perrin PPT, Squeak, Manix 83mm, Swick3, Lil' Temperance, VG10 Jester, Dfly2 Salt, Tasman Salt
Chris
Manix2, Elmax MT13, M4 Manix2, ZDP Caly Jr, SB Caly3.5, Cruwear MT12, XHP MT16, South Fork, SB Caly3, 20CP Para2, Military Left Hand, Perrin PPT, Squeak, Manix 83mm, Swick3, Lil' Temperance, VG10 Jester, Dfly2 Salt, Tasman Salt
Chris
-
xceptnl
- Member
- Posts: 8594
- Joined: Mon Feb 21, 2011 7:48 pm
- Location: Tobacco Country, Virginia
- Contact:
I'm pretty sure thats all he does. If I had a source for quality leather I would have made mine as well. He was great to purchase from and responded within hours via personal email that was specific to my order. Arrived within 3 days. Check this thread for moreClip wrote:... I wonder if I could wrap some leather around a large dowel or piece of PVC and get the same results.
*Landon*sal wrote: .... even today, we design a knife from the edge out!
-
phillipsted

- Member
- Posts: 3674
- Joined: Tue Oct 05, 2010 11:30 am
- Location: North Virginia
I like the final conclusion from the 2004 Verhoeven report:
"This study addresses the question of which final polishing (honing) technique is best to remove the bur and smooth the edge face. The major conclusion of the study is that of the three honing methods studied, the best method for removing the bur and setting the edge angle is clearly a final polish on leather loaded with a polishing compound such as the chromium oxide or diamond compounds used here. Edge quality matched that of razor blade standards..."
(emphasis added)
TedP