Hi Folks,
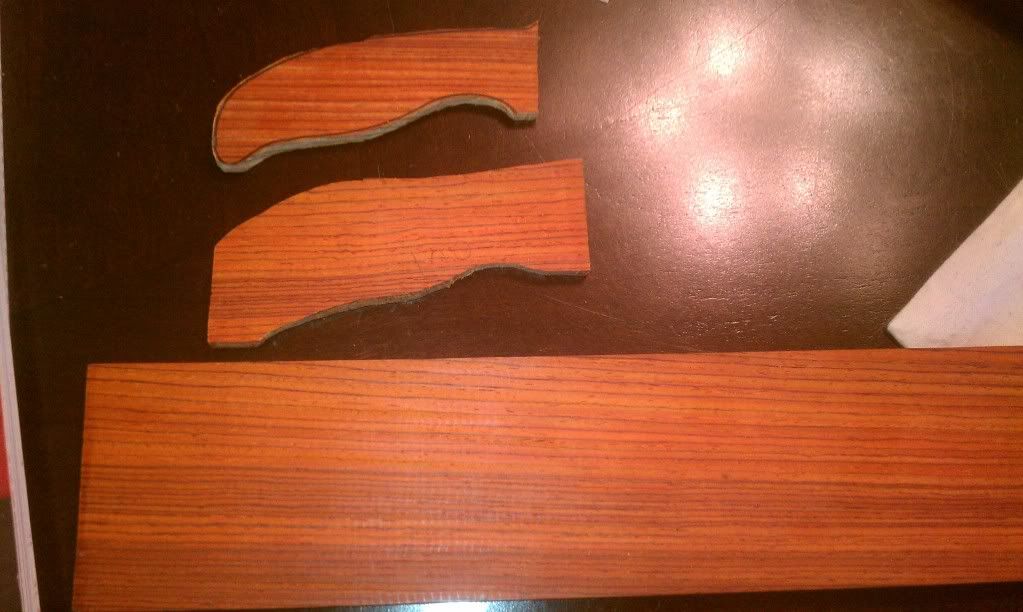
This is my first set of scales on the cruwear mule. I cut the tree and dried the wood for several years to make a walking staff but decided to make the scales. I stabilized the wood in a wood hardener for 2 weeks and dried for several weeks. I used green G10 liners and buff finished with carnauba wax. I have black walnut stabilizing now to use on the new mule I’m ordering tonight. I’ve learned through my mistakes on this one and think my next one will be better. (I hope)
:)
Very neat, I dig the green G-10 liners they really draw the eye. I'm in the process of making my own for the first time with the Elmax mule. I can only hope they look as nice as yours. Oh and how is working with G-10, is it hard to shape, and what do you use to shape it. I always figured it would chip ect. If you were too rough with it.
Great work. No one will ever see my first set of scales.
Our reason is quite satisfied, in 999 cases out of every 1000 of us, if we can find a few arguments that will do to recite in case our credulity is criticized by someone else. Our faith is faith in someone else's faith, and in the greatest matters this is most the case.
- William James, from The Will to Believe, a guest lecture at Yale University in 1897
Very nice, I haven't tried to make scales yet. I have some bloodwood (leftover flooring) that I hope to use one one of my Elmax mules. I picked up a couple of the less expensive Halpern G-10 scales just to get something on them. Good job, take care.
The Student wrote: Oh and how is working with G-10, is it hard to shape, and what do you use to shape it. I always figured it would chip ect. If you were too rough with it.
The G10 is very tough! I rough cut it on a scroll saw and burned a couple of blades. I worked it down on a spindle sander. You don't have to worry about it chipping.
Good luck with your Elmax!
Niles wrote:Really nice job! How did you go about stabilizing the wood? Are you just soaking the whole thing or do you use heat to speed things up?
Looking forward to your next set.
Thanks Niles!
I used Minwax wood hardener and this is to be done outside because of the vapor. I pour the hardener into a quart mason jar, add the wood blanks, and cover with a loose lid. Put the jar in a large coffee can (something similar) with a small hole drilled in the bottom away from any flames. Boil water and pour into the can. The hardener boils at a lower temp and will start filling the open grain. I continued to add boiling water for 30 minutes and then tightened the lid. As the hardener cools a vacuum occurs in the jar and pulls the resin into the wood. Soak for a couple of weeks and then dry. Good luck!
rondv wrote:Thanks Niles!
I used Minwax wood hardener and this is to be done outside because of the vapor. I pour the hardener into a quart mason jar, add the wood blanks, and cover with a loose lid. Put the jar in a large coffee can (something similar) with a small hole drilled in the bottom away from any flames. Boil water and pour into the can. The hardener boils at a lower temp and will start filling the open grain. I continued to add boiling water for 30 minutes and then tightened the lid. As the hardener cools a vacuum occurs in the jar and pulls the resin into the wood. Soak for a couple of weeks and then dry. Good luck!
Ron
Thanks for the info. I've tried this method before, but made a terrible mess as the hardener boiled too much and leaked out of the jar. I plan to try it again but will keep the temperature lower somehow. Any tips?
Rondv - in case you haven't found it yet, there is a long thread over in the Pictures Sub-forum on Mule scales. Lots and lots and lots of photos from the past couple of years.