Nice Job!cheapmovies25 wrote:Here are some pics of a delica and stretch that i mirror polished, both the blade and clip.
Show your mods!


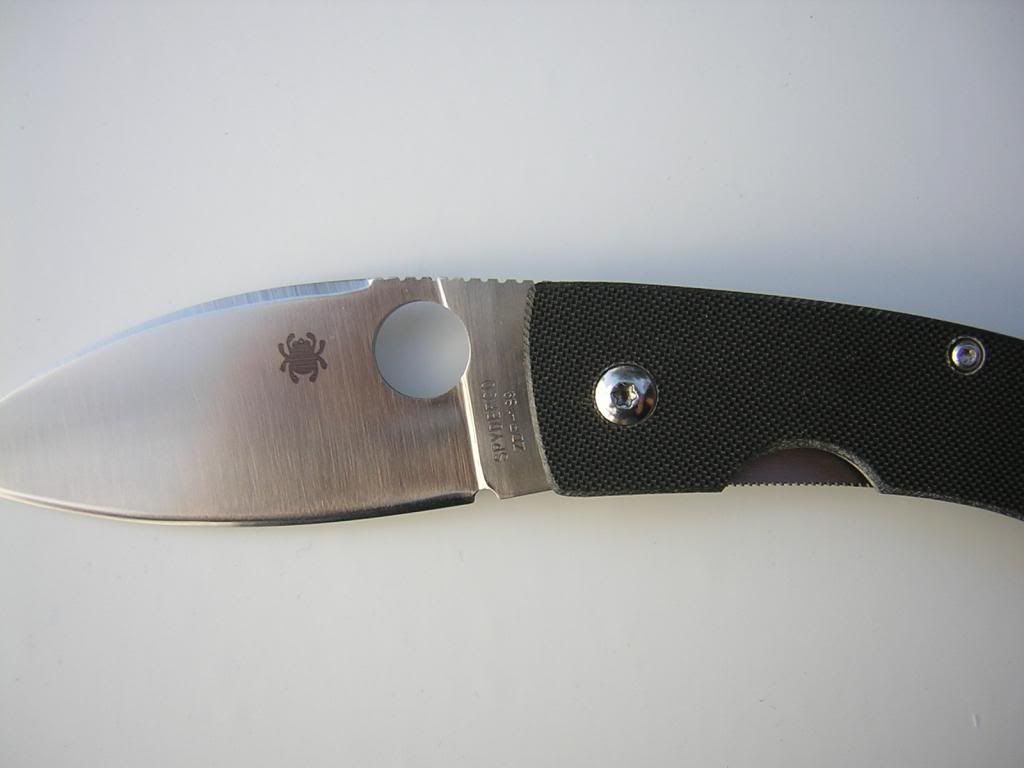
Replaced the T6's with T8's, swapped the brown G10 with the scale from a Ti Military, patina'd and tumbled the CPM-M4 blade, rounded the spine, bead-blasted the clip but left the underside smooth (not in the pic), replaced the backspacer with standoffs, polished the edge. Bead-blasting and blade mods done by So-Lo.

Here are some pics of a Tenacious I hacked up.... literally. I was kind of experimenting and it got to the point where I just decided to make it look sloppy purposely considering I had done so before I could admit it was on purpose :D
I still need to smooth that back dip I made.... I'm not really sure why it's there but like I said, I was experimenting!


I still need to smooth that back dip I made.... I'm not really sure why it's there but like I said, I was experimenting!


-
OldSarSwmr
- Member
- Posts: 1084
- Joined: Sat Jul 23, 2011 9:00 am
- Location: Richmond, VA

Jazz wrote:Beauty :cool: How'd you do that?
- best wishes, Jazz.
Hey Boss, just hit the edged with the torch and the heat will conduct through and bronze the middle. Saw a Kevin Wilkins custom with something similar and copied as best I could. Havnt done it to many spydies, but here's a kershaw i did in the same way.

Modded Military CTS-XHP
- black painted spacer >>> normal backspacers with modern design and very high-tech looking
- pivot screw >>> alien-head custom screw. polished screw and pivot head. veeeery high-tech looking
- torx-6 >>> good torx-9. slightly polished. better look, no more chance to break screws
- new (better quality) screws for clip. slightly polished
- little work with clip. deleted fins and factory defects on clip's edge
- red fiber "tuning tag" under clip. with hidden unique number and my signature
My :spyder:s: C85G2 (EDC), C63GPS, C63GPS2, C63GP3, C65CFP, C65BKP, C65TIP, C143GP, C90PBLE, C90CFPE, C10PGRE, C10PGRE FFG, C10SGRE, C11PGRE, C10JBB, C11JBBP, C11JBOP, C113CFPD, C28PGRE2, C149GP, C135GP, C126GPFG, C36GPBNXHP, C36CFM390P, C81GGY20CP2, C46GGY, C79OR, C142GP, C122GP, C136G, C148G, C28T, LSS3T, C150GP, C95G2
Well, it looks sweet - very nice. Thanks.korbiaka wrote:Hey Boss, just hit the edged with the torch and the heat will conduct through and bronze the middle. Saw a Kevin Wilkins custom with something similar and copied as best I could. Havnt done it to many spydies, but here's a kershaw i did in the same way.
- best wishes, Jazz.
-
Half Sack

- Member
- Posts: 261
- Joined: Sat Apr 30, 2011 12:55 am
- Location: Alberta, undisclosed location of the Weapon Plus Program
TheHunt or others Hawkbill mod question
Hey modders love what's been done so far, its great to see what people have done to personalize/improve on these designs so far. :cool:thehunt wrote:Belive me, it IS sharp :-)
Closed shot:
I couldnt get a better shot, I hope you can see what I did:
I dremelt a longish hole into the FRN for the tip to sit in.


My question, can others with Hawkbill blades confirm what TheHunt said in his post, that to correct the "sealing" of the blade (little/no blade visible when closed) you need to remove some of the handle area where the tip rests?
I have a Ladybug Hawkbill and will be getting a Byrd Hawkbill very soon thanks to #Byrdweek I suspect it will have the same issue and I'd prefer to have all/most of the blade hidden, especially if I just need to dremel the frn down.
But, looking at my Ladybug I can't confirm that my problem is in the handle area and not the lower blade area, the unsharpened area near the pivot.
Just looking for confirmation before I cut anything, worst come to worst I'll wait for my Byrd and experiment on that.
Secondary question, are the replacement scales for Byrds or do Spyderco scales fit? I may want to play with that aswell, or look into dying the scales.
I've got other questions but that's it for now.
SPYDERCOOOOO! :D
Welcome to our newest member, Half Sack
:spyder: Endura4 wave, Ladybug Hawkbill H1, Byrd Hawkbill, PM2 digi camo, Sharpmaker *Sprints: Dodo Orange, MeerKat Burgundy, "R" Nishijin *Discontinued: Caspian H1 :spyder: #ByrdWeek Winner :cool:
No one likes the dark - Robin Sherbatsky
*Signature not updated, purchases missing...*
:spyder: Endura4 wave, Ladybug Hawkbill H1, Byrd Hawkbill, PM2 digi camo, Sharpmaker *Sprints: Dodo Orange, MeerKat Burgundy, "R" Nishijin *Discontinued: Caspian H1 :spyder: #ByrdWeek Winner :cool:
No one likes the dark - Robin Sherbatsky
*Signature not updated, purchases missing...*
The FRN should not govern the restIng position of the blade. This position should be governed by the kick located on the blade near the pivot. By this mechanism the edge is parked without contacting anything and therefore is not dulled in the process.
Thanks,
Ken (my real name)
...learning something new all the time.
Ken (my real name)
...learning something new all the time.
I think the Byrd Hawkbills don't have as much curve as the Spyderco ones do, so having the gap between the handle and the blade might not be there at all.
I would check it out when you get it, then figure out if you want to mod it.
As far as the mod goes... what is stopping the blade when closed is the flat part of the blade closest to the handle when opened, it is hitting usually the lock bar on a lock back. The mod took some metal off the flat part of the blade closest to the handle so that the blade would close more into the handle. After that, when the tip of the blade hit the far end, part of the plastic was taken off to eliminate the contact.
*edit* Ken, sorry for repeating what you said, maybe saying it twice can't hurt. :)
-Brian
A distinguished lurker.
Waiting on a Squeak and Pingo with a Split Spring!
A distinguished lurker.
Waiting on a Squeak and Pingo with a Split Spring!
Well, the handle of the Ladybug wasnt originally designed to house a hawkbill-blade.
Believe me if I say, the tip rested on the handle.
All I had to do to let the blade rest a little deeper in the handle was making some space for the tip.
I did "mod" a Crossbill in that fashion too, but there you have to remove some material from the ricasso as well.
Believe me if I say, the tip rested on the handle.
All I had to do to let the blade rest a little deeper in the handle was making some space for the tip.
I did "mod" a Crossbill in that fashion too, but there you have to remove some material from the ricasso as well.
Si vis pacem parabellum