Spyderco Bushcraft Handle Tutorial

Discuss Spyderco's products and history.
User avatar
C_Claycomb
Member
Posts: 64
Joined: Sat Jun 10, 2006 10:05 am
Location: Bedfordshire, England

Spyderco Bushcraft Handle Tutorial

#1

Post by C_Claycomb »

I read that Spyderco were going to release their stock of Bushcraft blade blanks some time soon. If so, I thought some folks might find some photos and descriptions of how I shape this type of handle useful. Obviously there are many ways of doing most things in knife making and folk get comfortable with particular methods which suit their philosophy, tools and requirements. This is just how I do things.


Tools.
I don’t tend to use a belt sander for handle shaping but this is more to do with my grinder having only a 10” wheel. An 8” wheel would work much better for shaping this type of handle. All the work done on this handle can be done with a small selection of files. These are the ones I use:

Image

¼ wide flat smooth cut, ¼ x 6”square bastard, 8” half round bastard, 10” square Bastard, 10” half round smooth, cabinet maker’s rasp, 12” flat bastard.

The two half round files could be done without by substituting dowels and good sandpaper. Nearly all the shaping is done with just the cabinet rasp and the 10” square bastard. The smaller files are handy in some tighter corners, the big flat is good for straightening a few lines and getting lumps out.

I find some things invaluable for measuring work as it goes.

Image

A pin-gauge for keeping both sides of the handle the same shape is very handy. Vernier callipers (here shown with a temporary modification, on which more later) and a steel ruler (actually, a flexible 6” is better)

Lastly, I use a variety of backings for handle sanding. Here’s a picture although they won’t feature in any of the other pictures.

Image

In addition to a couple of rectangular bits of hardwood and a couple of pipes, I planed down a bit of pine to approximate an 8” radius, handy for evening up some curves when used with 80grit paper. Some 8mm thick shoe leather makes a great flexible backing. The strange metal bar is a wedge from a defunct electric generator and is about a 6” radius.

The knife

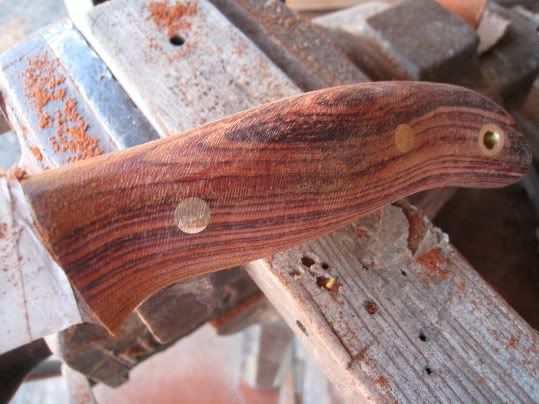
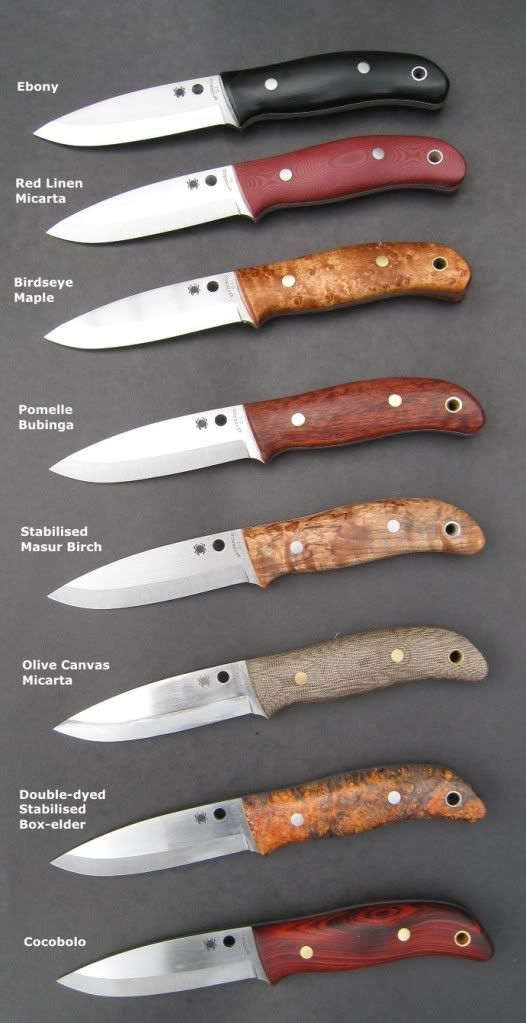
The idea behind the handle on the Spyderco/BushcraftUK knife was to have a fairly broad but well sculpted and rounded handle which would spread the load from heavy wood cutting over a large area of the user’s hand.

Exact dimensions will vary depending on the user’s hand but for average hands a grip with a maximum palm swell of 1 inch seems to work well. If 3/8th Micarta is used, a couple of vulcanised fibre spacers can be used to bulk things out.

It is of great benefit to get the handle slabs to an equal and uniform thickness before attaching them to the knife. I used not to be too worried, but it makes keeping everything even so much easier later on that I now thing it worth the extra effort.

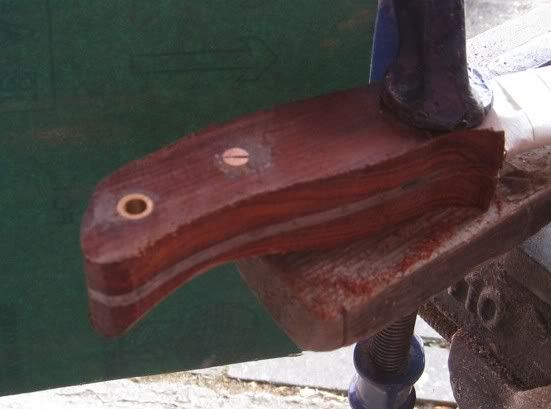
The project knife has cocobolo scales and is destined for someone with fairly large hands. The handle comes in at 27mm to start with.

Image

The general vital statistics for desired handle width, from the blade are:
.85 = 21 – 22mm
0.75 = 19-20mm
1 = 25mm
0.7519-20mm
1 = 25mm

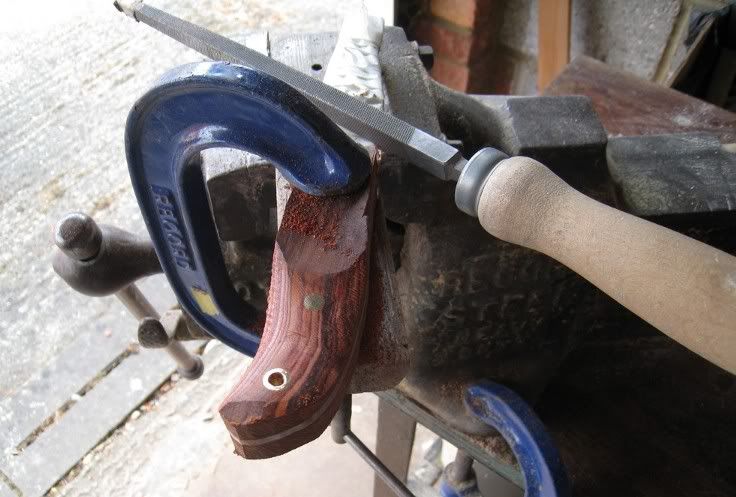
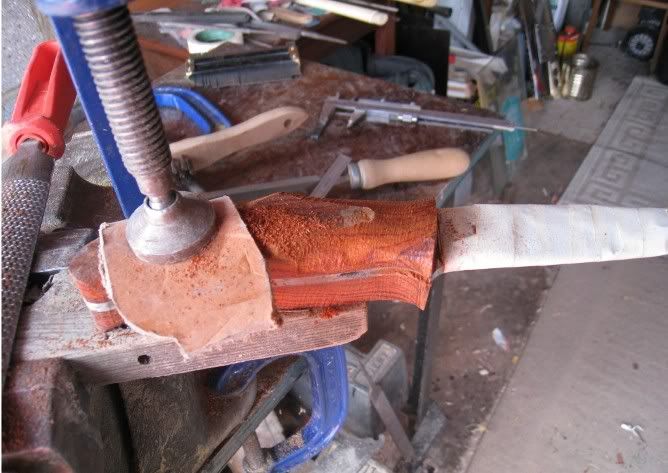
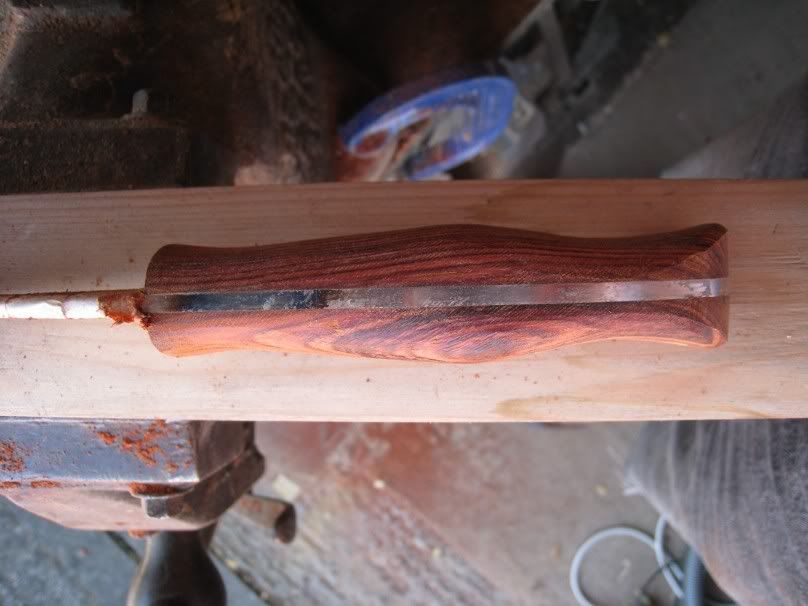
There are loads of ways of holding a handle to work on it. I have a solid vice and just use big G-clamps to hold it to an old bit of pine board. If the slabs are even it is simple, and much more solid, to clamp the handle for as much work as possible before swapping to clamping on the blade.

Image


I start off with the cabinet rasp and take a big bite from between the lanyard tube and the rear bolt.

Image

I use the edges of the rasp to allow me a deeper bite so that the thickness at the bottom of the cut is 23.5mm

Image

Cont...
User avatar
C_Claycomb
Member
Posts: 64
Joined: Sat Jun 10, 2006 10:05 am
Location: Bedfordshire, England

#2

Post by C_Claycomb »

I then switch to the 10” square bastard file. You can do just about all the handle shaping with a file like this. I cut back the lanyard tube and the bolt head. I am aiming for maximum width to fall about 0.25” in front of the rear bolt head.

Image

Image

I now flip the handle over and shape the other side until the width is a hair over 20mm at the narrowest point.

Image

If you have a pin gauge you can use it now to check how even you are keeping things. Otherwise just eye-ball it against a plain background.

Image

I now start on the front end of the handle. It is still possible to clamp on the handle by using some heavy leather to spread the load and prevent the clamp damaging the wood.

Image

Much the same as at the back, I know my starting width, and that both scales are the same, so can take almost all the wood off one side before starting on the other. I start with the cabinet rasp again and work the area between the front of the bolt and the leading edge of the handle. Thinnest point is mid-way between these points and I take it to 23.5 again. The leading edge of the handle is also taken down until the front of the scale measures 10mm. I will refine this further with finer files and sand paper and it will probably end up around 9-10mm.

Image

Once again I swap to the 10” square bastard file to work the bold head down and shape the curves further. A big flat file can be handy for keeping the slope straight from the low point just ahead of the bolt to the max width at mid handle.

Image

Getting there. Bear in mind that my starting handle thickness was a couple millimetres thicker than I wanted so although the unshaped flat area is clear at this point, the finished palm swell will fall a little further to the rear than it looks like in this picture.

Image

Cont...
User avatar
C_Claycomb
Member
Posts: 64
Joined: Sat Jun 10, 2006 10:05 am
Location: Bedfordshire, England

#3

Post by C_Claycomb »

One clamp will work, but two makes things much more secure. Taping the blade is a good idea, but a single clamp tends to shift a bit as the tape slides around under pressure. A second clamp arrests this.

Image

By shifting to clamping on the blade I can work the middle of the handle a bit more, reducing the flat and moving the max width rearwards

I change the perspective from which I view the work frequently to ensure that all the curves are smooth, from all angles.

Image

Image

I use my callipers to check thickness. Recently I tried toying around with modifying the verniers to help with keeping the handles even. I taped a bit of thin Micarta to the fixed side of the jaws. This way I can measure width, then check the width to the centre of the spine. It seems to work well enough that I will be on the look out for a real cheap set of callipers that I can grind one of the jaws back to a stub, or permanently bond a jaw extension to.

Image

Image

The view on the tang is still pretty rough. You need to round things off so that there are no distracting flats on spine and belly in order to better see how even the handle is.

Image

Most of this rounding can be carried out with that 10” bastard file. The 6”x.25 square also comes in handy. About the only place that the half round file comes in handy is in cleaning up the very front of the handle.

Image

Almost there...

Image

I often pad my vice with leather so that I can clamp on the handle to allow shaping of the but end. This design is meant to have a pear shaped cross section at the butt. This shape allows for a slightly wider range of grips without there being any edge to dig into the heal of your hand.

Image

As can be seen in these two pictures, the sharp corners at the butt, (and at the front leading edge, not yet done) are chamfered. This makes them less prone to chipping, more comfortable, and in the case of the front of the handle it eases the transition into a sheath.

Image
User avatar
C_Claycomb
Member
Posts: 64
Joined: Sat Jun 10, 2006 10:05 am
Location: Bedfordshire, England

#4

Post by C_Claycomb »

Other thoughts:
Temper and holes:
You might have noticed discolouration on the tang at the front of the handle. I stuck the blade in water and played a propane plumbers torch around the area. I don’t know if this is really needed, but I had delivery of my batch of blades just when those pictures were being posted of the broken tang.

In retrospect I would also have heated the butt end of the tang too, to soften it to allow for changing the lanyard tube hole size. The lanyard holes are a strange size, about 7mm and I found it impossible to find a source of suitable tubing. Opening the holes out to 8 – 8.1mm and using 5/16 tube works. I used a carbide twist drill, rather inexpertly :o , tempering/annealing and a regular drill would have been better :rolleyes: .

Palm Swell:
Where to put the max width. I never aim to have max depth and max width in the same plane. I reckon that the hollow in my palm, for max handle width, is about 0.25” further back than where my middle finger is attached, point of max handle depth. While there are lots of hand shapes, this seems to be a good generalisation.


The End: :D
Right, enough waffle. I know all this is real simple stuff, but I made my first knife from a kit advertised as “Our easiest to assemble…” and thought that these pictures might help out on someone’s first foray into knife making.

Best of luck, and thanks! :)
User avatar
unit
Member
Posts: 1831
Joined: Sat Nov 28, 2009 10:47 am
Location: Missouri, USA

#5

Post by unit »

Fantastic tutorial. Thanks!
Thanks,
Ken (my real name)

...learning something new all the time.
User avatar
dbcad
Member
Posts: 3111
Joined: Fri Jan 08, 2010 2:59 pm
Location: ga, usa

#6

Post by dbcad »

Very neat to see :) I don't have the tools or facilities, but it's cool to see what you can do with a bench and files. That'll be a nice looking knife I know :D

Charlie
Charlie

" Everything should be made as simple as possible, but not one bit simpler."

[CENTER]"Integrity is being good even if no one is watching"[/CENTER]
User avatar
Donut
Member
Posts: 9612
Joined: Sat Sep 05, 2009 5:47 pm
Location: Virginia Beach, VA, USA

#7

Post by Donut »

Excellent work!
-Brian
A distinguished lurker.
Waiting on a Squeak and Pingo with a Split Spring!
Marion David Poff
Banned
Posts: 723
Joined: Fri Sep 24, 2004 10:33 am

#8

Post by Marion David Poff »

Beautiful!

And, if you don't mind, email me. I wanted to ask you something, but the email I had from before bounced.

Best,
Marion
Marion David Poff
User avatar
ChapmanPreferred
Member
Posts: 2342
Joined: Fri Sep 24, 2004 10:33 am
Location: PA, USA
Contact:

#9

Post by ChapmanPreferred »

Beautifully done. Thank you for taking time to show how to apply handle scales well!
SFO Alumni/Authorized Spyderco Dealer (Startup)
Work EDC List
FRP: Nisjin Cricket PE, Manbug PE, Dragonfly PE
FLP: SS Cricket SE, byrd Flatbyrd CE
BRP: CF Military S90V
BLP: Forum S110V Native
[SIGPIC][/SIGPIC]
User avatar
SUDS
Member
Posts: 393
Joined: Sat Jun 26, 2010 6:54 am
Location: Adirondacks, Upstate New York

#10

Post by SUDS »

Nicely done! That looks like some beautiful wood
Adam
[SIGPIC][/SIGPIC]
Manix 2, Para 2, Frn/Wooden UKPK
bdbender
Member
Posts: 75
Joined: Fri Oct 23, 2009 11:16 am
Location: Santa Fe, NM

#11

Post by bdbender »

Thanks - very nice!

I feel like this sort of really informative thread is what's best about this forum, and lately it's been swamped with "I want a ****, I just got a ****, I can't wait for my ****, I love my new ****, I'm disappointed in my new ****, what's better, **** or ****.

Good show!
User avatar
skunk_2
Member
Posts: 84
Joined: Mon Dec 07, 2009 7:57 pm
Location: Newfoundland, Canada, Earth

#12

Post by skunk_2 »

great work!!!
User avatar
SecSpyral
Member
Posts: 705
Joined: Wed Feb 18, 2009 5:12 pm

#13

Post by SecSpyral »

thank you for putting in the time to make this tutorial.
User avatar
C_Claycomb
Member
Posts: 64
Joined: Sat Jun 10, 2006 10:05 am
Location: Bedfordshire, England

#14

Post by C_Claycomb »

Thanks guys!
Kudos to you for wading through that lot!!! :D

I did think about doing a full tutorial, complete with drilling and fitting the slabs, but that isn't any different from any full tang job and there are some great tutorials out there for that already...and by the time I was giving it serious thought, the glue was aready dry :rolleyes: :D

I hope to have some photos of one or two finished knives before long. I have been doing a batch for the folk at Bushcraft UK who helped and supported the project. Nine so far all with slightly different sized grips, all in different handle materials.

Now if only Spyderco will release the blanks ;) I am keen to see what other folks do. :D

Marion, you have mail. Cheers :)
User avatar
Jazz
Member
Posts: 7678
Joined: Sun Jul 01, 2007 7:46 pm
Location: Alberta, Canada

#15

Post by Jazz »

Very nice! I'm sure you just helped a lot of people out. Thanks for your effort. :cool:

- best wishes, Jazz.
User avatar
C_Claycomb
Member
Posts: 64
Joined: Sat Jun 10, 2006 10:05 am
Location: Bedfordshire, England

#16

Post by C_Claycomb »

Here is the finished knife...along with some buddies.
Image

Image

Image
User avatar
ChapmanPreferred
Member
Posts: 2342
Joined: Fri Sep 24, 2004 10:33 am
Location: PA, USA
Contact:

#17

Post by ChapmanPreferred »

Brilliant.
SFO Alumni/Authorized Spyderco Dealer (Startup)
Work EDC List
FRP: Nisjin Cricket PE, Manbug PE, Dragonfly PE
FLP: SS Cricket SE, byrd Flatbyrd CE
BRP: CF Military S90V
BLP: Forum S110V Native
[SIGPIC][/SIGPIC]
User avatar
angusW
Member
Posts: 1504
Joined: Tue Mar 24, 2009 1:13 am
Location: Hamilton, Ontario

#18

Post by angusW »

Thanks for the tutorial. Those turned out extremely well. I've one of those kits as well which I started working on tonight. Was pretty cheap and gives me a chance to try out making a handle before I ruin, I mean make a handle on something nicer.

Lee Valley sells a package of 6 plastic calipers for about $10.

http://www.leevalley.com/en/wood/page.a ... 3513,43546
Member of the LH Military club.

My Spydies
User avatar
FIMS
Member
Posts: 990
Joined: Mon Oct 19, 2009 9:41 pm
Location: Toronto, Ontario, Canada.

#19

Post by FIMS »

That was an awesome read with two cups of tea, and a gorgeous end product.
Oderint Dum Metuant - Let them hate, so long as they fear.

:spyder:'s - I have sincerely now lost count.

http://www.spydiewiki.com/
http://spyderco.com/edge-u-cation/glossary.php
User avatar
Quickbeam
Member
Posts: 57
Joined: Sun May 29, 2005 1:58 pm

#20

Post by Quickbeam »

Great work Chris. I have been using my Spyderco Bushcrafter over the last few days and its a great knife. I like the way you have sculpted the grips to spread the load. Spyderco have done a great job with the grind, this is the first Bushcraft knife that I have got on with.

Nick
Post Reply