Community Sharpening Journal, Part 2

Discuss Spyderco's products and history.
pinchyfisher
Member
Posts: 58
Joined: Sun Mar 05, 2023 6:58 am

Re: Community Sharpening Journal, Part 2

#241

Post by pinchyfisher »

8th_Note wrote:
Mon Apr 14, 2025 9:46 am
Does anyone have any tips on freehanding a wharncliff blade? I can never seem to get them as sharp, especially on the last half inch or so of the blade, as I can with a more traditional drop point or leaf shaped blade. It seems like a wharny should be easier to sharpen, but that has not been my experience thus far. Thanks
I learned the hard way- but if you are struggling to apex the entire edge of a wharnie, it would be worth checking to see if the wharnie actually has some variation/curve (isn't completely flat) by holding the edge vertical against a perpendicular flat surface with light behind it to look for gaps. If there is variance, you can true up the edge by holding the blade vertical and making some passes on a stone- dulling the edge and truing it up for flatness as well.

Once this is done, sharpen as you normally would, and you shouldnt need to raise the blade/account for belly/etc.

Without verifying/truing up the edge, you can end up chasing dull areas of a wharnie for a long time. At least thats my experience- a few minutes of truing up the edge saves a lot of effort in the long run.

Hope this helps!
User avatar
8th_Note
Member
Posts: 483
Joined: Mon Dec 16, 2024 7:56 am
Location: Southern Appalachian Foothills

Re: Community Sharpening Journal, Part 2

#242

Post by 8th_Note »

@Guts, @xceptnl, @vivi, and @pinchyfisher

Thank you for the tips. I really appreciate you taking the time
S30V; S35VN; VG-10; BD1N; H1; SuperBlue/SUS410; 8Cr13MoV; Micro-Melt PD#1; REX-45; Cruwear; BD1; K390; Magnacut; HAP40/SUS410; 20CV; 15V; M4; SPY27; LC200N; S90V
jmf552
Member
Posts: 7
Joined: Wed Feb 25, 2015 2:22 pm

Re: Community Sharpening Journal, Part 2

#243

Post by jmf552 »

I am a huge Spyderco fan, although I have not visited this forum for a long time. I'm not an expert on knives or sharpening, so I am hoping I can get some really basic advice. I have:

> An original Delica and Endura from the early '90's
> A Sharpmaker system with triangle rods from the rough "diamond" through to the ultra-fine - It has both 30 and 40 degree angles
> A two-sided strop board, with the little blocks of stuff you rub on each side
> A brand-new Persistence, which is one of their "value" knives
> Arriving today, I'm getting a 50x-1000x USB microscope. It displays the image through a smartphone or PC. It seemed like a cool toy and thought it might help me see what is going on with the edge better than a magnifying glass. A YouTube knife "expert" was using one to look at edges.

I thought I was keeping my Delica up to snuff with the Sharpmaker over the years. But when I got the new Persistence, there was no comparison. The newer, cheaper knife was way sharper. So I worked the Delica double through the coarse and fine rods again, following the instruction video. It got a little sharper, but not like the Persistence. The edge looks good under a magnifying glass, but I was feeling a tiny bit of roughness on the left side on the edge of the coarse rod. I kept at it, on both sides of course, but I don't seem to be making progress on it.

It's not just that knife that bothers me. It's more that despite following instructions, I'm not using the Sharpmaker system effectively, and I'd like to improve.

Any advice? Thanks.
User avatar
xceptnl
Member
Posts: 9000
Joined: Mon Feb 21, 2011 6:48 pm
Location: Tobacco Country, Virginia
Contact:

Re: Community Sharpening Journal, Part 2

#244

Post by xceptnl »

jmf552 wrote:
Tue Apr 15, 2025 10:11 am
I am a huge Spyderco fan, although I have not visited this forum for a long time. I'm not an expert on knives or sharpening, so I am hoping I can get some really basic advice. I have:

> An original Delica and Endura from the early '90's
> A Sharpmaker system with triangle rods from the rough "diamond" through to the ultra-fine - It has both 30 and 40 degree angles
> A two-sided strop board, with the little blocks of stuff you rub on each side
> A brand-new Persistence, which is one of their "value" knives
> Arriving today, I'm getting a 50x-1000x USB microscope. It displays the image through a smartphone or PC. It seemed like a cool toy and thought it might help me see what is going on with the edge better than a magnifying glass. A YouTube knife "expert" was using one to look at edges.

I thought I was keeping my Delica up to snuff with the Sharpmaker over the years. But when I got the new Persistence, there was no comparison. The newer, cheaper knife was way sharper. So I worked the Delica double through the coarse and fine rods again, following the instruction video. It got a little sharper, but not like the Persistence. The edge looks good under a magnifying glass, but I was feeling a tiny bit of roughness on the left side on the edge of the coarse rod. I kept at it, on both sides of course, but I don't seem to be making progress on it.

It's not just that knife that bothers me. It's more that despite following instructions, I'm not using the Sharpmaker system effectively, and I'd like to improve.

Any advice? Thanks.
Welcome back jmf. The microscope sounds like a useful tool/toy depending on your situation. Photos of the edge (even without magnification) could help us understand better your dilemma.

When you say rough on one side, do you mean the burr or the feel on the stone? Have you tried the sharpie trick to aid understanding of what your passes are actually removing? Have you cleaned your stones recently? Have you swapped the stones from one side to the other to see if the problem moves?

Just some quick off the top of my head questions. Sometimes we can all get perplexed by sharpening hiccups. This is the place to bring your questions for sure. Hope we can help.
Image
sal wrote: .... even today, we design a knife from the edge out!
*Landon*
jmf552
Member
Posts: 7
Joined: Wed Feb 25, 2015 2:22 pm

Re: Community Sharpening Journal, Part 2

#245

Post by jmf552 »

xceptnl wrote:
Tue Apr 15, 2025 10:33 am
jmf552 wrote:
Tue Apr 15, 2025 10:11 am
I am a huge Spyderco fan, although I have not visited this forum for a long time. I'm not an expert on knives or sharpening, so I am hoping I can get some really basic advice. I have:

> An original Delica and Endura from the early '90's
> A Sharpmaker system with triangle rods from the rough "diamond" through to the ultra-fine - It has both 30 and 40 degree angles
> A two-sided strop board, with the little blocks of stuff you rub on each side
> A brand-new Persistence, which is one of their "value" knives
> Arriving today, I'm getting a 50x-1000x USB microscope. It displays the image through a smartphone or PC. It seemed like a cool toy and thought it might help me see what is going on with the edge better than a magnifying glass. A YouTube knife "expert" was using one to look at edges.

I thought I was keeping my Delica up to snuff with the Sharpmaker over the years. But when I got the new Persistence, there was no comparison. The newer, cheaper knife was way sharper. So I worked the Delica double through the coarse and fine rods again, following the instruction video. It got a little sharper, but not like the Persistence. The edge looks good under a magnifying glass, but I was feeling a tiny bit of roughness on the left side on the edge of the coarse rod. I kept at it, on both sides of course, but I don't seem to be making progress on it.

It's not just that knife that bothers me. It's more that despite following instructions, I'm not using the Sharpmaker system effectively, and I'd like to improve.

Any advice? Thanks.
Welcome back jmf. The microscope sounds like a useful tool/toy depending on your situation. Photos of the edge (even without magnification) could help us understand better your dilemma.

When you say rough on one side, do you mean the burr or the feel on the stone? Have you tried the sharpie trick to aid understanding of what your passes are actually removing? Have you cleaned your stones recently? Have you swapped the stones from one side to the other to see if the problem moves?

Just some quick off the top of my head questions. Sometimes we can all get perplexed by sharpening hiccups. This is the place to bring your questions for sure. Hope we can help.
Thanks for your reply. My answers:

When you say rough on one side, do you mean the burr or the feel on the stone? Not sure I would know the difference, but it feels like the latter.

Have you tried the sharpie trick to aid understanding of what your passes are actually removing? I just tried that, and it seems to removing material evenly across the edge, but it's hard to know for sure with just a magnifying glass. I will try it again when I get the microscope.

Have you cleaned your stones recently? Yes, they are pretty clean.

Have you swapped the stones from one side to the other to see if the problem moves? I just tried that. I also tried different edges of the triangle rods. It does not seem to change. Always left side. I want to emphasize the difference is slight, but noticeable. It could be my technique, but I've tried to keep that consistent.
JBoone
Member
Posts: 103
Joined: Thu Mar 15, 2018 10:53 pm
Location: Charlotte

Re: Community Sharpening Journal, Part 2

#246

Post by JBoone »

Jmf

The edges coming from spyderco these days are pretty crazy. I have had a wicked edge for two years and have a hard time matching. Not trying to discourage you but just saying that some of these edges set a high bar for initial sharpness.

I am still learning though and no master by any stretch but I do set new edges on most if not all of my knives. I start with 17 dps generally and raise a burr with the corser diamonds.
jmf552
Member
Posts: 7
Joined: Wed Feb 25, 2015 2:22 pm

Re: Community Sharpening Journal, Part 2

#247

Post by jmf552 »

JBoone wrote:
Tue Apr 15, 2025 12:28 pm
Jmf

The edges coming from spyderco these days are pretty crazy. I have had a wicked edge for two years and have a hard time matching. Not trying to discourage you but just saying that some of these edges set a high bar for initial sharpness.

I am still learning though and no master by any stretch but I do set new edges on most if not all of my knives. I start with 17 dps generally and raise a burr with the corser diamonds.
Thanks for your reply. I'm afraid I don't know the sharpening lingo. That's what I'm trying to learn.

Could you explain, "I do set new edges on most if not all of my knives. I start with 17 dps generally and raise a burr with the corser diamonds." I guess "17 dps per side" means 17 degrees? How do you set that? What do you mean by "corser diamonds?" And you raise a burr, then how do you smooth that out? Thanks for your patience. I know very little about this.
User avatar
Brock O Lee
Member
Posts: 4070
Joined: Thu Jul 21, 2011 3:34 am
Location: Victoria, Australia

Re: Community Sharpening Journal, Part 2

#248

Post by Brock O Lee »

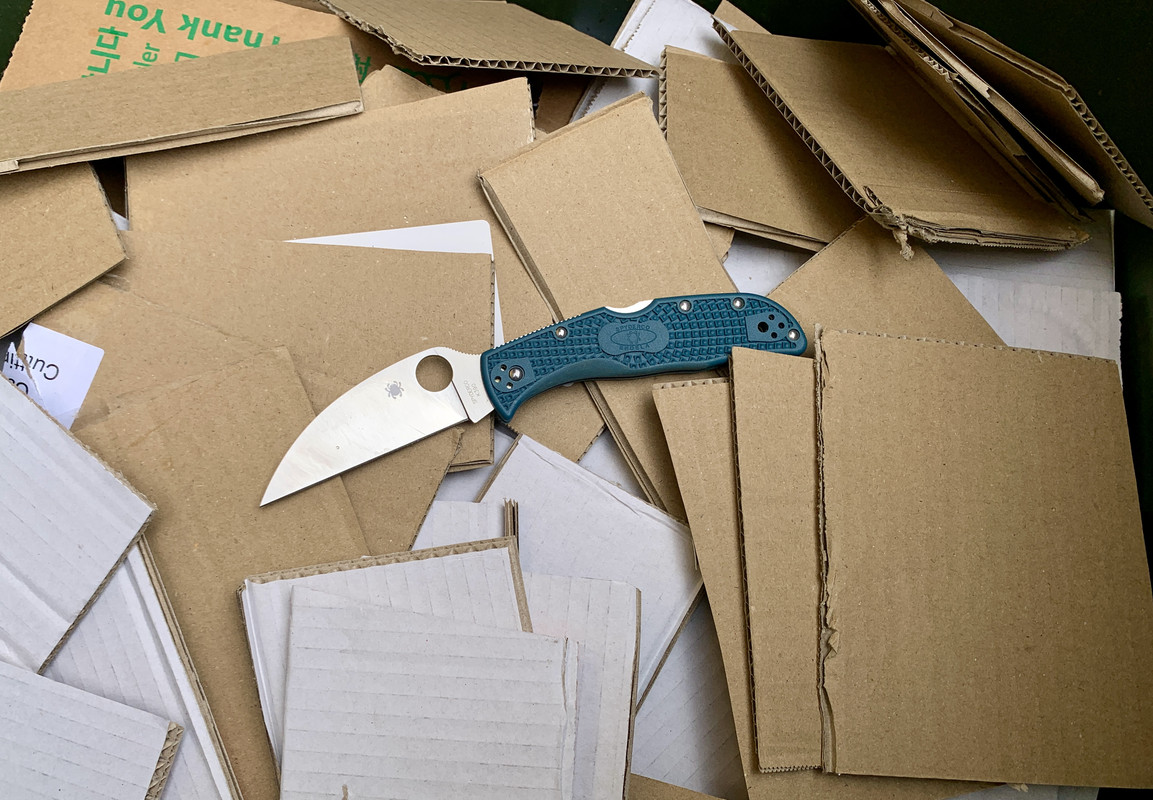
Seki's K390 is such a great steel. I use this Endela several times a week to break down boxes, and I usually sharpen it every 3 months.

Image

I cannot remember when last I sharpened it, probably about 2 months ago. It was not shaving arm hair anymore, but did not feel dull yet, so I thought I'd just strop it and see how it responded. A few passes on a basswood strop, loaded with 1 micron diamonds, and it popped arm hair again, with and against the growth. Really impressive, given the number of miles on the existing edge.

For me K390, with this heat treatment, is one of those special steels that just keeps on cutting, and never seems to roll, chip or dull on cardboard and packaging. I usually run it at about 16-17 dps, with a DMT fine micro bevel. I could likely go lower and drop the micro bevel altogether. It should give a sharper and longer lasting edge, assuming it won't chip. However, I quite like how durable and worry free it is at the moment.
Hans

Favourite Spydies: Military S90V, PM2 Cruwear, Siren LC200N, UKPK S110V, Endela Wharncliffe K390
Others: Victorinox Pioneer, CRK: L Sebenza, L Inkosi, Umnumzaan
Scandi Grind
Member
Posts: 1153
Joined: Wed Apr 06, 2022 6:37 pm

Re: Community Sharpening Journal, Part 2

#249

Post by Scandi Grind »

jmf552 wrote:
Tue Apr 15, 2025 8:10 pm
JBoone wrote:
Tue Apr 15, 2025 12:28 pm
Jmf

The edges coming from spyderco these days are pretty crazy. I have had a wicked edge for two years and have a hard time matching. Not trying to discourage you but just saying that some of these edges set a high bar for initial sharpness.

I am still learning though and no master by any stretch but I do set new edges on most if not all of my knives. I start with 17 dps generally and raise a burr with the corser diamonds.
Thanks for your reply. I'm afraid I don't know the sharpening lingo. That's what I'm trying to learn.

Could you explain, "I do set new edges on most if not all of my knives. I start with 17 dps generally and raise a burr with the corser diamonds." I guess "17 dps per side" means 17 degrees? How do you set that? What do you mean by "corser diamonds?" And you raise a burr, then how do you smooth that out? Thanks for your patience. I know very little about this.
17 dps stands for 17 degrees per side, which means it is the number you would use when sharpening. 17 dps would be the same as someone saying 34 degrees inclusive, which is obviously just the two 17 degrees on each side added together.

Setting an edge at a particular angle just means choosing an angle and holding that while you sharpen. There are fixed sharpening jig systems that hold the angle for you, but I just freehand using a little plastic angle wedge as a starting reference. Take a look at Spydercos Sharpmaker, it is a very good system that is relatively inexpensive compared to many fixed angle systems, but doesn't require the same skill level as freehanding.

Coarser diamonds refers to a sharpening stone with bigger diamond particles, which will cut metal faster than a finer stone would.

When a burr is raised, that means that the edge has been apexed. In other words the two lines that make up the triangle that is your edge have met, then one side was ground a little farther until it overhangs the opposite side of the edge a little. That overhang is the burr. Once you have formed a burr you want to minimize it by doing light alternating strokes. Sometimes I'll do three light strokes per side, then two, then alternate six strokes to minimize the burr, but make sure you end doing alternating strokes.

Most peoples start to getting very sharp edges begins with forming a burr, but just as important is minimizing it. If you leave that burr on there, you have what is called a wire edge. It's almost like having a piece of foil for an edge, it will crumble as soon as you cut anything and will not stay sharp.

Form the burr. Remove the burr. This is the basic starting point for getting sharp edges.
Last edited by Scandi Grind on Wed Apr 16, 2025 6:03 pm, edited 1 time in total.
"A knifeless man is a lifeless man."

-- Old Norse proverb
User avatar
8th_Note
Member
Posts: 483
Joined: Mon Dec 16, 2024 7:56 am
Location: Southern Appalachian Foothills

Re: Community Sharpening Journal, Part 2

#250

Post by 8th_Note »

Scandi Grind wrote:
Wed Apr 16, 2025 10:07 am
When a burr is raised, that means that you edge has been apexed. In other words the two lines that make up the triangle that is your edge have met, then one side was ground a little farther until it overhangs the opposite side of the edge a little. That overhang is the burr. Once you have formed a burr you want to minimize it by doing light alternating strokes. Sometimes I'll do three light strokes per side, then two, then alternate six strokes to minimize the burr, but make sure you end doing alternating strokes.

Most peoples start to getting very sharp edges begins with forming a burr, but just as important is minimizing it. If you leave that burr on there, you have what is called a wire edge. It's almost like having a piece of foil for an edge, it will crumble as soon as you cut anything and will not stay sharp.

Form the burr. Remove the burr. This is the basic starting point for getting sharp edges.
This is the most concise and clear explanation that I have ever read on this concept. Thank you
S30V; S35VN; VG-10; BD1N; H1; SuperBlue/SUS410; 8Cr13MoV; Micro-Melt PD#1; REX-45; Cruwear; BD1; K390; Magnacut; HAP40/SUS410; 20CV; 15V; M4; SPY27; LC200N; S90V
JBoone
Member
Posts: 103
Joined: Thu Mar 15, 2018 10:53 pm
Location: Charlotte

Re: Community Sharpening Journal, Part 2

#251

Post by JBoone »

Thanks scandi! Explained better than I could.

I am indeed on a fixed angle system and my only non guided work is on a strop or my cheap 1X30 harbor freight for convex edges on some of my blades.

Hats off to those who have freehand sharpening down! I have a hard enough time on my guided/fixed system.
Scandi Grind
Member
Posts: 1153
Joined: Wed Apr 06, 2022 6:37 pm

Re: Community Sharpening Journal, Part 2

#252

Post by Scandi Grind »

No problem. I always like to break things down into their simplest form, it makes it easier for me to internalize, and it has the added benefit of making it easier to explain too.
"A knifeless man is a lifeless man."

-- Old Norse proverb
Robert Ptacek
Member
Posts: 78
Joined: Sat Feb 23, 2008 7:47 am

Re: Community Sharpening Journal, Part 2

#253

Post by Robert Ptacek »

jmf552 wrote:
Tue Apr 15, 2025 10:11 am
I am a huge Spyderco fan, although I have not visited this forum for a long time. I'm not an expert on knives or sharpening, so I am hoping I can get some really basic advice. I have:

> An original Delica and Endura from the early '90's
> A Sharpmaker system with triangle rods from the rough "diamond" through to the ultra-fine - It has both 30 and 40 degree angles
> A two-sided strop board, with the little blocks of stuff you rub on each side
> A brand-new Persistence, which is one of their "value" knives
> Arriving today, I'm getting a 50x-1000x USB microscope. It displays the image through a smartphone or PC. It seemed like a cool toy and thought it might help me see what is going on with the edge better than a magnifying glass. A YouTube knife "expert" was using one to look at edges.

I thought I was keeping my Delica up to snuff with the Sharpmaker over the years. But when I got the new Persistence, there was no comparison. The newer, cheaper knife was way sharper. So I worked the Delica double through the coarse and fine rods again, following the instruction video. It got a little sharper, but not like the Persistence. The edge looks good under a magnifying glass, but I was feeling a tiny bit of roughness on the left side on the edge of the coarse rod. I kept at it, on both sides of course, but I don't seem to be making progress on it.

It's not just that knife that bothers me. It's more that despite following instructions, I'm not using the Sharpmaker system effectively, and I'd like to improve.

Any advice? Thanks.
It does sound like a burr.At the end of your sharpening take ultralight alternating strokes.The strokes should be so light that you can do them without holding the base of the Sharpmaker.The saber ground Endura/Delica have thicker edges which don't sharpen as quickly or deburr as quickly.
Guts
Member
Posts: 516
Joined: Wed Sep 07, 2022 8:53 am
Location: Pacific Northwest

Re: Community Sharpening Journal, Part 2

#254

Post by Guts »

Sharpened up a Minarai Petty in BD1N steel that was getting dull.
- Atoma 600-1200
- Stroppy Stuff 1um on leather

Image
:bug-red-white :bug-red :bug-white-red
jmf552
Member
Posts: 7
Joined: Wed Feb 25, 2015 2:22 pm

Re: Community Sharpening Journal, Part 2

#255

Post by jmf552 »

Robert Ptacek wrote:
Thu Apr 17, 2025 5:11 am
jmf552 wrote:
Tue Apr 15, 2025 10:11 am
I am a huge Spyderco fan, although I have not visited this forum for a long time. I'm not an expert on knives or sharpening, so I am hoping I can get some really basic advice. I have:

> An original Delica and Endura from the early '90's
> A Sharpmaker system with triangle rods from the rough "diamond" through to the ultra-fine - It has both 30 and 40 degree angles
> A two-sided strop board, with the little blocks of stuff you rub on each side
> A brand-new Persistence, which is one of their "value" knives
> Arriving today, I'm getting a 50x-1000x USB microscope. It displays the image through a smartphone or PC. It seemed like a cool toy and thought it might help me see what is going on with the edge better than a magnifying glass. A YouTube knife "expert" was using one to look at edges.

I thought I was keeping my Delica up to snuff with the Sharpmaker over the years. But when I got the new Persistence, there was no comparison. The newer, cheaper knife was way sharper. So I worked the Delica double through the coarse and fine rods again, following the instruction video. It got a little sharper, but not like the Persistence. The edge looks good under a magnifying glass, but I was feeling a tiny bit of roughness on the left side on the edge of the coarse rod. I kept at it, on both sides of course, but I don't seem to be making progress on it.

It's not just that knife that bothers me. It's more that despite following instructions, I'm not using the Sharpmaker system effectively, and I'd like to improve.

Any advice? Thanks.
It does sound like a burr.At the end of your sharpening take ultralight alternating strokes.The strokes should be so light that you can do them without holding the base of the Sharpmaker.The saber ground Endura/Delica have thicker edges which don't sharpen as quickly or deburr as quickly.
Thanks for this advice. I tried it and it made a noticeable difference. It did not reach the probably unreachable sharpness I had hoped for, but it definitely helped.
User avatar
Brock O Lee
Member
Posts: 4070
Joined: Thu Jul 21, 2011 3:34 am
Location: Victoria, Australia

Re: Community Sharpening Journal, Part 2

#256

Post by Brock O Lee »

jmf552 wrote:
Fri Apr 18, 2025 9:44 am
Robert Ptacek wrote:
Thu Apr 17, 2025 5:11 am
jmf552 wrote:
Tue Apr 15, 2025 10:11 am
I am a huge Spyderco fan, although I have not visited this forum for a long time. I'm not an expert on knives or sharpening, so I am hoping I can get some really basic advice. I have:

> An original Delica and Endura from the early '90's
> A Sharpmaker system with triangle rods from the rough "diamond" through to the ultra-fine - It has both 30 and 40 degree angles
> A two-sided strop board, with the little blocks of stuff you rub on each side
> A brand-new Persistence, which is one of their "value" knives
> Arriving today, I'm getting a 50x-1000x USB microscope. It displays the image through a smartphone or PC. It seemed like a cool toy and thought it might help me see what is going on with the edge better than a magnifying glass. A YouTube knife "expert" was using one to look at edges.

I thought I was keeping my Delica up to snuff with the Sharpmaker over the years. But when I got the new Persistence, there was no comparison. The newer, cheaper knife was way sharper. So I worked the Delica double through the coarse and fine rods again, following the instruction video. It got a little sharper, but not like the Persistence. The edge looks good under a magnifying glass, but I was feeling a tiny bit of roughness on the left side on the edge of the coarse rod. I kept at it, on both sides of course, but I don't seem to be making progress on it.

It's not just that knife that bothers me. It's more that despite following instructions, I'm not using the Sharpmaker system effectively, and I'd like to improve.

Any advice? Thanks.
It does sound like a burr.At the end of your sharpening take ultralight alternating strokes.The strokes should be so light that you can do them without holding the base of the Sharpmaker.The saber ground Endura/Delica have thicker edges which don't sharpen as quickly or deburr as quickly.
Thanks for this advice. I tried it and it made a noticeable difference. It did not reach the probably unreachable sharpness I had hoped for, but it definitely helped.
Hey JMF, have a look at the fascinating electron microscope photos in the links below... It helped me to understand the nature of a burr a little bit better, and that improved my approach to sharpening.
IMG_0946.jpeg
https://scienceofsharp.com/2015/01/13/w ... rr-part-2/

https://scienceofsharp.com/2015/10/30/b ... al-part-1/

https://scienceofsharp.com/2024/02/03/s ... ife-burrs/
Hans

Favourite Spydies: Military S90V, PM2 Cruwear, Siren LC200N, UKPK S110V, Endela Wharncliffe K390
Others: Victorinox Pioneer, CRK: L Sebenza, L Inkosi, Umnumzaan
User avatar
xceptnl
Member
Posts: 9000
Joined: Mon Feb 21, 2011 6:48 pm
Location: Tobacco Country, Virginia
Contact:

Re: Community Sharpening Journal, Part 2

#257

Post by xceptnl »

Brock O Lee wrote:
Fri Apr 18, 2025 5:34 pm
jmf552 wrote:
Fri Apr 18, 2025 9:44 am
Robert Ptacek wrote:
Thu Apr 17, 2025 5:11 am
jmf552 wrote:
Tue Apr 15, 2025 10:11 am
I am a huge Spyderco fan, although I have not visited this forum for a long time. I'm not an expert on knives or sharpening, so I am hoping I can get some really basic advice. I have:

> An original Delica and Endura from the early '90's
> A Sharpmaker system with triangle rods from the rough "diamond" through to the ultra-fine - It has both 30 and 40 degree angles
> A two-sided strop board, with the little blocks of stuff you rub on each side
> A brand-new Persistence, which is one of their "value" knives
> Arriving today, I'm getting a 50x-1000x USB microscope. It displays the image through a smartphone or PC. It seemed like a cool toy and thought it might help me see what is going on with the edge better than a magnifying glass. A YouTube knife "expert" was using one to look at edges.

I thought I was keeping my Delica up to snuff with the Sharpmaker over the years. But when I got the new Persistence, there was no comparison. The newer, cheaper knife was way sharper. So I worked the Delica double through the coarse and fine rods again, following the instruction video. It got a little sharper, but not like the Persistence. The edge looks good under a magnifying glass, but I was feeling a tiny bit of roughness on the left side on the edge of the coarse rod. I kept at it, on both sides of course, but I don't seem to be making progress on it.

It's not just that knife that bothers me. It's more that despite following instructions, I'm not using the Sharpmaker system effectively, and I'd like to improve.

Any advice? Thanks.
It does sound like a burr.At the end of your sharpening take ultralight alternating strokes.The strokes should be so light that you can do them without holding the base of the Sharpmaker.The saber ground Endura/Delica have thicker edges which don't sharpen as quickly or deburr as quickly.
Thanks for this advice. I tried it and it made a noticeable difference. It did not reach the probably unreachable sharpness I had hoped for, but it definitely helped.
Hey JMF, have a look at the fascinating electron microscope photos in the links below... It helped me to understand the nature of a burr a little bit better, and that improved my approach to sharpening.

IMG_0946.jpeg

https://scienceofsharp.com/2015/01/13/w ... rr-part-2/

https://scienceofsharp.com/2015/10/30/b ... al-part-1/

https://scienceofsharp.com/2024/02/03/s ... ife-burrs/
Excellent articles Hans, thank you for sharing. I like the detailed classification of burr types.
Image
sal wrote: .... even today, we design a knife from the edge out!
*Landon*
Mage7
Member
Posts: 504
Joined: Sun Nov 13, 2022 9:06 am

Re: Community Sharpening Journal, Part 2

#258

Post by Mage7 »

pinchyfisher wrote:
Mon Apr 14, 2025 6:41 pm
8th_Note wrote:
Mon Apr 14, 2025 9:46 am
Does anyone have any tips on freehanding a wharncliff blade? I can never seem to get them as sharp, especially on the last half inch or so of the blade, as I can with a more traditional drop point or leaf shaped blade. It seems like a wharny should be easier to sharpen, but that has not been my experience thus far. Thanks
I learned the hard way- but if you are struggling to apex the entire edge of a wharnie, it would be worth checking to see if the wharnie actually has some variation/curve (isn't completely flat) by holding the edge vertical against a perpendicular flat surface with light behind it to look for gaps. If there is variance, you can true up the edge by holding the blade vertical and making some passes on a stone- dulling the edge and truing it up for flatness as well.

Once this is done, sharpen as you normally would, and you shouldnt need to raise the blade/account for belly/etc.

Without verifying/truing up the edge, you can end up chasing dull areas of a wharnie for a long time. At least thats my experience- a few minutes of truing up the edge saves a lot of effort in the long run.

Hope this helps!
I've actually found pretty much all Wharncliffe blades to need an ever-so-slight rise/fall of the handle, as there really is no such thing as the blade being completely true, and even if it is, the likelihood the hone surface has low-spots which also cause issue, to the point that I have never had a Wharncliffe that I could just lie flat on the hone and actually make contact with the entire edge apex, or at least not even pressure across the whole length. They end up needing the slightest rising and lowering of the handle, very similar to what a straight-razor hone meisters refer to as a rolling X stroke. Of course, I am talking about the more minute levels of apex refinement when trying to get the apex hair-whittling keen; they're still plenty capable of getting just working-sharp without extra finesse.
User avatar
8th_Note
Member
Posts: 483
Joined: Mon Dec 16, 2024 7:56 am
Location: Southern Appalachian Foothills

Re: Community Sharpening Journal, Part 2

#259

Post by 8th_Note »

Mage7 wrote:
Fri Apr 18, 2025 8:20 pm
pinchyfisher wrote:
Mon Apr 14, 2025 6:41 pm
8th_Note wrote:
Mon Apr 14, 2025 9:46 am
Does anyone have any tips on freehanding a wharncliff blade? I can never seem to get them as sharp, especially on the last half inch or so of the blade, as I can with a more traditional drop point or leaf shaped blade. It seems like a wharny should be easier to sharpen, but that has not been my experience thus far. Thanks
I learned the hard way- but if you are struggling to apex the entire edge of a wharnie, it would be worth checking to see if the wharnie actually has some variation/curve (isn't completely flat) by holding the edge vertical against a perpendicular flat surface with light behind it to look for gaps. If there is variance, you can true up the edge by holding the blade vertical and making some passes on a stone- dulling the edge and truing it up for flatness as well.

Once this is done, sharpen as you normally would, and you shouldnt need to raise the blade/account for belly/etc.

Without verifying/truing up the edge, you can end up chasing dull areas of a wharnie for a long time. At least thats my experience- a few minutes of truing up the edge saves a lot of effort in the long run.

Hope this helps!
I've actually found pretty much all Wharncliffe blades to need an ever-so-slight rise/fall of the handle, as there really is no such thing as the blade being completely true, and even if it is, the likelihood the hone surface has low-spots which also cause issue, to the point that I have never had a Wharncliffe that I could just lie flat on the hone and actually make contact with the entire edge apex, or at least not even pressure across the whole length. They end up needing the slightest rising and lowering of the handle, very similar to what a straight-razor hone meisters refer to as a rolling X stroke. Of course, I am talking about the more minute levels of apex refinement when trying to get the apex hair-whittling keen; they're still plenty capable of getting just working-sharp without extra finesse.
Great advice. Thanks

I think hair-whittling is the goal of everyone that comes to this thread
S30V; S35VN; VG-10; BD1N; H1; SuperBlue/SUS410; 8Cr13MoV; Micro-Melt PD#1; REX-45; Cruwear; BD1; K390; Magnacut; HAP40/SUS410; 20CV; 15V; M4; SPY27; LC200N; S90V
ejames13
Member
Posts: 566
Joined: Tue Jan 19, 2016 2:25 pm
Location: Virginia, USA

Re: Community Sharpening Journal, Part 2

#260

Post by ejames13 »

Picked up a Cruwear Millie. Fresh 14dps semi-mirror edge. This steel just wants to get sharp.

Image
Post Reply