So, I have been trying different sharpening techniques on my cheap kitchen knives and have come to a strategy that I hope will start producing consistently good results.
My tests have been on cheap Cuisinart knives with nothing but my little double sided Work Sharp diamond stones, and I do all of it free hand.
The first technique that I developed over the course of my experimenting came about because these knives are so often subjected to abuse. I have no idea how "correct" this seems, but it was taking to long to repair edges just by doing normal strokes on my little stone, so I tried starting my sharpening process by using the same technique you would use for an axe or machete, small circular motions all the way along the blade edge. I saw a guy in Alaska do this to a kitchen knife on a documentary series called Life Below Zero. It seems to do the trick of getting the edge repaired quickly, then I follow up by doing strokes to get the edge consistent.
After doing the above, my goal in the past had been to try to get basically a hair shaving edge on these knives. I've only actually gotten the paring knife to that level though. Anyway, the results of this sharpening method only seemed to be working well on very few of the things that I cut in the kitchen. Cutting a watermelon with this edge seemed to work awful, even though I could tell it was in fact sharp, at least by my standard. Slicing cheese seemed to be working better.
Well, my Dad likes to use the butcher steel on these knives, but it always creates an overhanging irregular burr . I told him it was just pretty much messing up the edge, but he said it always cut well after he did it.
What I surmised from this is that two things must be helping the knife cut when my Dad uses the butcher steel, first of all it actually does create a thin edge because he always ends up pushing the edge over, essentially making a sharp burr, but because it is a burr, that edge won't last long. The other thing the butcher steel did was it created an irregular toothy edge. This led me to theorize that perhaps most things in the kitchen would cut better with a toothy edge.
To test my theory, I again got the edge on one the knives repaired using my coarse diamond stone, made sure it was sharp as I could get it, then I used a piece of 220 grit sand paper taped to some glass to finish the edge.
I tested this knife on a watermelon it worked great! I will be testing it with the other kitchen knives as well for more tasks. It seems to have very promising results. I also want to see what it might do on my EDC knives now.
Is my technique weird? I don't know. I am curious what techniques some people here use. What works for you on your kitchen knives?
Kitchen Knife Sharpening Experiment
-
Scandi Grind
- Member
- Posts: 443
- Joined: Wed Apr 06, 2022 6:37 pm
Kitchen Knife Sharpening Experiment
"A knifeless man is a lifeless man."
-- Old Norse proverb
-- Old Norse proverb
-
metaphoricalsimile
- Member
- Posts: 555
- Joined: Sun Jun 28, 2020 7:56 pm
Re: Kitchen Knife Sharpening Experiment
Calling all Vivis!
He's a kitchen worker and uses coarse edges and finds them to cut vegetation better and longer.
He's a kitchen worker and uses coarse edges and finds them to cut vegetation better and longer.
Re: Kitchen Knife Sharpening Experiment
Cheap production knives usually aren't heat treated all that well, making them relatively difficult to sharpen. They tend to like coarse toothy edges, as that is where your aggression comes from. They won't take an extremely keen edge, as they lack the edge stability to support it. I think your grit choice is fine, but I'll say that the circular motion can make it quite difficult to maintain a perfect angle. With that said, it does remove material quickly, as you are perpetually cutting perpendicularly (or close) to the previous scratch pattern. I'd recommend a coarse or extra coarse diamond plate or Waterstones, ending in featherlight alternating passes, constantly inspecting for a burr, and going straight to a 3 or 1 micron leather strop. Use light pressure on the strop as well. It will allow you to see if you left any burr. The size of your burr is directly proportional to the amount of scratchiness left on the leather after the pass. If it is heavily scratching up the leather, go back to the stone. If it is hardly scratching up the leather at all, simply do 3-5 passes per side (the less the better) and do a cut test.
Re: Kitchen Knife Sharpening Experiment
I admire you folks who spend time perfecting the edges on their kitchen knives. Since culinary is neither my job nor my hobby, I usually just fire up the Chef’s Choice, and 2-3 minutes later my knife is shaving sharp or better. I don’t use it on nice pocket knives because it introduces a recurve near the plunge line or choil. It uses slowly rotating abrasives, steels and strops, and does not heat the blade noticeably.
I don’t doubt that manual sharpening produces a better all-round edge, but man this is quick and easy, and sharp enough for our cooking.
I don’t doubt that manual sharpening produces a better all-round edge, but man this is quick and easy, and sharp enough for our cooking.
Re: Kitchen Knife Sharpening Experiment
I actually have one of those Chef's Choice sharpeners. It was a gift. If someone brings me butter knives to sharpen...................
Re: Kitchen Knife Sharpening Experiment
You should be able to repair the soft stainless edge of a Cuisinart knife on a diamond stone pretty quickly without doing circles.
Consider getting a Crystolon course and India fine.
Consider getting a Crystolon course and India fine.

Re: Kitchen Knife Sharpening Experiment
I bought a 15$ Santoku from the grocery store because I needed something to break in some new diamond stones on. I reprofiled it to 10DPS and have been easily maintaining with the Galley V and a leather strop with 1 micron diamond paste on it. Any time it gets dull, 5-10 strokes on the Galley V and the same on the strop. 2 minute maintenance at most.
-Matt a.k.a. Lo_Que, loadedquestions135 I ❤ The P'KAL 
"The world of edges has a small doorway in, but opens into a cavern that is both wide and deep." -sal
"The world of edges has a small doorway in, but opens into a cavern that is both wide and deep." -sal
"Ghost hunters scope the edge." -sal
-
Scandi Grind
- Member
- Posts: 443
- Joined: Wed Apr 06, 2022 6:37 pm
Re: Kitchen Knife Sharpening Experiment
You know, I really thought I shouldn't have to do circles myself, but after hours of plain strokes over several frequent re-sharpenings, I gave circles a shot and it has saved me huge amounts of time. I'm not sure if I wore out the sharpening plate (not stones like I previously said), but it is only a couple years old I think, although I probably pressed much too hard on it when I was first learning to use it. I also think that it might build up filings really fast because it has magnets behind the sharpening plates, and I am not sure if that contributes.
I am thinking I want to get a cheap Norton stone or something since my current set-up is really not ideally sized for kitchen knives anyway, it is just what I happened to have.
"A knifeless man is a lifeless man."
-- Old Norse proverb
-- Old Norse proverb
Re: Kitchen Knife Sharpening Experiment
Different tools will not overcome technique.
I suggested the Nortons because they are less aggressive and in my experience get along better with soft stainless than diamonds. But again, they aren't a replacement for proper technique.
You shouldn't have to do circles. Period. If you've spent "hours of plain strokes" but somehow overcome that issue with circles, it's a core technique problem.
How are you with sharpening something that isn't a Cuisinart knife?
Re: Kitchen Knife Sharpening Experiment
My recent experience with sharpening a set of pretty cheap but okay kitchen knives was a bit of an eye opener. It was amazing how quickly they built a burr, almost instantly, in fact. I didn’t think they would respond well to too much of a back and forth with the burr, so; I just built the burr, removed it, stropped them, and left it at that. I did notice a number of small chips but left those alone. It didn’t seem to me that they were causing much of a problem. They got sharp enough to do the job, certainly much better than they had been. That’s good enough for what they are.
Re: Kitchen Knife Sharpening Experiment
I'm a pro chef and use the same sharpening approach on the two 10" chef knives I keep in my knife roll.vivi wrote: ↑Tue Jul 05, 2022 9:48 amhttps://www.harborfreight.com/4-sided-d ... 92867.html
If I'm just sharpening a knife, I'll use the 300 grit side. I stop once the edge cleanly shaves, and I can run my nail down the length of the edge and feel it catch. I avoid edges that feel smooth when I do the fingernail test.
If I'm reprofiling the edge to a thinner angle, I reset the edge on the 200 grit side, then polish up on the 300 grit side.
These edges are more coarse than what most people run. I prefer them for a few reasons:
- They cut about 4x longer than high polish edges based on my testing. Evidence.
- They are faster to apply - less steps required
- They are cheaper to apply - a single $12 stone is all I use
- The edges are superior slicers vs polished edges, and don't snag like serrated edges can.

This stone can reset the edge of a chef knife in under ten minutes. They grind fast.
Cutting the volume I do the increased edge retention is very noticeable. I can slice over 100lbs of tomatos and the edge will still bite into the skin with every cut. More polished edges would need touched up to avoid slipping around after that many.
Polished edges are still better for some kitchen uses, like mincing garlic and herbs, but most food prep tasks are easier to do with a coarse edge IMO. Any kind of meat slicing, cutting breads etc. they really shine.
-
Scandi Grind
- Member
- Posts: 443
- Joined: Wed Apr 06, 2022 6:37 pm
Re: Kitchen Knife Sharpening Experiment
My pocket knives are all hair shaving sharp. My fixed blades are also hair shaving sharp, minus my Mora which is only hair shaving on some parts of the blade, it sees some abuse. I have never used circles on any of these blades and the time to sharpen them is about what I expected. My fixed blades are all high carbon, mostly 1095, and my pocket knives are mostly cheap Chinese stainless and my Swiss Army knife is whatever that stuff is.Eli Chaps wrote: ↑Wed Jul 06, 2022 8:51 pmDifferent tools will not overcome technique.
I suggested the Nortons because they are less aggressive and in my experience get along better with soft stainless than diamonds. But again, they aren't a replacement for proper technique.
You shouldn't have to do circles. Period. If you've spent "hours of plain strokes" but somehow overcome that issue with circles, it's a core technique problem.
How are you with sharpening something that isn't a Cuisinart knife?
None of the above knives have seen nearly the amount of abuse as these kitchen knives do though, frequently used on glass cutting boards, and when I started sharpening the kitchen knives they hadn't been sharpened in probably 7 years or so.
It could be that my technique isn't as good as I think, but I do light strokes trying to keep it at a consistent angle. I'm practicing a lot to try to get better. Maybe I don't lean the edge into the stone enough to remove the burr that I usually find on it, but I haven't noticed any evidence that I am steepening the angle of the bevel, so I hadn't thought that was it. I should probably bust out the sharpie and see if it tells me anything. Could be a lack of angle consistency.
I'm not sure if it contributes, but my sharpener is only a 4 by 1 inches, which I find a little challenging to fit a 7 in. chef knife on, and that's why I want something bigger soon.
"A knifeless man is a lifeless man."
-- Old Norse proverb
-- Old Norse proverb
-
Scandi Grind
- Member
- Posts: 443
- Joined: Wed Apr 06, 2022 6:37 pm
Re: Kitchen Knife Sharpening Experiment
Vivi,
I read your "Falling out of love with serrations" thread and was very interested in how your sharpening method seems to be working out for you. I am definitely going to be experimenting much more with course edges!
I have nothing I can claim against the performance of serrations, but I don't like the look, so I am very excited to see a sharpening strategy that might provide some of the advantages usually associated to a SE.
"A knifeless man is a lifeless man."
-- Old Norse proverb
-- Old Norse proverb
Re: Kitchen Knife Sharpening Experiment
My post is probably gonna be insignificant for this thread (or this forum), but I maintain the edges on my kitchen knives, which are all Victorinox, with the 15-degree setting on my Sharpmaker. It literally takes me no more than 20 to 30 seconds, using the smallest amount of pressure on the rods (sometimes the grey rods, and sometimes only the white rods). Then I strop off any possible wire edge using the cardboard back of a notepad. This creates very sharp edges that last me a good while. I do all my own cooking.
Jim
Jim

Re: Kitchen Knife Sharpening Experiment
Hey Scandi, I’ve found sharpness is in the eye of the beholder. Ah, hahaha!Scandi Grind wrote: ↑Wed Jul 06, 2022 11:57 amSo, I have been trying different sharpening techniques on my cheap kitchen knives and have come to a strategy that I hope will start producing consistently good results.
With cheap stainless knives you’ll likely find the more you refine the edge the less they’ll cut.
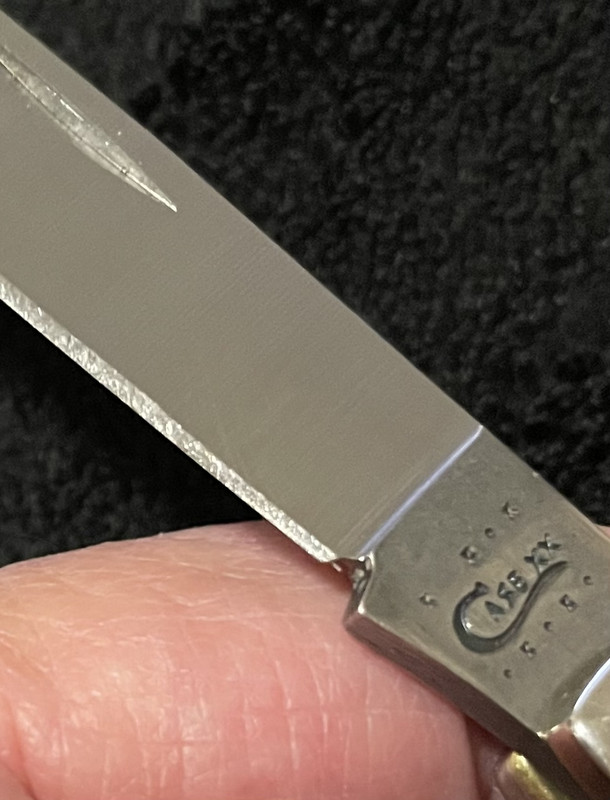
Here’s an old Surgical Stainless steel Case Slimline that’s got to be way better than Non Surgical Stainless. Ah, hahaha, ah, hahaha, ah, hahaha!
Sharpened to a “fine” edge even say to 1200grit SiC it’ll clean shave, push cut phonebook paper etc. but cut things like crusty bread or rope like a sharp Paddle Pop stick and the edge lasts a minute and a half.
Sharpened straight off SharpMaker diamond rods and very lightly stropped off chrome oxide on stiff leather, it’s a different animal all together. It’ll barely shave, won’t push cut anything but zings through rope, crusty bread, bites tomato skin and slices cleanly, same with phone book paper, raw meat and cooked steak and does it for a reasonable time.
Hard to get a pic of entire blade without reflection but an idea of what I consider the ideal edge on a run of the mill Stainless blade. It’s the same edge I put on PE H1.
A day without laughter is a day wasted. ~ Charlie Chaplin