Police 4 K390 SE Testing Log

Discuss Spyderco's products and history.
User avatar
Evil D
Member
Posts: 27147
Joined: Sat Jun 26, 2010 9:48 pm
Location: Northern KY

Re: Police 4 K390 SE Testing Log

#41

Post by Evil D »

These pics were from the first day I got it but I forgot to post them, first things I cut actually. Second thing I cut was my left thumb but I'll spare you all from that pic :winking-tongue


It does food prep decently, not as good as my Caribbean but the edge on that knife is much thinner. Even despite how short these serrations are they still tend to walk a bit through the cut but I managed to slice these up for sandwiches just fine.

Image
Image
Image
Image


The cutting edge is just a bit short for these larger veggies, the choil wanted to drag a lot especially on the tomato. It did start to patina almost immediately but not nearly as dark for bold as I expected, nothing like 52100 which started to rainbow on the first cut. Next time we cook something with some red meat I'll try to cut some up and see how it goes. I may eventually force a patina but for now I like to see how it develops naturally and how corrosion resistant it really is, and a forced patina would skew those results.

Image
Image
All SE all the time since 2017
~David
User avatar
sal
Member
Posts: 17058
Joined: Fri Sep 24, 2004 12:00 pm
Location: Golden, Colorado USA

Re: Police 4 K390 SE Testing Log

#42

Post by sal »

Thanx David.

I'm going through the same process myself.

sal
Joshua J.
Member
Posts: 1090
Joined: Sat Mar 04, 2006 11:37 pm
Location: Central Alberta, Canada.

Re: Police 4 K390 SE Testing Log

#43

Post by Joshua J. »

Evil D wrote:
Sat Oct 02, 2021 5:24 pm
Joshua J. wrote:
Sat Oct 02, 2021 4:56 pm

If you only sharpen the serrations on the backside with a Benchstone the original grind pattern of the serrations would be kept for the entire life of the knife.

In my opinion the only correct way to sharpen serrations is with a Benchstone and then just de-bur with a rod, you always keep the original factory scallops.


I would think even the deburring process would alter those micro serrations or even remove them. Doing this will eventually shorten the height of the serrations and thicken the edge over time, not to mention move the edge off center of the blade. I have tried honing the flat side of my Stretch this way with somewhat successful results aside from making that side of the blade pretty ugly.
You've actually got it backwards, grinding in the scallops reduces the edge to spine width and increases thickness behind the edge, you've accounted for this by cutting height off the scallops, but that significantly shortens the life of the factory grind.
Grinding flat with a benchstone on the back side of a serrated blade reduces thickness behind the edge at the same time as restoring the shape of the factory scallops.
Yes it's incredibly ugly, but looks don't cut.
User avatar
Cl1ff
Member
Posts: 1129
Joined: Fri Sep 13, 2019 4:35 pm
Location: Florida

Re: Police 4 K390 SE Testing Log

#44

Post by Cl1ff »

Joshua J. wrote:
Tue Oct 05, 2021 4:09 am
Evil D wrote:
Sat Oct 02, 2021 5:24 pm
Joshua J. wrote:
Sat Oct 02, 2021 4:56 pm

If you only sharpen the serrations on the backside with a Benchstone the original grind pattern of the serrations would be kept for the entire life of the knife.

In my opinion the only correct way to sharpen serrations is with a Benchstone and then just de-bur with a rod, you always keep the original factory scallops.


I would think even the deburring process would alter those micro serrations or even remove them. Doing this will eventually shorten the height of the serrations and thicken the edge over time, not to mention move the edge off center of the blade. I have tried honing the flat side of my Stretch this way with somewhat successful results aside from making that side of the blade pretty ugly.
You've actually got it backwards, grinding in the scallops reduces the edge to spine width and increases thickness behind the edge, you've accounted for this by cutting height off the scallops, but that significantly shortens the life of the factory grind.
Grinding flat with a benchstone on the back side of a serrated blade reduces thickness behind the edge at the same time as restoring the shape of the factory scallops.
Yes it's incredibly ugly, but looks don't cut.
Each of your statements are both partially correct.
Your method does indeed maintain the thickness behind the edge as you said. However, as Evil D mentioned, it will also result in eventual loss of the serrations and move the edge off center.

Evil D’s method will slightly increase the thickness behind the edge each sharpening session, but it will maintain the scallops and is better for reprofiling.

Both methods are essentially looking for ways to make sharpening serrations faster and each come with trade offs (some bigger than others).

The only way to keep the original thickness behind the edge and maintain a scalloped serrated edge for the entire life of a knife is to to do both. It’s pretty much the same as sharpening a chisel. However this will still result in pushing the edge off center.

In my opinion, either of your methods work just fine because the amount of sharpening sessions required to encounter these problems is many, but unless you do both like I just said, only Evil D’s knife will stay a serrated knife in the long run. It’ll just have a thick edge. Evil D’s thick edge would also be fixable by going back and taking material off of the flat side with a bench stone while Joshua’s now plain edge would have to be re-scalloped by one of Spyderco’s grinding wheels or caught before the scallops are totally gone so you can grind them back to original height with rods.

Considering this was all brought up as a way to try keeping these factory micro-serrations on this Police, Evil D is ultimately correct, regardless of the proper way to sharpen a Spyderedge, in that the method you mentioned would still remove them courtesy of the scallops’ deburring process.

It’s way too messy trying to convey this all with words and no graphics lol :grin-sweat

https://youtu.be/y_OG5v28l7A
rex121 is the king of steel, but nature’s teeth have been cutting for hundreds of millions of years and counting :cool:
kerrcobra
Member
Posts: 689
Joined: Tue Apr 17, 2018 11:46 am
Location: Atlanta, Ga

Re: Police 4 K390 SE Testing Log

#45

Post by kerrcobra »

Cl1ff wrote:
Tue Oct 05, 2021 6:28 am
Joshua J. wrote:
Tue Oct 05, 2021 4:09 am
Evil D wrote:
Sat Oct 02, 2021 5:24 pm
Joshua J. wrote:
Sat Oct 02, 2021 4:56 pm

If you only sharpen the serrations on the backside with a Benchstone the original grind pattern of the serrations would be kept for the entire life of the knife.

In my opinion the only correct way to sharpen serrations is with a Benchstone and then just de-bur with a rod, you always keep the original factory scallops.


I would think even the deburring process would alter those micro serrations or even remove them. Doing this will eventually shorten the height of the serrations and thicken the edge over time, not to mention move the edge off center of the blade. I have tried honing the flat side of my Stretch this way with somewhat successful results aside from making that side of the blade pretty ugly.
You've actually got it backwards, grinding in the scallops reduces the edge to spine width and increases thickness behind the edge, you've accounted for this by cutting height off the scallops, but that significantly shortens the life of the factory grind.
Grinding flat with a benchstone on the back side of a serrated blade reduces thickness behind the edge at the same time as restoring the shape of the factory scallops.
Yes it's incredibly ugly, but looks don't cut.
Each of your statements are both partially correct.
Your method does indeed maintain the thickness behind the edge as you said. However, as Evil D mentioned, it will also result in eventual loss of the serrations and move the edge off center.

Evil D’s method will slightly increase the thickness behind the edge each sharpening session, but it will maintain the scallops and is better for reprofiling.

Both methods are essentially looking for ways to make sharpening serrations faster and each come with trade offs (some bigger than others).

The only way to keep the original thickness behind the edge and maintain a scalloped serrated edge for the entire life of a knife is to to do both. It’s pretty much the same as sharpening a chisel. However this will still result in pushing the edge off center.

In my opinion, either of your methods work just fine because the amount of sharpening sessions required to encounter these problems is many, but unless you do both like I just said, only Evil D’s knife will stay a serrated knife in the long run. It’ll just have a thick edge. Evil D’s thick edge would also be fixable by going back and taking material off of the flat side with a bench stone while Joshua’s now plain edge would have to be re-scalloped by one of Spyderco’s grinding wheels or caught before the scallops are totally gone so you can grind them back to original height with rods.

Considering this was all brought up as a way to try keeping these factory micro-serrations on this Police, Evil D is ultimately correct, regardless of the proper way to sharpen a Spyderedge, in that the method you mentioned would still remove them courtesy of the scallops’ deburring process.

It’s way too messy trying to convey this all with words and no graphics lol :grin-sweat

https://youtu.be/y_OG5v28l7A
I think you explained it just fine, Cl1ff. Exactly what I was thinking in my mind too.
--Jeremy
User avatar
Evil D
Member
Posts: 27147
Joined: Sat Jun 26, 2010 9:48 pm
Location: Northern KY

Re: Police 4 K390 SE Testing Log

#46

Post by Evil D »

That'll also only work on a full flat grind, otherwise you'll be grinding the back at a much steeper angle and then you'll really grind your serrations off.
All SE all the time since 2017
~David
User avatar
JacksonKnives
Member
Posts: 837
Joined: Thu Jan 10, 2008 8:28 pm
Location: Alberta, Canada
Contact:

Re: Police 4 K390 SE Testing Log

#47

Post by JacksonKnives »

Cl1ff wrote:
Tue Oct 05, 2021 6:28 am

...
In my opinion, either of your methods work just fine because the amount of sharpening sessions required to encounter these problems is many, but unless you do both like I just said, only Evil D’s knife will stay a serrated knife in the long run.
...
This is a helpful answer to a question nobody was (directly) asking.

The initial question was "will cutting performance change when the factory grinding finish is removed by sharpening?" and Joshua's response was "it wouldn't if you only hone down the saber grind on the back, leaving the grind on the scallops alone."

If your goals change, your methods will must follow.
—Daniel Jackson
User avatar
Evil D
Member
Posts: 27147
Joined: Sat Jun 26, 2010 9:48 pm
Location: Northern KY

Re: Police 4 K390 SE Testing Log

#48

Post by Evil D »

Oohhhhhkaaaay and away we go..


Started the day out with a small box..

Image

Then did some yard work and cut a little nylon rope. No big deal.

Image

Pretty cool funnel web while mowing. Not sure we have actual "funnel web spiders" here. I mowed over him :rofl

Image

Then went around the yard trimming various stuff.

Image

Not sure what this tree is, some kind of oak I think? It's really hard even green.

Image
Image
Image

It really struggled to make some of these cuts. A lot of these had to be made in "carving cuts".

Image
Image
Image

It seems like these short height serrations tend to steer through cuts a lot more than the tall ones. Most of the time it would want to scoop out when trying to make a single cut through bigger branches.

Image

Other times I'd get the angle just right and it would swipe right through in a clean slice.

Image
Image

This is one of about 5 piles I made.

Image

Lots more to come...
All SE all the time since 2017
~David
User avatar
Evil D
Member
Posts: 27147
Joined: Sat Jun 26, 2010 9:48 pm
Location: Northern KY

Re: Police 4 K390 SE Testing Log

#49

Post by Evil D »

Next up I found some old dead branches, I figured I'd do some carving.

Image

I like the ones with a lot of smaller branches because they're a lot harder to carve.

Image
Image
Image
Image
Image


Oh dang....out of Coke Zero...what to do with this can...? :thinking

Image

You already know..

Image
Image


And with that we have our first edge damage..

Image
Image

Seems that the thicker base of the aluminum can was a bit too much. There's a spot where the edge just fractured off inside the first large scallop. I wasn't sure if it rolled or chipped but I can't feel an edge on either side the blade and looking at it under a loupe it's jagged and clearly broken out.


More to come..
All SE all the time since 2017
~David
User avatar
Evil D
Member
Posts: 27147
Joined: Sat Jun 26, 2010 9:48 pm
Location: Northern KY

Re: Police 4 K390 SE Testing Log

#50

Post by Evil D »

Well now that the edge was chipped, I figured I may as well put on my stupid pants and have at it.


Same tire I cut up in the Caribbean torture test, again cutting out the side wall.

(this pic shows the sidewall I had already cut out before...I flipped it over and did the other side)
Image
Image
Image
Image


Oh lookie, a piece of water hose under the back porch, not sure why that's even there so lets cut it up.

Image

That hose was hard and old but still soft enough that "carving it" was a little too floppy so I got out a little cutting board to work on.

Image
Image
All SE all the time since 2017
~David
User avatar
kobold
Member
Posts: 1821
Joined: Mon Aug 24, 2020 12:38 am
Location: The Swamp

Re: Police 4 K390 SE Testing Log

#51

Post by kobold »

I expected more resilience. Hopefully this is just the factory overheated edge.
Military/PM2/P3 Native Chief/Native GB2 DF2 PITS Chaparral Tasman Salt 2 SE Caribbean Sheepfoot SE SpydieChef Swayback Manix2 Sage 1 SSS Stretch 2 XL G10
User avatar
Evil D
Member
Posts: 27147
Joined: Sat Jun 26, 2010 9:48 pm
Location: Northern KY

Re: Police 4 K390 SE Testing Log

#52

Post by Evil D »

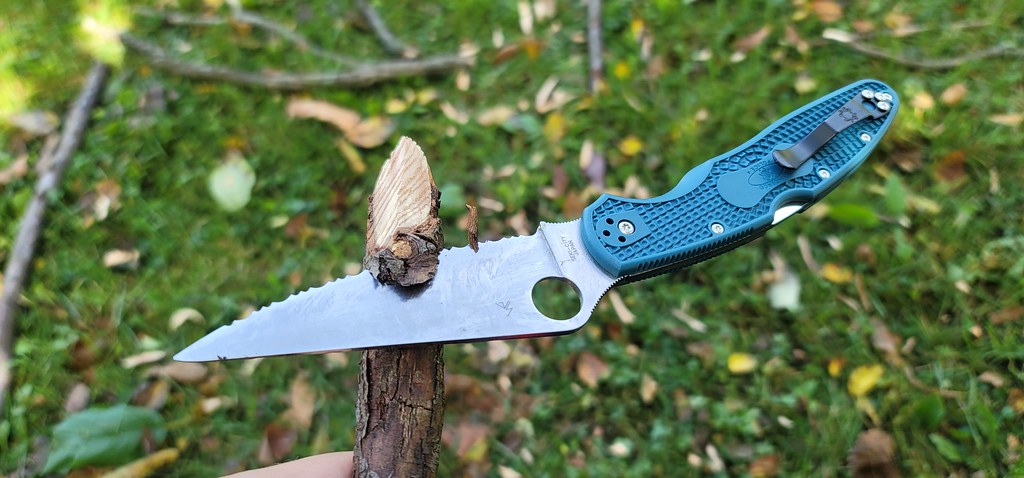
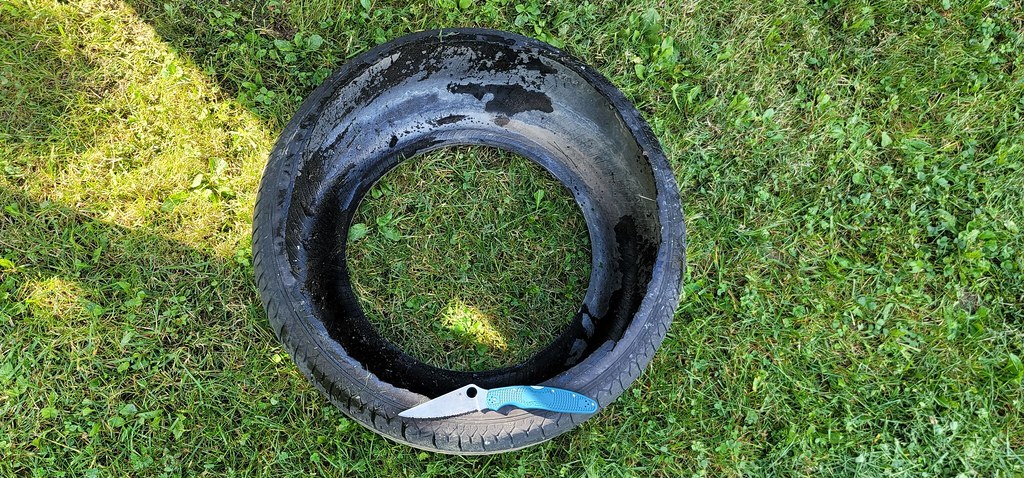
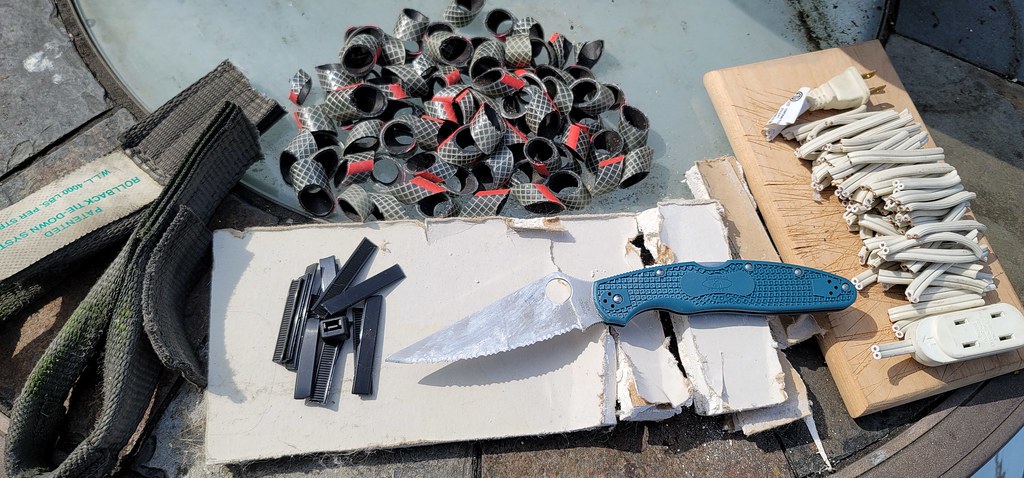
I had to go back and look at the Caribbean thread and try to round up the same stuff I cut with it.


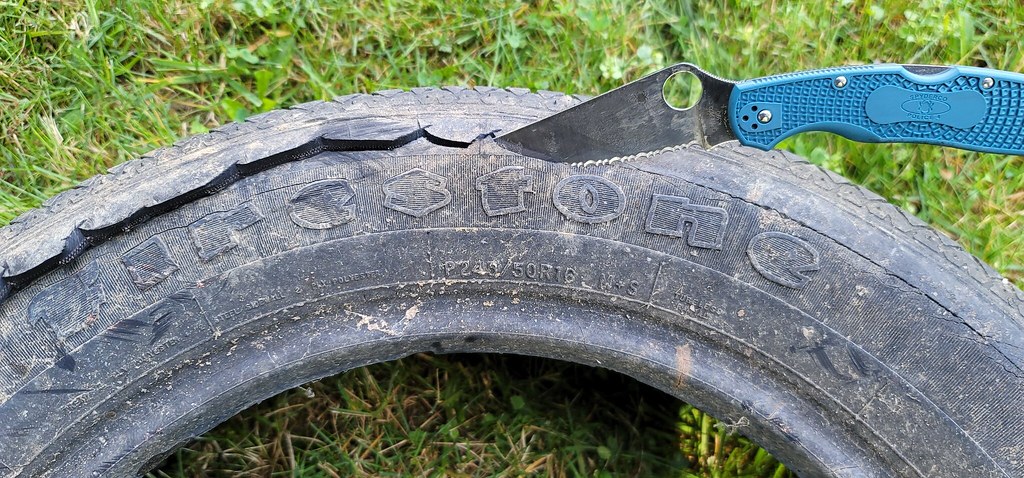
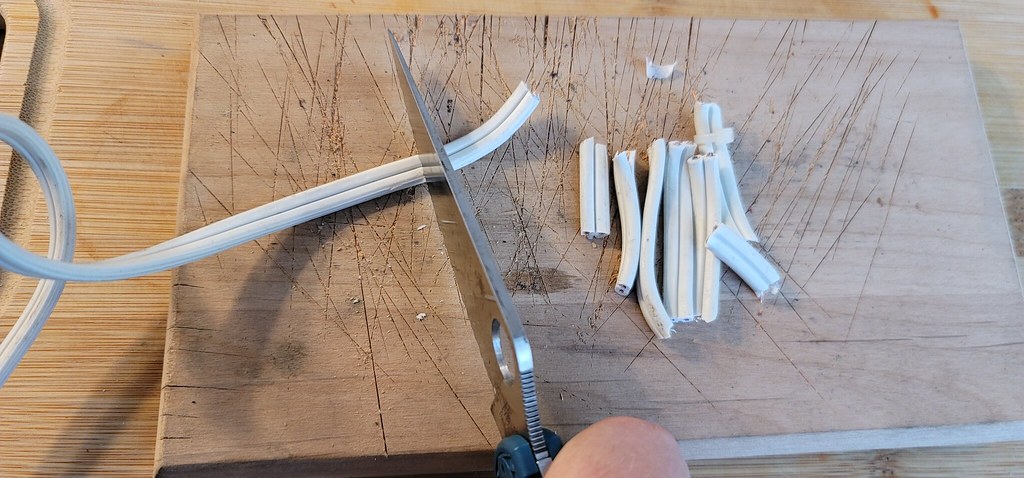
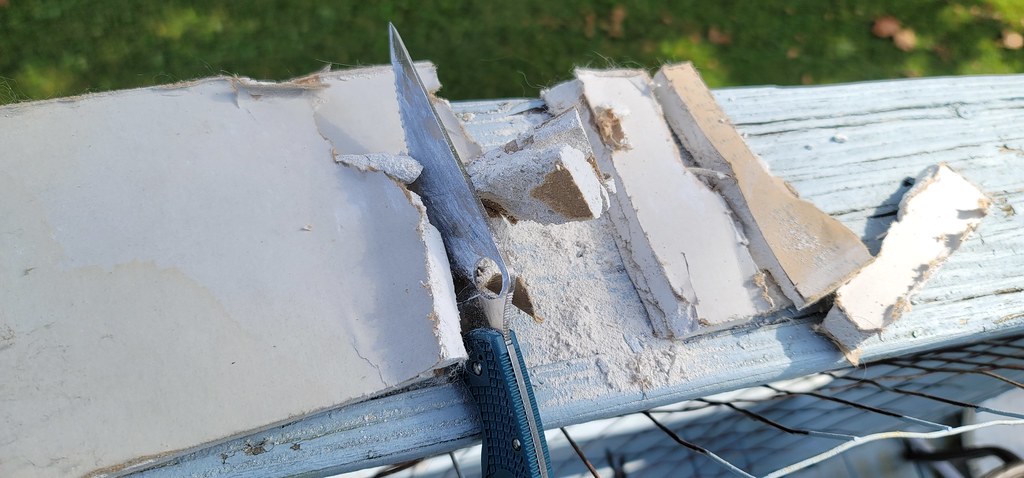
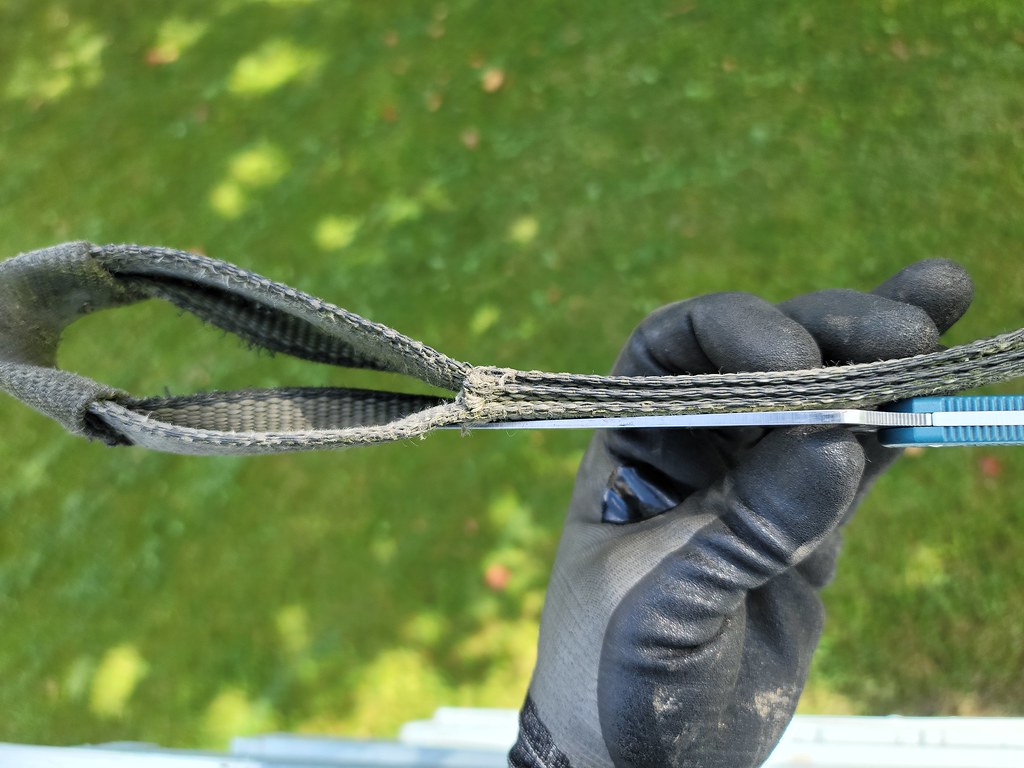
Here's some old tow strap. This stuff is really tough to cut. I must say, this Police doesn't slice it quite as well as the Caribbean did, but keep in mind 
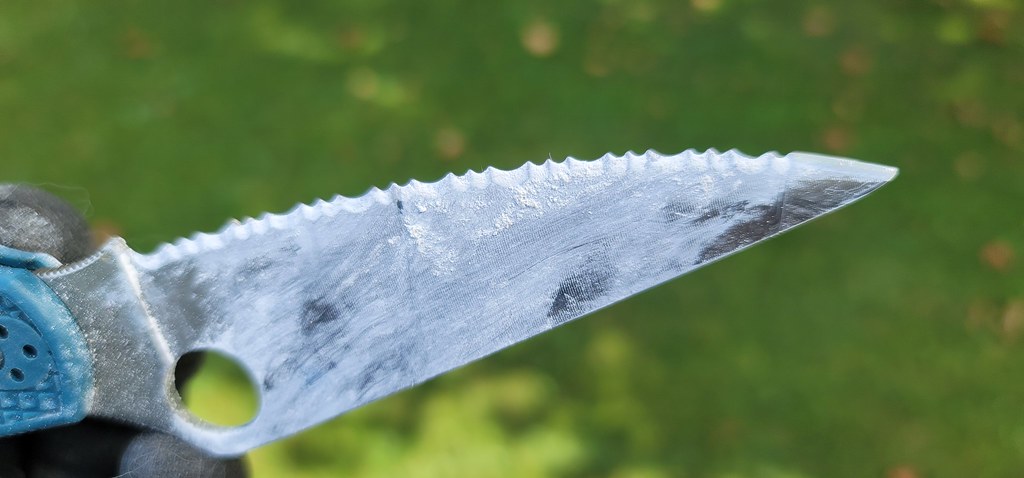
this has all been done with the factory edge and has NOT been sharpened or touched up since I received it. Also the Caribbean had already been reprofiled a bit by the time I started doing the torture test, and some of the cutting effort and even edge damage may be due to the factory edge.

Image

I could make it in one fold/pull cut but it took a lot of effort.

Image

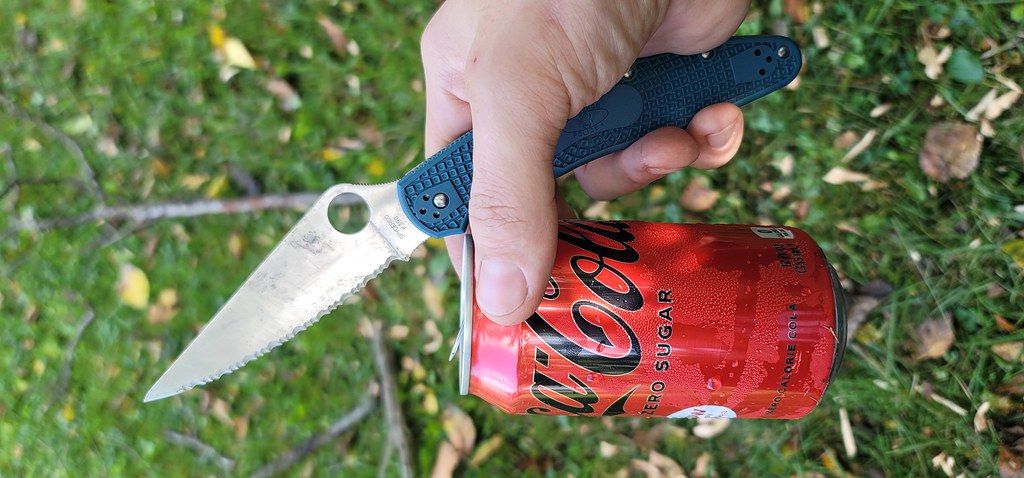
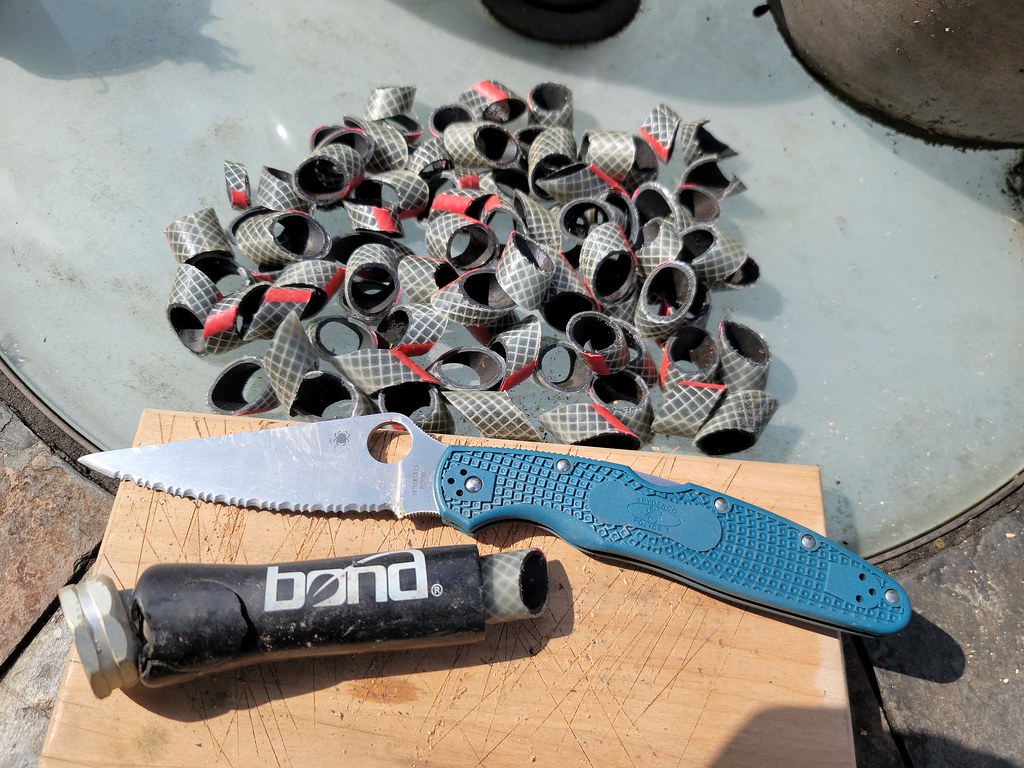
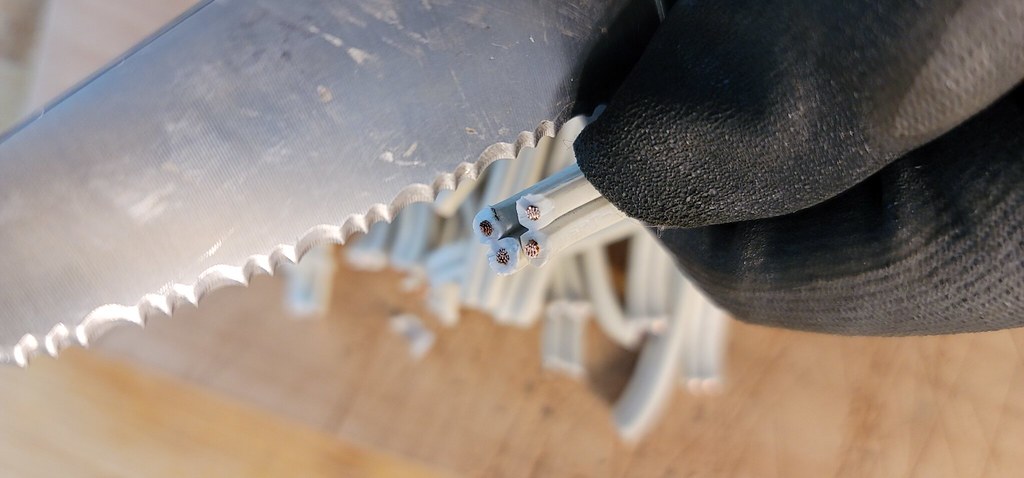
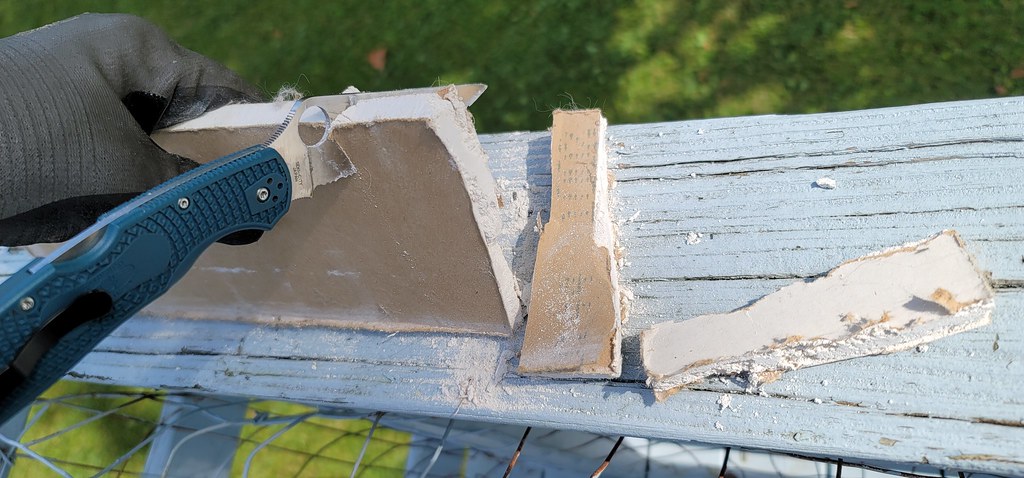
Even though that was hard to cut, I tried to cut a "dog bone" which is a few layers of that strap sewn together and almost glued or something, they're really stiff and crazy strong.

Image
Image

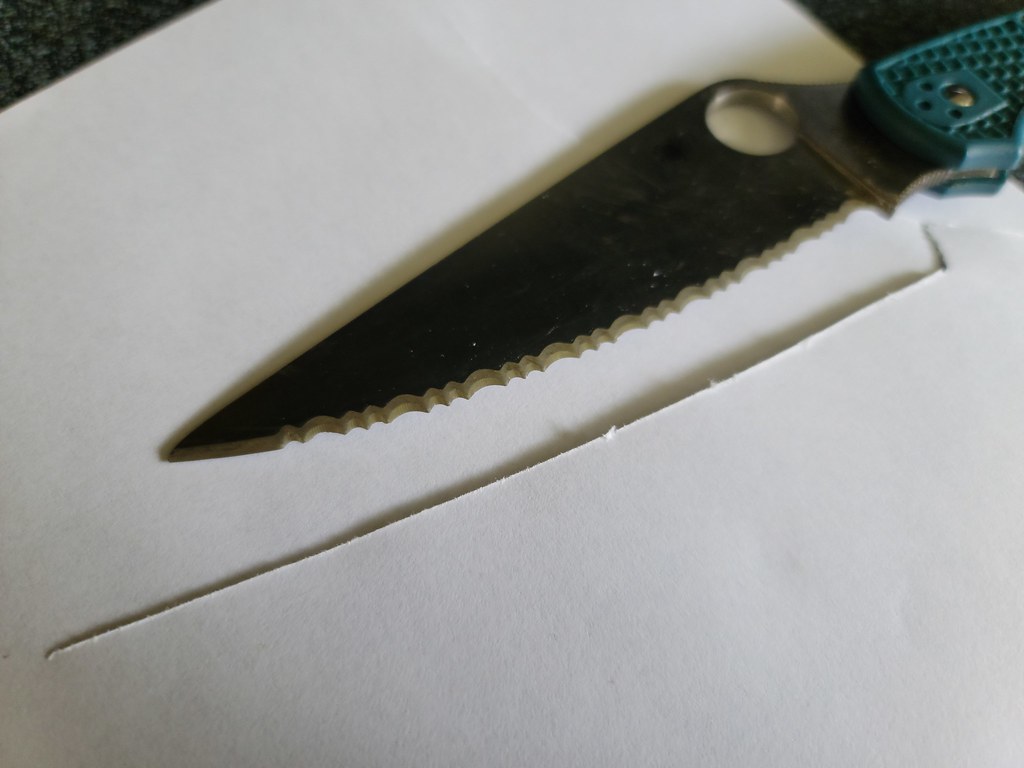
I gave it my best effort but was only able to cut through about half of that in one pull swipe, but it sawed through the rest of the way pretty easily.

Image

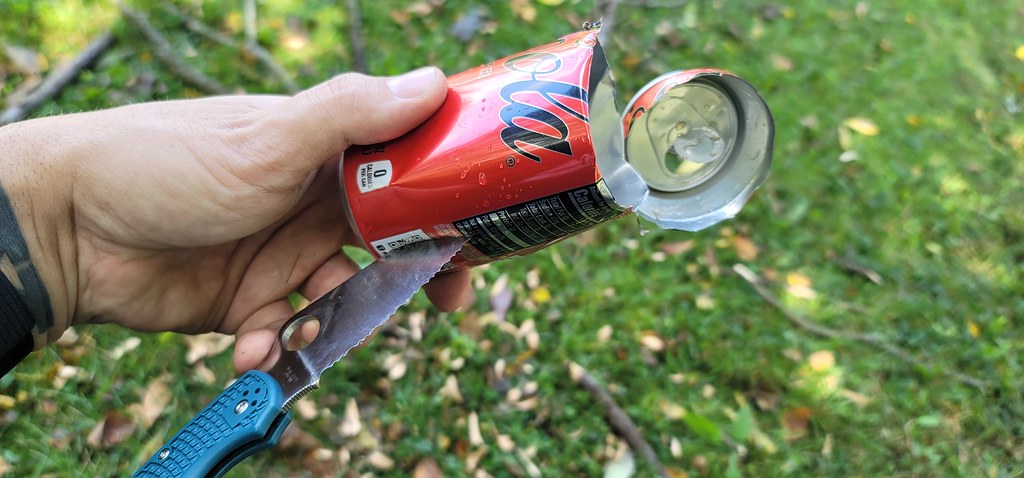
At this point I realized that with the Caribbean I was testing sharpness after each cut test and touching it up as needed, and I noticed it took a lot of strength to cut that strap so I got out some printer paper, and as you might guess it really isn't very sharp. It wouldn't push cut the paper practically at all unless I locked into a single serration that was still sharp. It made more of an "edge geometry rip".

Image


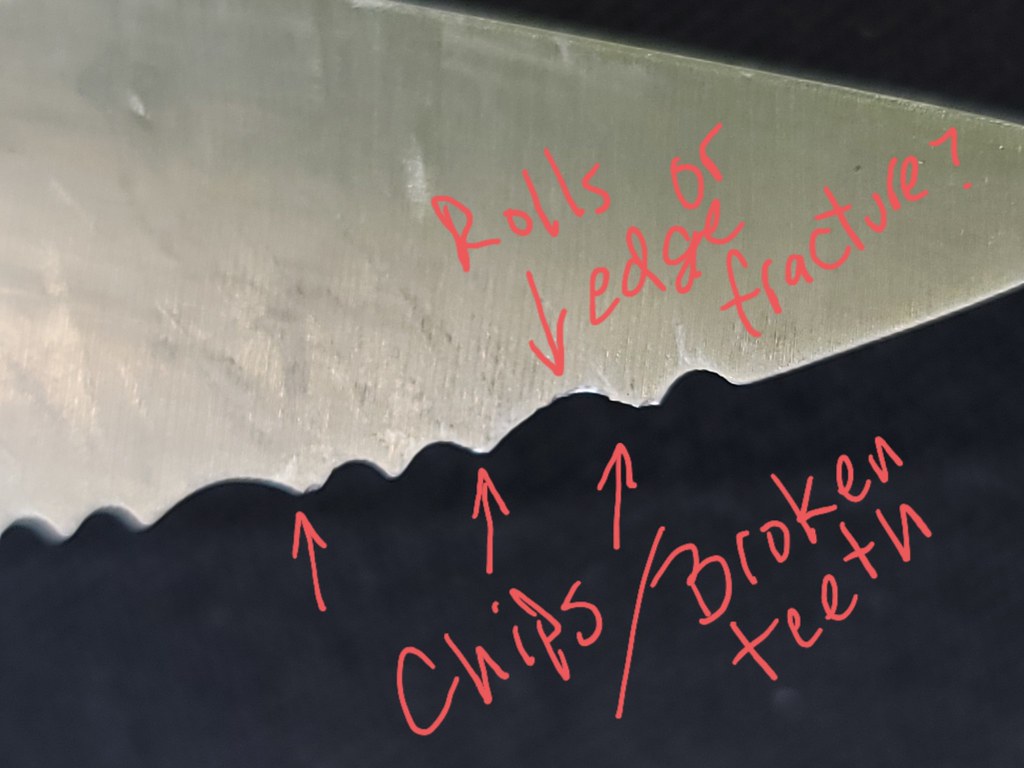
So, at this point in my book this knife is dull. Actually a few cut tests prior to this I would have touched up the edge, but I know there are some of you out there that like to see just how far an edge will go, and I guess if I just keep touching it up we're only learning about toughness and not much about edge retention so I kept forging onward without fixing the edge.
All SE all the time since 2017
~David
User avatar
Evil D
Member
Posts: 27147
Joined: Sat Jun 26, 2010 9:48 pm
Location: Northern KY

Re: Police 4 K390 SE Testing Log

#53

Post by Evil D »

Alright so getting back to the same materials I did with the Caribbean, we have a fat zip tie, folded over the edge and cut in the shortest sections I could manage.

Image
Image

In the last test I found an old shop light power cord but I didn't have any junk out in the garage so this old extension cord that probably should be replaced anyway is up next. It was at least 20 feet.

Image

I tried to make cutting board style cuts but the wire inside wanted to fray too much.

Image

So it's back to the ol' fold 'n pull method, and I tried to move around on the edge and not just work at the heel of the blade.

Image

Really starting to notice it hand up in some spots..

Image
Image

After 20 or whatever feet of that cord I started noticing my first blister. I can't really tell what part of the handle caused it, I had gripped it on and off the choil, but I suspect it was either the point of the choil or what would be the first finger groove point that's just behind your index finger when you grip behind the choil if that makes sense..it's not exactly a sharp point, but the blister is right in that spot on the handle.

Image
Image

Anyway, no pain no gain onward and finished the cord.

Image

Can't lie, that really sucked.
All SE all the time since 2017
~David
User avatar
Evil D
Member
Posts: 27147
Joined: Sat Jun 26, 2010 9:48 pm
Location: Northern KY

Re: Police 4 K390 SE Testing Log

#54

Post by Evil D »

I said it before and I'll say it again, whoever is doing drywall professionally and actually chooses to use a pocket knife, you're crazy. Absolutely no way I'd go with a folder for this when there are perfectly designed saws for it, but here we are.

And, I'm not sure how much this matters but this is "vintage drywall", thicker and probably way better quality than the crap we find in hardware stores today.

Image
Image

This is also a stupid example of blade geometry. When you're cutting a box for example, if you cut with your blade at 90 degrees to the sheet of cardboard you can feel that there's a lot of resistance, but if you angle the blade at 45 or so it allows the board to separate around the sides of the blade. This stuff does no such separating, it's too rigid and you really have to smash the crap out of the blade to get it to cut through. Even very aggressive sawing action doesn't really make it easier, and eventually it just broke under my weight.

Image
Image
Image
Image


More to come..
All SE all the time since 2017
~David
User avatar
Wartstein
Member
Posts: 15218
Joined: Mon Jul 02, 2018 10:06 am
Location: Salzburg, Austria, Europe

Re: Police 4 K390 SE Testing Log

#55

Post by Wartstein »

Thanks for this thread and the effort and passion you put into it, David!

Really curious how hard and time consuming repairing that edge will turn out to be!
And, as soon as the Police does not have the factory edge at all after some sharpenings: How it will compare then to the LC200N of your Caribbean SE when it comes to toughness.

K390 in SE is really cool stuff.
Still: My totally uneducated gut feeling somehow tells me, that for the average knife guy end user (like me) LC or VG10 probably are the better choice in a serrated knife. Edge retention especially in my VG10 Endela SE is really good already, probably the teeth are tougher than with K390 (?) and first and foremost: I am not worried if some edge damage needs to be fixed, but I think with K390 I would...
Top three going by pocket-time (update March 24):
- EDC: Endura thin red line ffg combo edge (VG10); Wayne Goddard PE (4V), Endela SE (VG10)
-Mountains/outdoors: Pac.Salt 1 SE (H1), Salt 2 SE (LC200N), and also Wayne Goddard PE (4V)
User avatar
Evil D
Member
Posts: 27147
Joined: Sat Jun 26, 2010 9:48 pm
Location: Northern KY

Re: Police 4 K390 SE Testing Log

#56

Post by Evil D »

Ok so here's a nice little group shot of all that mess..

Image

And remember that's not counting all the branch carving, the car tire and the Coke can.


So what about that edge damage?


Well, good question. I'm trying my best to resist directly comparing this to the Caribbean because there are just way too many variables. For one, there are a BUNCH of edge geometry differences between these two knives and that's just with the factory bevels, and then reprofiling changes a lot too. Until Spyderco make another SE Police 4 in a different steel, we can't really have a clear comparison between knife/steel vs knife/steel and any edge damage or edge retention could be chalked up to edge geometry as much as steel differences.

Consider for a moment, that this was all done with A) The factory edge, and B) without touch up sharpening between tests.

In my mind that seems like pretty amazing edge retention. I also think it's worth noting that this edge wasn't what I would consider to be peak sharpness from the beginning, it wasn't insanely sharp out of the box and wouldn't push cut phone book paper. Maybe part of this is just the nature of serrations being more aggressive even when "dull".

Either way, my next step is to finish reprofiling the edge and fix the damage, and then we'll go from there. I may even redo a couple of those tests to see how the edge holds up.
All SE all the time since 2017
~David
User avatar
Evil D
Member
Posts: 27147
Joined: Sat Jun 26, 2010 9:48 pm
Location: Northern KY

Re: Police 4 K390 SE Testing Log

#57

Post by Evil D »

Wartstein wrote:
Tue Oct 05, 2021 1:50 pm
Thanks for this thread and the effort and passion you put into it, David!

Really curious how hard and time consuming repairing that edge will turn out to be!
And, as soon as the Police does not have the factory edge at all after some sharpenings: How it will compare then to the LC200N of your Caribbean SE when it comes to toughness.

K390 in SE is really cool stuff.
Still: My totally uneducated gut feeling somehow tells me, that for the average knife guy end user (like me) LC or VG10 probably are the better choice in a serrated knife. Edge retention especially in my VG10 Endela SE is really good already, probably the teeth are tougher than with K390 (?) and first and foremost: I am not worried if some edge damage needs to be fixed, but I think with K390 I would...


Well, the only test I didn't do with this knife was the coax cable, because I already know it's going to destroy the edge. Oh, I just remembered I did try to cut some bones, I guess I could do that too?

But remember, LC200N and H1 both saw edge damage on different materials, and H1 is highly regarded as being one of the toughest steels we can get with serrations.
All SE all the time since 2017
~David
yablanowitz
Member
Posts: 6909
Joined: Sun Apr 09, 2006 2:16 pm
Location: Liberal, Kansas

Re: Police 4 K390 SE Testing Log

#58

Post by yablanowitz »

Evil D wrote:
Tue Oct 05, 2021 8:56 am
That'll also only work on a full flat grind, otherwise you'll be grinding the back at a much steeper angle and then you'll really grind your serrations off.
It would work on a flat saber grind as well as a full flat. It's when you try it on a hollow grind (especially a hollow saber grind) that you start grinding off the points first.
Leksy
Member
Posts: 91
Joined: Wed Mar 17, 2021 1:39 pm

Re: Police 4 K390 SE Testing Log

#59

Post by Leksy »

Thanks for sharing!
I think, even if you sharpen the factory edge to the perfect point, your results wouldnt be different.
In my experience, K390 loses its 'initial' sharpness pretty fast, but the 'residual' sharpness lasts insanely long.
Also your test seems to prove that its toughness is above average, more than enough for such a hard tool steel, even on a serrated edge.
The Meat man
Member
Posts: 5858
Joined: Wed Jan 03, 2018 8:01 pm
Location: Missouri, USA

Re: Police 4 K390 SE Testing Log

#60

Post by The Meat man »

Wow!!! Nothing like jumping off the deep end! :D I love it! Hope the sharpening part goes alright.
- Connor

"What is a man profited, if he shall gain the whole world, and lose his own soul?"
Post Reply