Mule Team
-
legOFwhat?

- Member
- Posts: 3143
- Joined: Mon Jul 09, 2018 5:58 am
- Location: Kentucky; Earth
Re: Mule Team
Wooo! Pma11 and rwl34 are back in stock....PD#1 is out now 
-Larry
Hebrews 13:6 So we may boldly say: “The Lord is my helper; I will not fear. What can man do to me?”
MNOSD #0049
Hebrews 13:6 So we may boldly say: “The Lord is my helper; I will not fear. What can man do to me?”
MNOSD #0049

Re: Mule Team
I use epoxy for knife handles on a regular basis. Most epoxies are not completely water stable. If water is a concern I would suggest you do not consider any of the typical 5 minute epoxies you find readily available at hardware stores. 5 minute epoxies have the lowest water resistance and weakest bond of all epoxies. Use a high quality slow cure (30 minute cure) epoxy like those from West Systems or BSI. As for bond strength, it depends very much on which materials you are bonding and the physical orientation of the materials. If you epoxy 2 pieces of G10 together they will be bonded for life. If you epoxy a piece of G10 to a piece of copper you can knock the copper off with about 50lbs of pressure. If you epoxied G10 scales directly to the tang with no pins or other hardware for instance, the scales would break free very quickly while you use the knife. Epoxy is very strong in certain ways and not so strong in others. Epoxy is fairly hard and does not handle shock very well. A hard smack with a hammer will break the bond in many cases. I use corby bolts to provide the support of pins with a little added mechanical advantage from the bolt "shoulder".
If you use the right epoxy and mix it correctly, you should expect it to remain sealed. I epoxied copper liners and a micarta handle to a 4V Mule. Copper against steel adds to the corrosion potential by introducing the possibility for galvanic corrosion as well. After 18 months of use (including beach camping trips) I removed the handle and found that the epoxy effectively sealed everything and provided enough of a barrier between the copper and the steel as well. There was absolutely no corrosion on the tang.
There's a Mule thread in the pictures forum with a bunch of handles that have been epoxied if you want to check them out. I'd be happy to answer questions if you choose to make your own and need any advise along the way.
Best regards,
Chad
:spyder: Spyderco fan and collector since 1991. :spyder:
Father of 2, nature explorer, custom knife maker.
@ckc_knifemaker on Instagram.
Father of 2, nature explorer, custom knife maker.
@ckc_knifemaker on Instagram.
-
legOFwhat?
- Member
- Posts: 3143
- Joined: Mon Jul 09, 2018 5:58 am
- Location: Kentucky; Earth
Re: Mule Team
Just wanted to say thank you for posting up your amazing work on those knives! You, TedP and others have inspired me.
-Larry
Hebrews 13:6 So we may boldly say: “The Lord is my helper; I will not fear. What can man do to me?”
MNOSD #0049
Hebrews 13:6 So we may boldly say: “The Lord is my helper; I will not fear. What can man do to me?”
MNOSD #0049
Re: Mule Team
Thank you very Much Larry! I appreciate the kind words. :D You've made yourself quite a beautiful collection of Mules! That red/fuchsia pearl kirinite handle you made is stunning! I don't expect to like a "pink" handle and for some reason that one just grabs my attention. Nicely done!legOFwhat? wrote: ↑Wed Mar 20, 2019 9:31 amJust wanted to say thank you for posting up your amazing work on those knives! You, TedP and others have inspired me.
Best regards,
Chad
:spyder: Spyderco fan and collector since 1991. :spyder:
Father of 2, nature explorer, custom knife maker.
@ckc_knifemaker on Instagram.
Father of 2, nature explorer, custom knife maker.
@ckc_knifemaker on Instagram.
-
legOFwhat?
- Member
- Posts: 3143
- Joined: Mon Jul 09, 2018 5:58 am
- Location: Kentucky; Earth
Re: Mule Team
Well thank you! Maybe one day I'll get, at least, competent enough to try all those multi-material handles like you. Tried my 1st a few weeks ago with brass and a couple of paper micarta inserts...has more gaps than a strip mall :DXplorer wrote: ↑Wed Mar 20, 2019 12:33 pmThank you very Much Larry! I appreciate the kind words. :D You've made yourself quite a beautiful collection of Mules! That red/fuchsia pearl kirinite handle you made is stunning! I don't expect to like a "pink" handle and for some reason that one just grabs my attention. Nicely done!legOFwhat? wrote: ↑Wed Mar 20, 2019 9:31 amJust wanted to say thank you for posting up your amazing work on those knives! You, TedP and others have inspired me.
Best regards,
Chad
Now I got a better understanding of what "NOT" to do :)
-Larry
Hebrews 13:6 So we may boldly say: “The Lord is my helper; I will not fear. What can man do to me?”
MNOSD #0049
Hebrews 13:6 So we may boldly say: “The Lord is my helper; I will not fear. What can man do to me?”
MNOSD #0049
Re: Mule Team
I look forward to seeing your first multi-material handle!!legOFwhat? wrote: ↑Wed Mar 20, 2019 1:05 pm...Tried my 1st a few weeks ago with brass and a couple of paper micarta inserts..
Personally I would suggest combining G10 and/or micarta at first and skip the metals like brass and copper. Using materials that sand down at similar rates is helpful. Also, a granite surfacing stone and a pair of 1-2-3 blocks will help you make surfaces perfectly flat and corners perfectly square. Then, glue (with 30 minute cure epoxy so you're not pressured) in stages so you don't have too many pieces to hold tight at once. It takes longer, but it helps keep everything tight.
CK
:spyder: Spyderco fan and collector since 1991. :spyder:
Father of 2, nature explorer, custom knife maker.
@ckc_knifemaker on Instagram.
Father of 2, nature explorer, custom knife maker.
@ckc_knifemaker on Instagram.
-
Tucson Tom

- Member
- Posts: 1633
- Joined: Tue Mar 28, 2017 10:19 pm
- Location: Somewhere in Arizona
Re: Mule Team
I was delighted to find Chad and Larry talking about Mule making. This is a project I want to launch into, but have not yet had enough courage to get started. I have admired the thread with peoples work, and read some posts that talk about how people do things. I even have some slabs of micarta I bought and some solid brass pins.
I have sort of "writers block" in fear of getting started. My biggest worry is shaping the handle. Once I epoxy material on, there seems to be no turning back. But maybe there is? I could drill out the pins and bust off the epoxy and start over?? I would hate to do that, but knowing I could would give me the confidence to get started. But I had thought of starting with screw removable scales at first using some fairly ordinary wood, just to get practice, then once I had the shaping figured out, I could start using fancier materials and epoxy it on and get fancy mosaic pins and such ???
Any advice will be gratefully accepted since you fellows seem to have experience and know what you are about.
Here is a first concrete question. If I buy 2 slabs of Micarta, how thick should I order?

Re: Mule Team
Here's a few old tutorials.
viewtopic.php?t=35469
viewtopic.php?t=50100
viewtopic.php?f=2&t=50150
viewtopic.php?t=40768
viewtopic.php?t=40984
viewtopic.php?t=35469
viewtopic.php?t=50100
viewtopic.php?f=2&t=50150
viewtopic.php?t=40768
viewtopic.php?t=40984
Re: Mule Team
Just jump in bro! You can do it.Tucson Tom wrote: ↑Wed Mar 20, 2019 11:00 pm... This is a project I want to launch into, but have not yet had enough courage to get started.....
Yes. Unfortunately, I know first hand that you can drill out your pins and pry your scales off with a screwdriver and start over if you have to. It's a pain..but it's an option if you need it.Tucson Tom wrote: ↑Wed Mar 20, 2019 11:00 pm... I could drill out the pins and bust off the epoxy and start over??...
This really depends on what you want in your final shaping. I would suggest thicker materials will not only allow for more contouring (if you want) but will also allow more room for fixing mistakes if needed. Granted thicker materials mean you do more work removing material but that's not very difficult. 3/8" scales would be a good starting point IMO.Tucson Tom wrote: ↑Wed Mar 20, 2019 11:00 pmHere is a first concrete question. If I buy 2 slabs of Micarta, how thick should I order?
You can also add G10 liners to a scale material to add some color and increase the thickness if you prefer.
If you are planning to use micarta I would suggest adding a G10 liner just to make sure the inside of the scales are water-tight. Micarta is very durable (one of my favorite handle materials) but it also absorbs water and will grow mildew if allowed to remain wet. If you epoxy a thin layer of G10 to the underside of the micarta you'll always know your scales are not getting wet from the inside no matter what.
Buy good quality 30 minute cure epoxy from BSI or West Systems. It's stronger, more water resistant and allows you to work without time pressure.
If you don't have clamps for holding the parts during gluing, spring clamps are $1.99 at Harbor Freight. If you need them get at least 6, preferably 8.
If you want to do a "dry run" on the handle shaping just outline the Mule and cut it out of a piece of cheap wood (use a basic 1x2). Mount it in a vise and shape away. A simple rasp will work fine for all the rough shaping and sandpaper will finish it off.
When doing the final sanding, you should also consider using a sanding block or a bar so that you are not using varying pressures directly from your fingers. Different shaped sanding blocks and bars will help achieve different sanded shapes (flat, convex, concave, etc...) as well.
If you have questions along the way just let me know.
Have fun!
Chad
:spyder: Spyderco fan and collector since 1991. :spyder:
Father of 2, nature explorer, custom knife maker.
@ckc_knifemaker on Instagram.
Father of 2, nature explorer, custom knife maker.
@ckc_knifemaker on Instagram.

-
Tucson Tom
- Member
- Posts: 1633
- Joined: Tue Mar 28, 2017 10:19 pm
- Location: Somewhere in Arizona
Re: Mule Team
Wow!! Thank you very much.
I'll get busy and order some G10 to sandwich under the micarta as you suggest, as well as the recommended epoxy.
And Crux, I appreciate you showing your "herd" as a bit of an incentive. Various styles in there. And they all look to be attached with screws.
One sort simply uses flat scales and rounds the edges, which looks like something even I could do with my current skills. This is essentially what the Spyderco Junction is like.
The ones like the mule scales you can buy, maintain a constant thickness from one end to another, but are curved across their entire surface. They could even be part of a cylinder, I'm not sure -- but even this wouldn't be hard to do. I have some of those on hand to study carefully.
What a person really wants though is something with some palm swell -- I would have to experiment, but it is good to know that these simpler shapes are quite serviceable!
-
Tucson Tom
- Member
- Posts: 1633
- Joined: Tue Mar 28, 2017 10:19 pm
- Location: Somewhere in Arizona
Re: Mule Team
These are great -- thanks! Reminds me of the "suspended project" of getting this little bandsaw I bought at an estate sale on the air. That is what my life is all about these days, getting unfinished projects finished -- and it feels great!
I found BSI 30 minute epoxy at USA Knifemaker (as well as West System, but in larger quantities).
Then the decision arises of whether to include a lanyard tube or not.
Re: Mule Team
Ah, you missed the naked s35vn and she wasn't screwed. Unlike the rest of us poor blokes.
Can you find it and can it cut? :eek:
Re: Mule Team
I find the best way to finish for optimal ergonomics is use strips of sand paper and pull them back and forth, it really goes miles in terms of getting a well rounded handle. Just jump in, making handles really are not that hard and they are very rewarding.
-
legOFwhat?
- Member
- Posts: 3143
- Joined: Mon Jul 09, 2018 5:58 am
- Location: Kentucky; Earth
Re: Mule Team
For me the easiest way to get started was making removable scales, like others have mentioned, that way if you ruin the scales you still have hardware for the next try. I'll throw a material list of sorts,that worked for me the best:
https://www.knifemaking.com/product-p/rd6.htm Assuming you have a drill press...
https://www.knifemaking.com/product-p/cp972.htm They also have stainless....
https://www.knifemaking.com/handles-s/1507.htm I've tried nearly every offering they have now...
The above barrel screws work great for 1/4" and 3/16" with or without liners but any thicker than 1/4" you'll have to get the longer screws...
The other links seem to have about everything covered and I hope these links are not frowned upon...
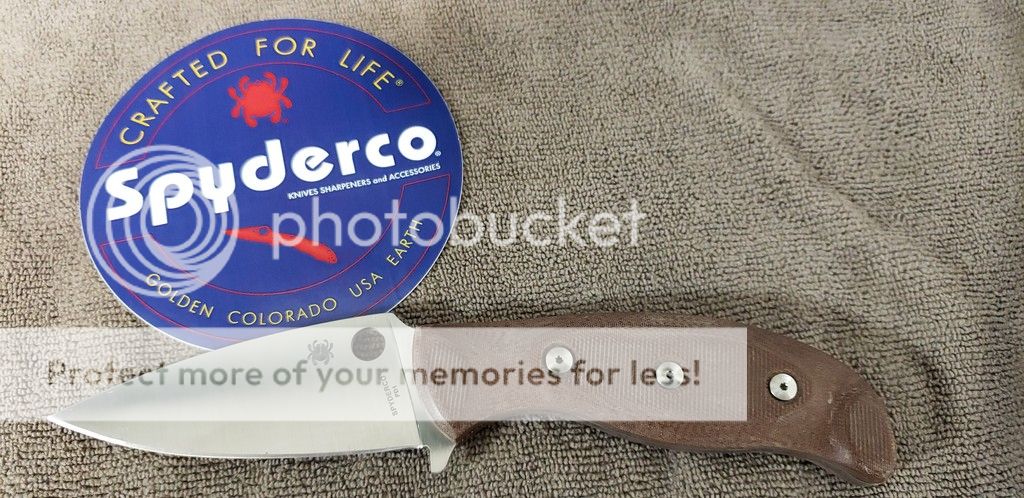
One of my favorite "users" is this PD#1 with brown linen micarta
https://www.knifemaking.com/product-p/rd6.htm Assuming you have a drill press...
https://www.knifemaking.com/product-p/cp972.htm They also have stainless....
https://www.knifemaking.com/handles-s/1507.htm I've tried nearly every offering they have now...
The above barrel screws work great for 1/4" and 3/16" with or without liners but any thicker than 1/4" you'll have to get the longer screws...
The other links seem to have about everything covered and I hope these links are not frowned upon...
One of my favorite "users" is this PD#1 with brown linen micarta

^^^this "shoeshine" method works fast and stays consistant.
-Larry
Hebrews 13:6 So we may boldly say: “The Lord is my helper; I will not fear. What can man do to me?”
MNOSD #0049
Hebrews 13:6 So we may boldly say: “The Lord is my helper; I will not fear. What can man do to me?”
MNOSD #0049
Re: Mule Team
So random question/thought:
Would Spyderco run an exclusive of a Mule if a dealer/distributor put up the cash for an exclusive?
Would Spyderco run an exclusive of a Mule if a dealer/distributor put up the cash for an exclusive?
Re: Mule Team
Tucson Tom wrote: ↑Thu Mar 21, 2019 10:23 pmWhat a person really wants though is something with some palm swell -- I would have to experiment, but it is good to know that these simpler shapes are quite serviceable!
^^ This ^^ Exactly what I was going to say. In order to have good palm swell you need to start with thick enough material which is why I suggested 3/8". Cut strips the length of the sandpaper about an inch wide. Use the "shoeshine" motion top, bottom, and/or each side of the handle to create rounded surfaces. I suggest working top, bottom, left and right as 4 separate surfaces and once they're all contoured to your satisfaction work on smoothing and/or rounding the transitions between the 4 main surfaces to your liking. You can control the "line" between the surfaces with good precision by how high or low you hold your hands when doing the "shoeshine". Be gentle with course grits and try to establish a nice consistent motion. Remember that flat sides help you index the cutting edge and gain leverage over twisting. So, while rounded feels more comfortable in the palm..too round is hard to control. As you do your shaping, be conscious of the fact that there's a happy medium between flat and round on a knife handle. Your goal should be some nice comfortable "swell" but not round sides per say.Skidoosh wrote: I find the best way to finish for optimal ergonomics is use strips of sand paper and pull them back and forth, it really goes miles in terms of getting a well rounded handle. Just jump in, making handles really are not that hard and they are very rewarding.
Notice in this example how the contouring/rounding of the side doesn't get too close to the spine at the top, leaving a top surface for applying downward pressure on the handle that is also gently rounded. This gentle rounding makes it comfortable while still very controllable. The overall thickness also tapers from top to bottom. The bottom surface is rounded much more-so than the top and transitions seamlessly into the side. You might choose to modify the details to suit your personal preferences, but this is a good close up picture to look at as you think about what you want to do with each surface.

Remember to completely finish the leading edge of the handle before you put it on the knife of course.
If you prefer to do other styles of contouring let me know and I'll be glad to help you get your plan headed in the right direction.
There's nothing that will happen along the way that you can't find a solution for here if you just stop and ask. Make yourself a handle my man.. you'll be glad you did. :)
Best,
CK
:spyder: Spyderco fan and collector since 1991. :spyder:
Father of 2, nature explorer, custom knife maker.
@ckc_knifemaker on Instagram.
Father of 2, nature explorer, custom knife maker.
@ckc_knifemaker on Instagram.
-
Tucson Tom
- Member
- Posts: 1633
- Joined: Tue Mar 28, 2017 10:19 pm
- Location: Somewhere in Arizona
Re: Mule Team
Thank you! I am excited and eager to start making dust.
Re: Mule Team
Great post and fantastic looking handle. It that micara and CF?Xplorer wrote: ↑Fri Mar 22, 2019 12:23 pmTucson Tom wrote: ↑Thu Mar 21, 2019 10:23 pmWhat a person really wants though is something with some palm swell -- I would have to experiment, but it is good to know that these simpler shapes are quite serviceable!^^ This ^^ Exactly what I was going to say. In order to have good palm swell you need to start with thick enough material which is why I suggested 3/8". Cut strips the length of the sandpaper about an inch wide. Use the "shoeshine" motion top, bottom, and/or each side of the handle to create rounded surfaces. I suggest working top, bottom, left and right as 4 separate surfaces and once they're all contoured to your satisfaction work on smoothing and/or rounding the transitions between the 4 main surfaces to your liking. You can control the "line" between the surfaces with good precision by how high or low you hold your hands when doing the "shoeshine". Be gentle with course grits and try to establish a nice consistent motion. Remember that flat sides help you index the cutting edge and gain leverage over twisting. So, while rounded feels more comfortable in the palm..too round is hard to control. As you do your shaping, be conscious of the fact that there's a happy medium between flat and round on a knife handle. Your goal should be some nice comfortable "swell" but not round sides per say.Skidoosh wrote: I find the best way to finish for optimal ergonomics is use strips of sand paper and pull them back and forth, it really goes miles in terms of getting a well rounded handle. Just jump in, making handles really are not that hard and they are very rewarding.
Notice in this example how the contouring/rounding of the side doesn't get too close to the spine at the top, leaving a top surface for applying downward pressure on the handle that is also gently rounded. This gentle rounding makes it comfortable while still very controllable. The overall thickness also tapers from top to bottom. The bottom surface is rounded much more-so than the top and transitions seamlessly into the side. You might choose to modify the details to suit your personal preferences, but this is a good close up picture to look at as you think about what you want to do with each surface.
Remember to completely finish the leading edge of the handle before you put it on the knife of course.
If you prefer to do other styles of contouring let me know and I'll be glad to help you get your plan headed in the right direction.
There's nothing that will happen along the way that you can't find a solution for here if you just stop and ask. Make yourself a handle my man.. you'll be glad you did. :)
Best,
CK
Re: Mule Team
Thank you :)
Yes. Paper micarta is one of my favorite handle materials for knives I plan to keep for myself. That one is my personal EDC. :)
Best regards,
Chad
:spyder: Spyderco fan and collector since 1991. :spyder:
Father of 2, nature explorer, custom knife maker.
@ckc_knifemaker on Instagram.
Father of 2, nature explorer, custom knife maker.
@ckc_knifemaker on Instagram.