Page 7 of 22
Re: Rhino
Posted: Thu Jun 09, 2016 8:09 pm
by Liquid Cobra
SpyderNut wrote:Liquid Cobra wrote:That's a great story, thank you for sharing. So once you sent your proto to Spyderco you were Rhino-less? Did you make a second one?
No problem, LC. It is my pleasure. :) Yes, that is correct, Sal and Eric possess my only Rhino (which has left me Rhino-less for the time-being). However, I recently started on making two other Rhinos, one in CPM-M4 and one in a new "mystery" steel. :D
That's great to hear. Now that the rhino has been announced will you be able to share some images of the ones you're making now?
Re: Rhino
Posted: Thu Jun 09, 2016 9:06 pm
by SpyderNut
Liquid Cobra wrote:SpyderNut wrote:Liquid Cobra wrote:That's a great story, thank you for sharing. So once you sent your proto to Spyderco you were Rhino-less? Did you make a second one?
No problem, LC. It is my pleasure. :) Yes, that is correct, Sal and Eric possess my only Rhino (which has left me Rhino-less for the time-being). However, I recently started on making two other Rhinos, one in CPM-M4 and one in a new "mystery" steel. :D
That's great to hear. Now that the rhino has been announced will you be able to share some images of the ones you're making now?
I believe so. But just to be on the safe side, let me ask and find out if it would be okay. :)
Re: Rhino
Posted: Fri Jun 10, 2016 2:45 pm
by SpyderNut
SpyderNut wrote:Liquid Cobra wrote:SpyderNut wrote:Liquid Cobra wrote:That's a great story, thank you for sharing. So once you sent your proto to Spyderco you were Rhino-less? Did you make a second one?
No problem, LC. It is my pleasure. :) Yes, that is correct, Sal and Eric possess my only Rhino (which has left me Rhino-less for the time-being). However, I recently started on making two other Rhinos, one in CPM-M4 and one in a new "mystery" steel. :D
That's great to hear. Now that the rhino has been announced will you be able to share some images of the ones you're making now?
I believe so. But just to be on the safe side, let me ask and find out if it would be okay. :)
Hey LC,
I received permission today to post some pictures of the Rhino, so I will try to get some of those posted in the next few days. Stay tuned! :)
Re: Rhino
Posted: Fri Jun 10, 2016 2:53 pm
by Liquid Cobra
Thats fantastic. Glad for us and glad that you will no longer be rhino-less :)
Re: Rhino
Posted: Sat Jun 11, 2016 10:56 pm
by SpyderNut
Liquid Cobra wrote: That's great to hear. Now that the rhino has been announced will you be able to share some images of the ones you're making now?
Hi Liquid Cobra,
As I mentioned on Friday, I received permission from Spyderco to share some of my original work-in-progress photos of the first Rhino I made. (Unfortunately, I have yet to take photos of the two I am making now). The pictures are basically presented in chronological order, so you can see how the knife evolved from raw materials to the finished product. I hope you enjoy. :)
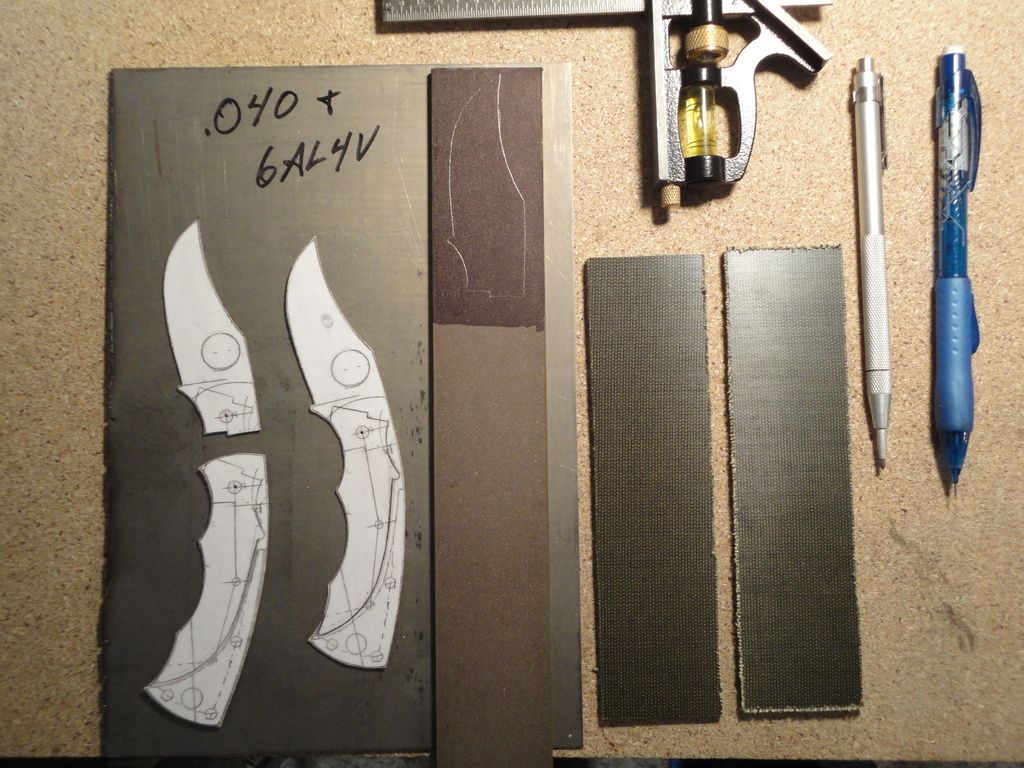
Chapter One: The Blade
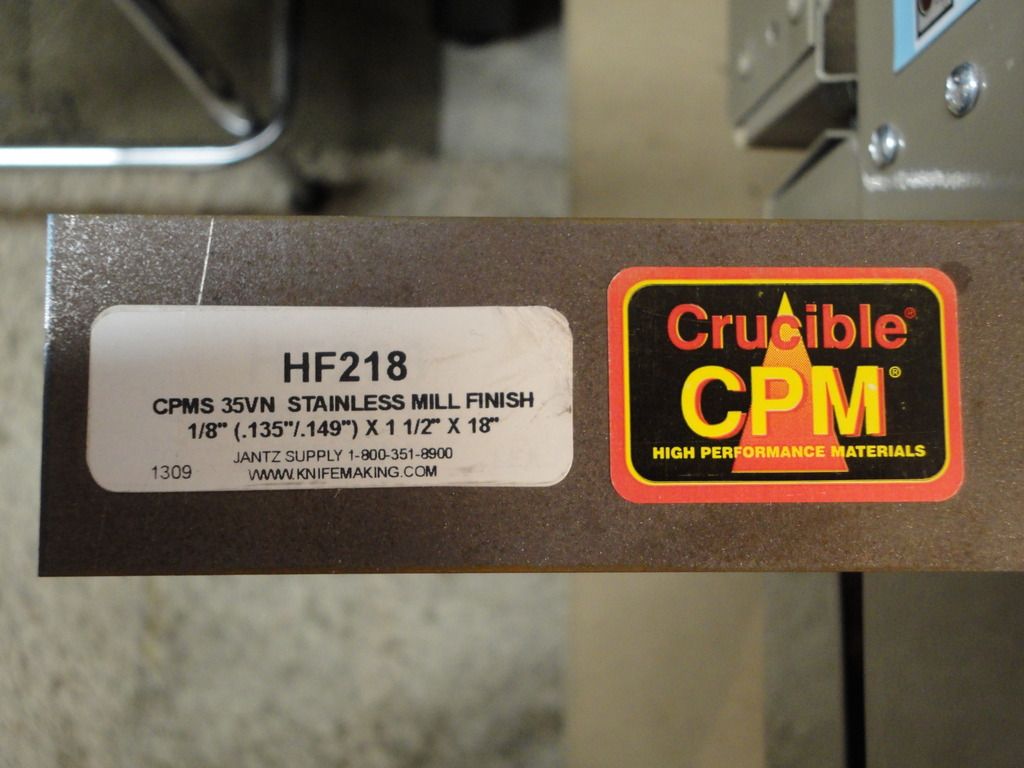
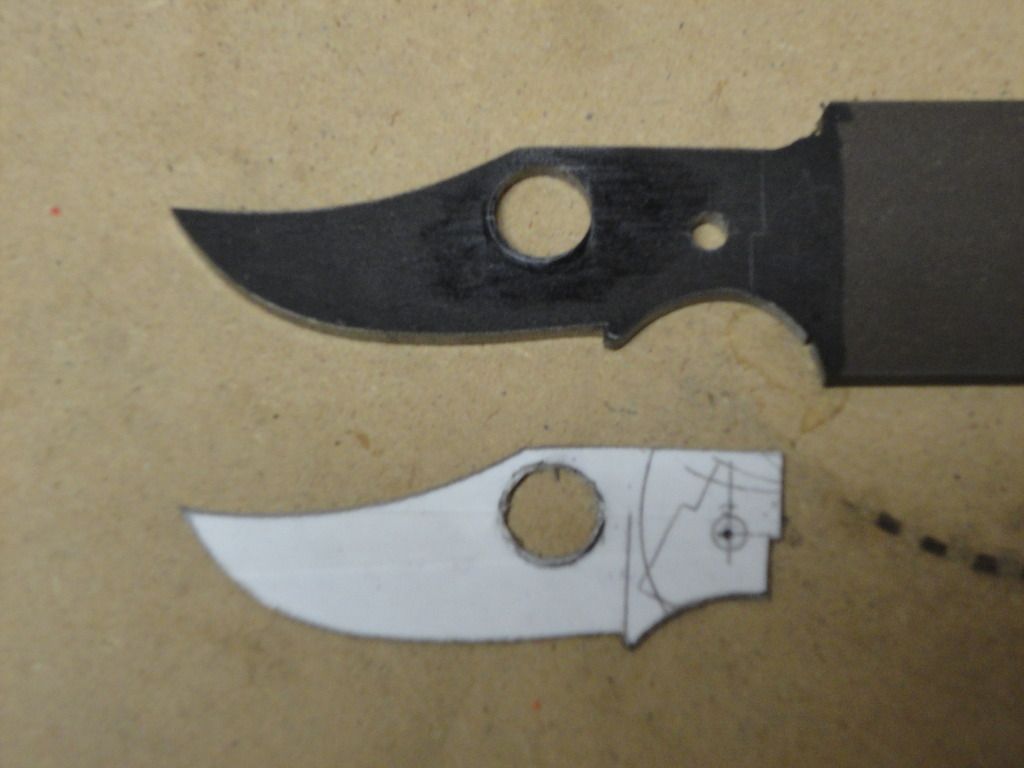
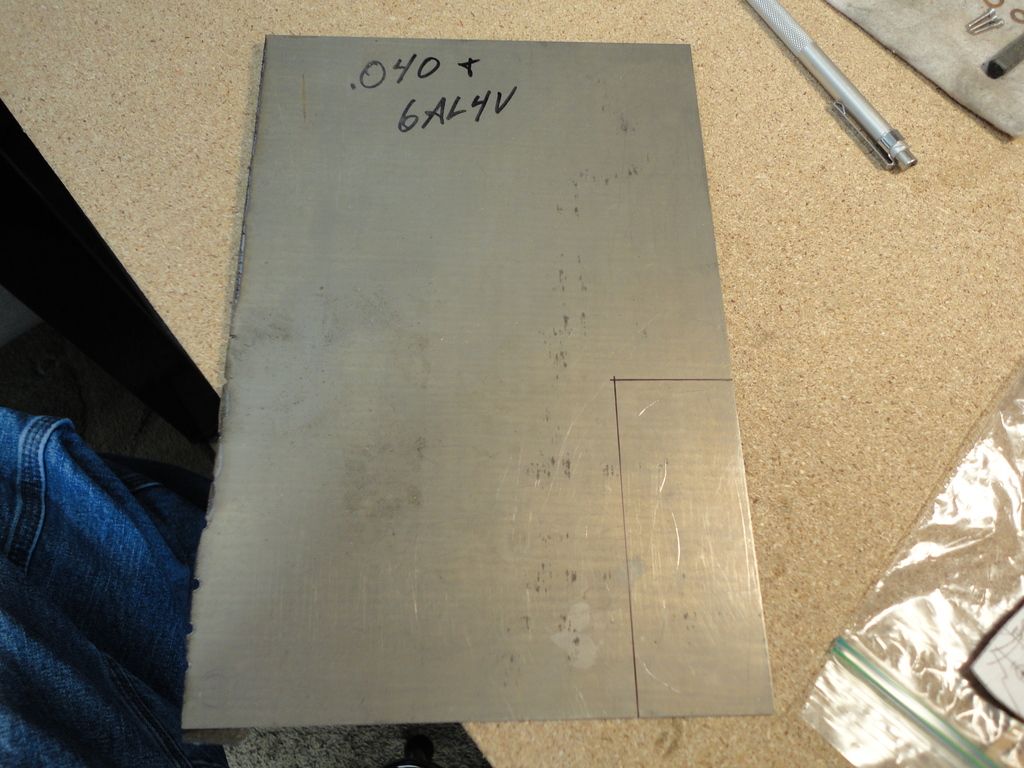
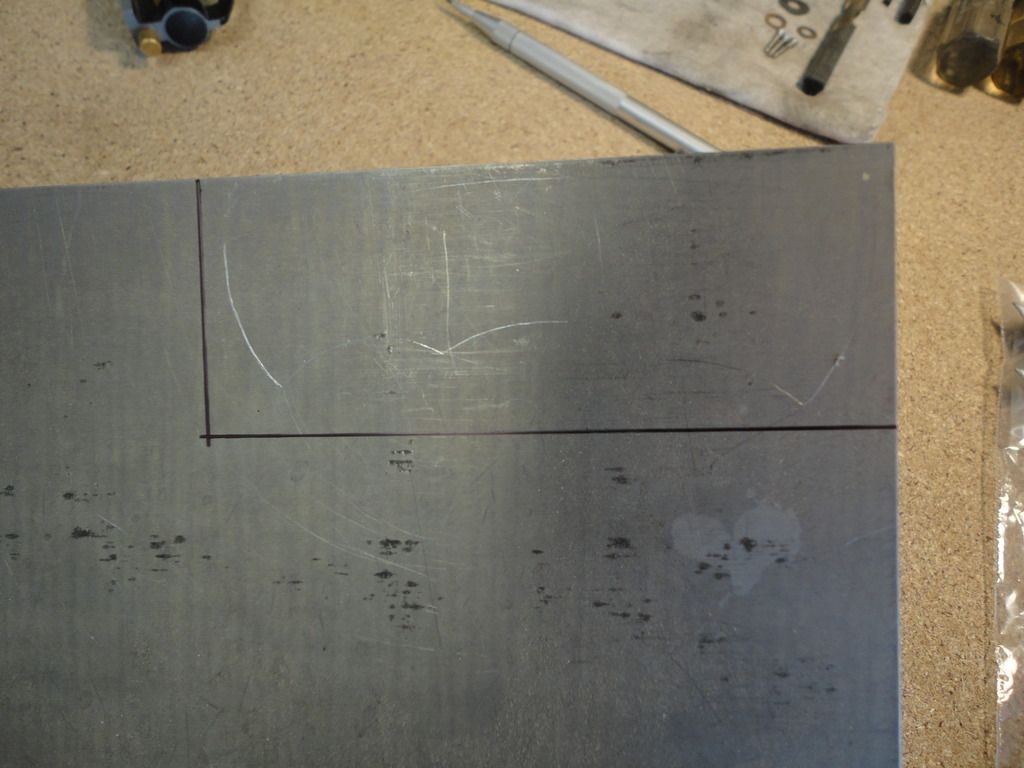
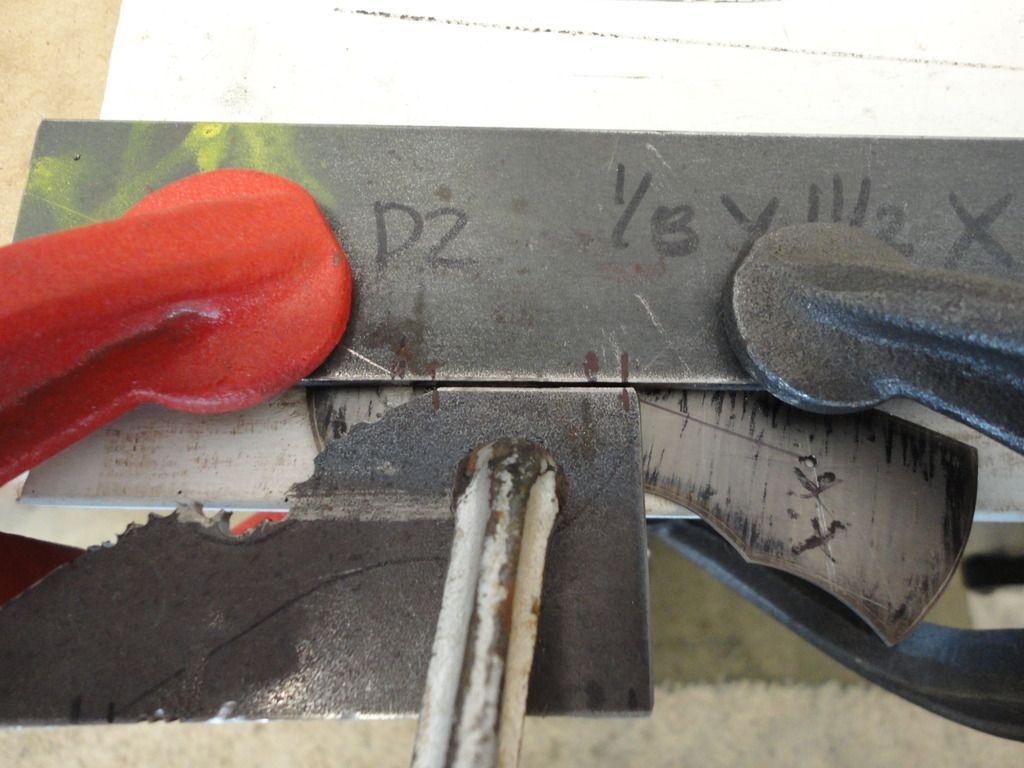
It all starts with the materials: CPM-S35VN for the blade, 0.040" Ti for the liner, and dark green canvas Micarta for the scales. (The templates are located at the left):
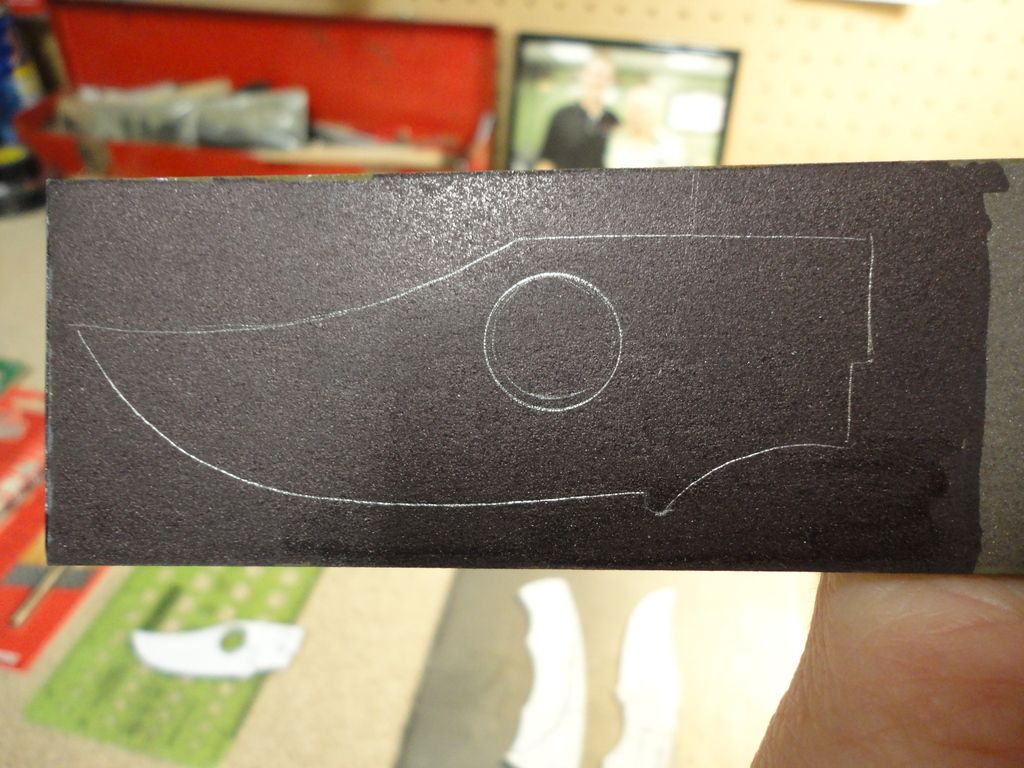
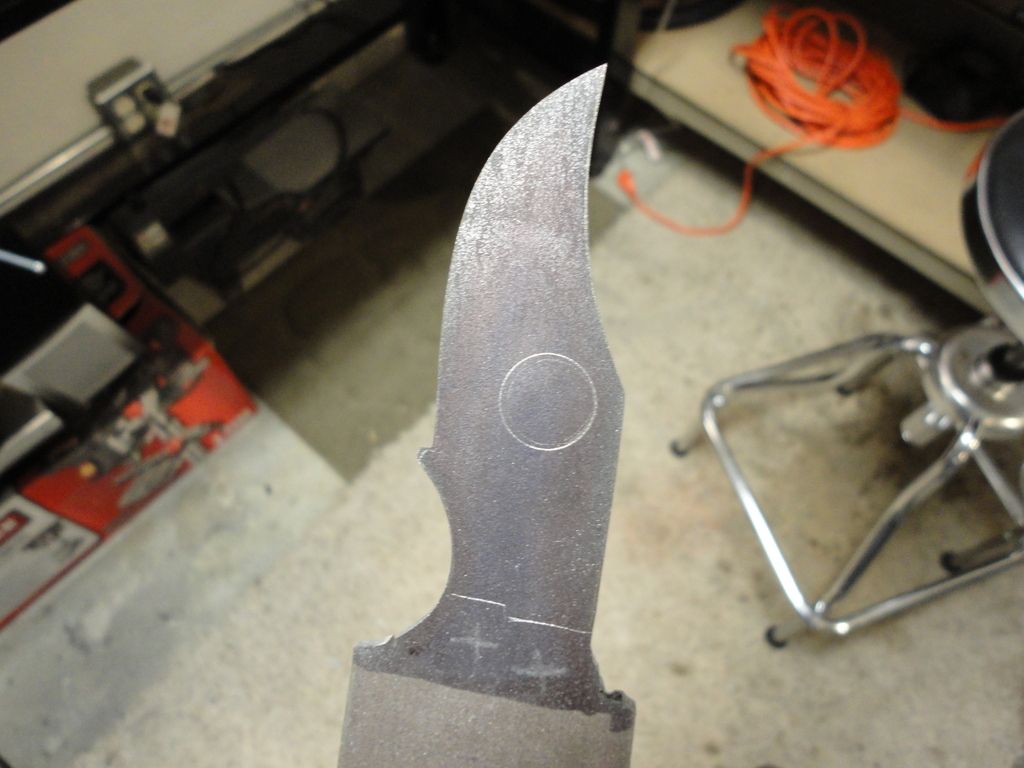
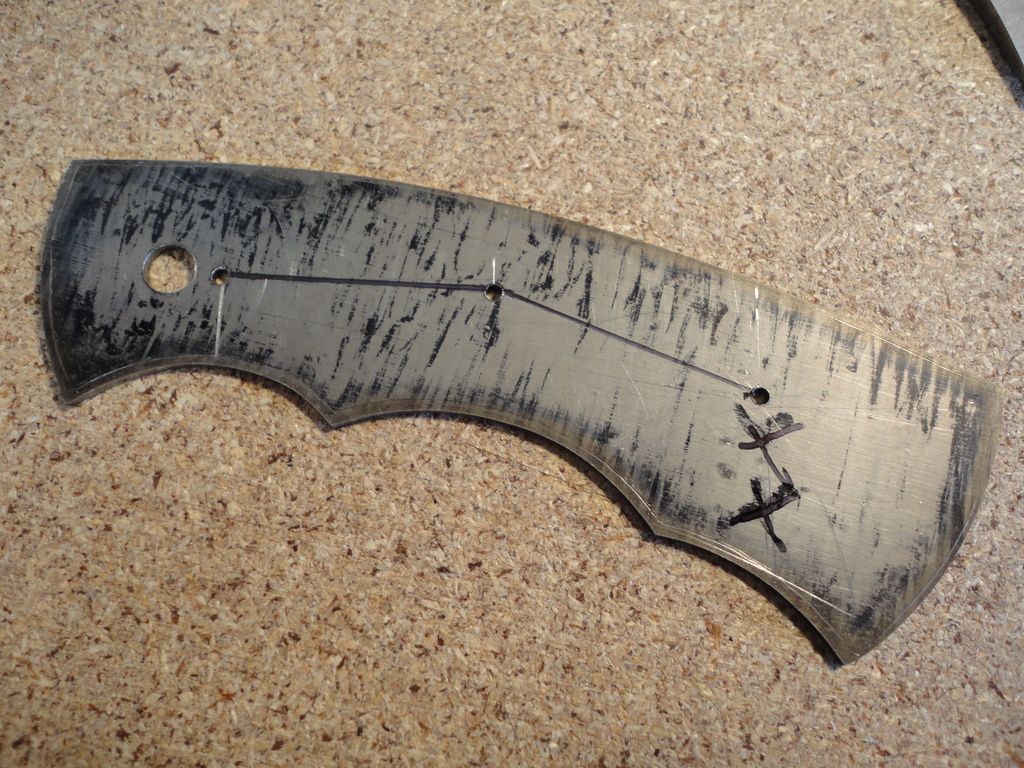
The blade is always first. To begin, I scribe the outline of the blade onto the blade stock as shown here. Note that the Round Hole and usually also the pivot and lock relief holes are included at this time. (Side note: I have been granted a license agreement with Spyderco for use of their Round Hole):
Next, the blade is rough-cut following the outline of the scribe line:
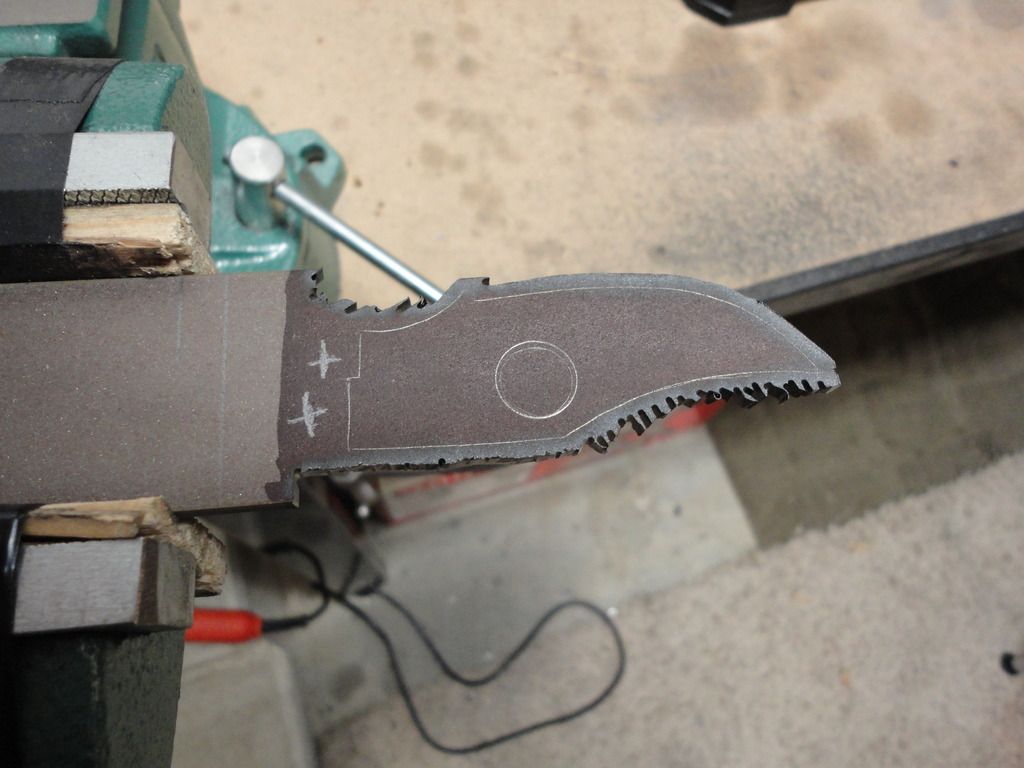
The rough edges are then smoothed out:

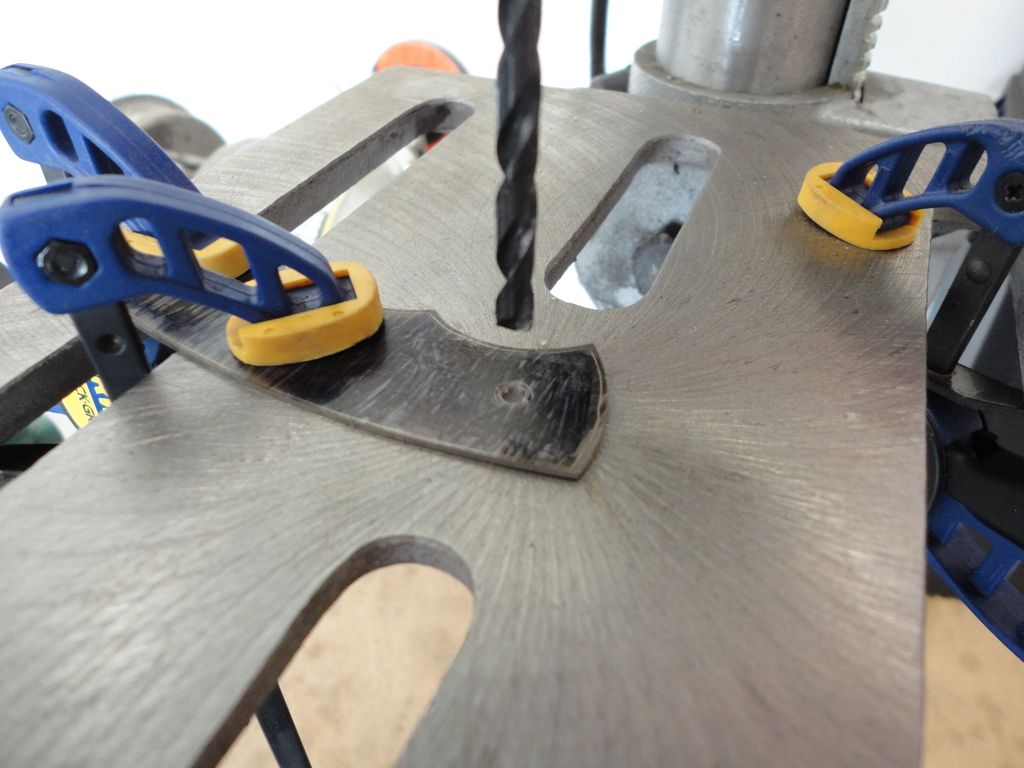
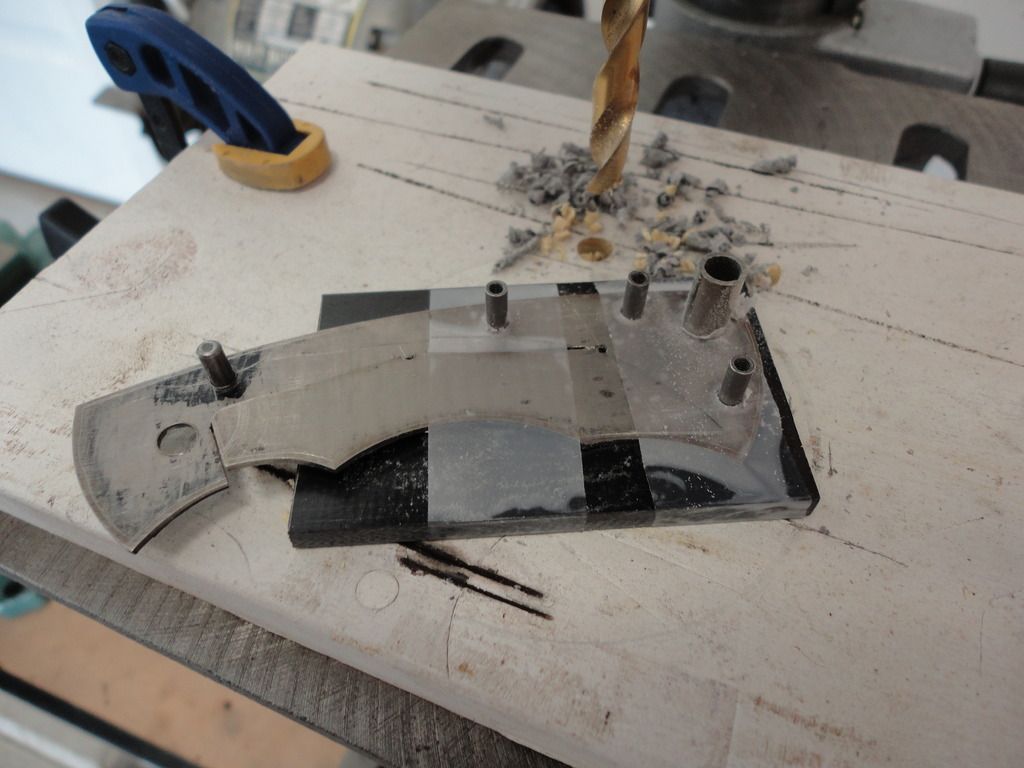
Next, the Round Hole and pivot holes are drilled:
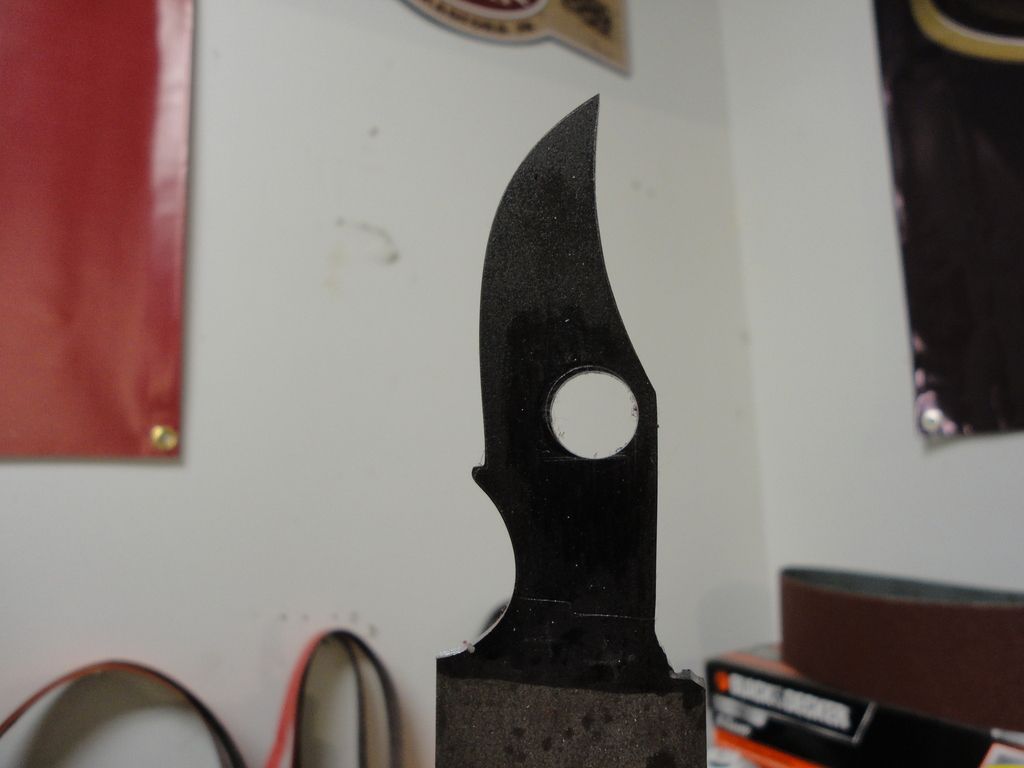
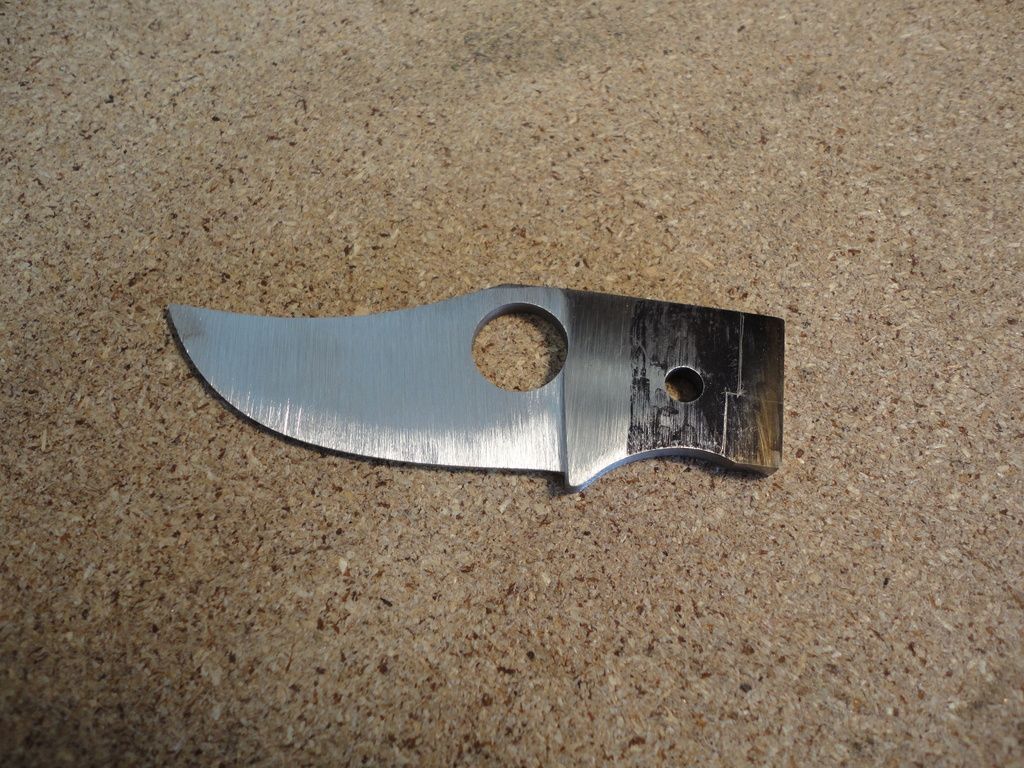
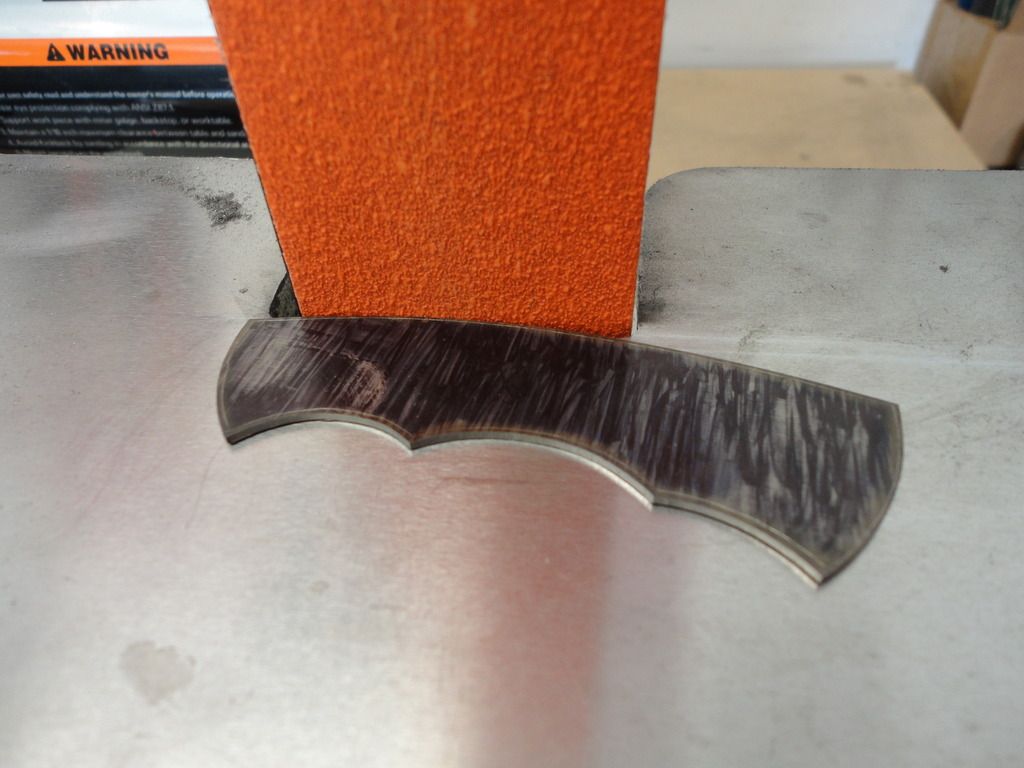
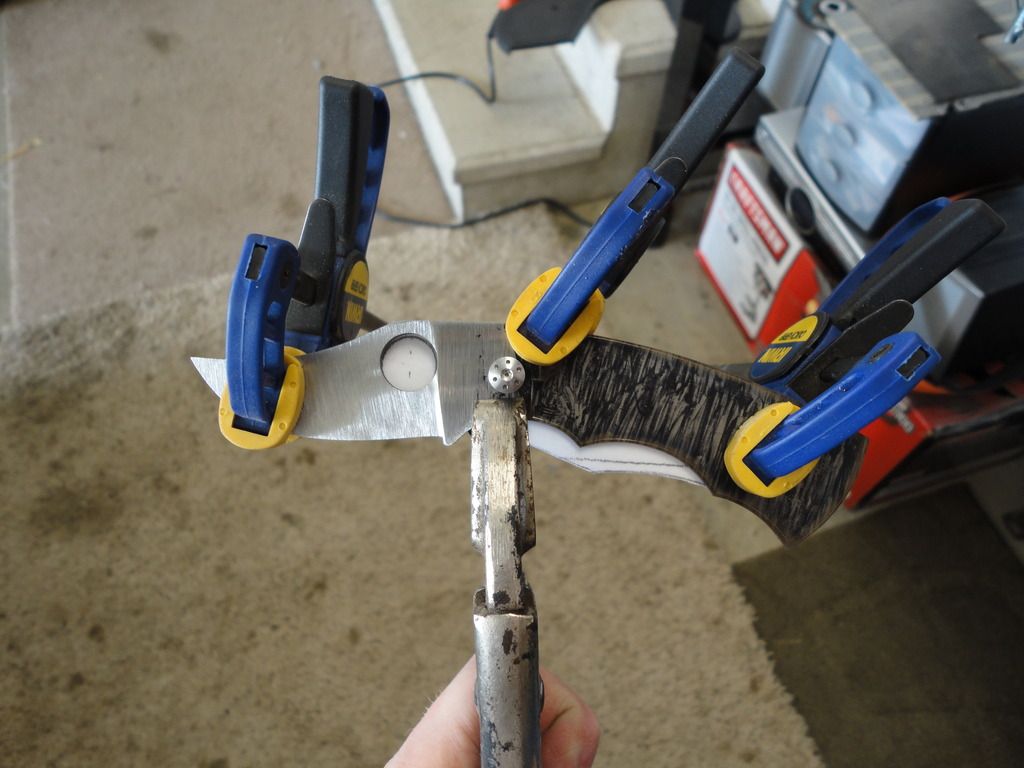
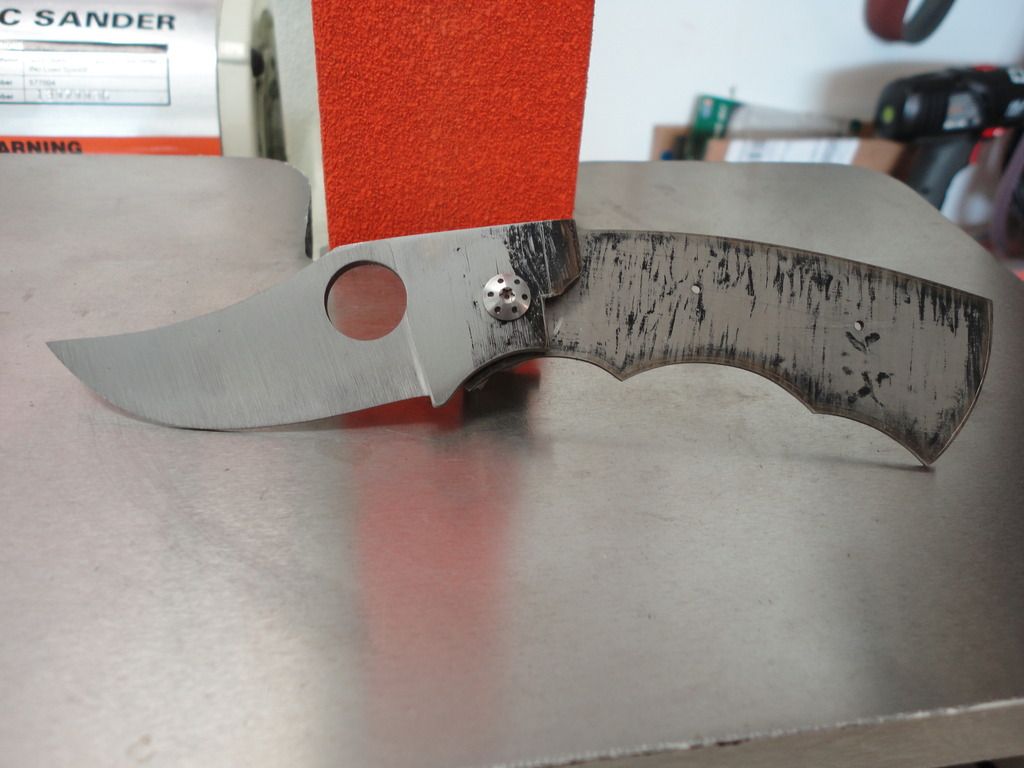
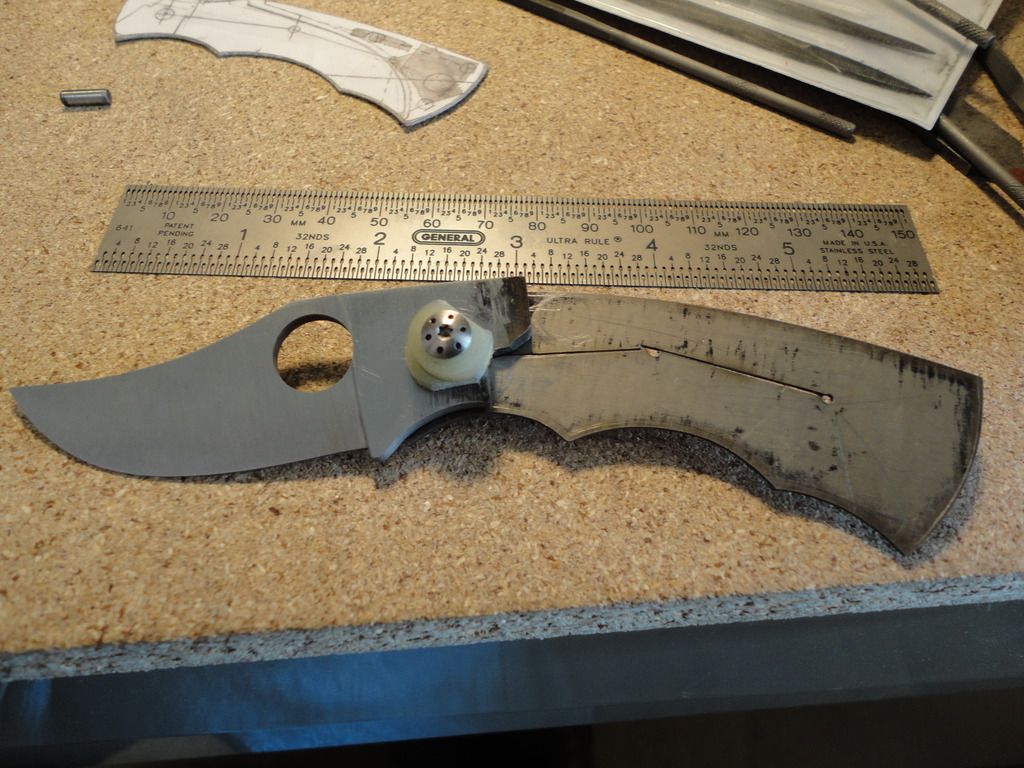
The next step is to remove the scale from the blade and begin the initial blade grind to establish the plunge lines. Note: With smaller and shorter blades, it is sometimes helpful to leave the blade attached to the blade stock until after the plunge lines have been established:
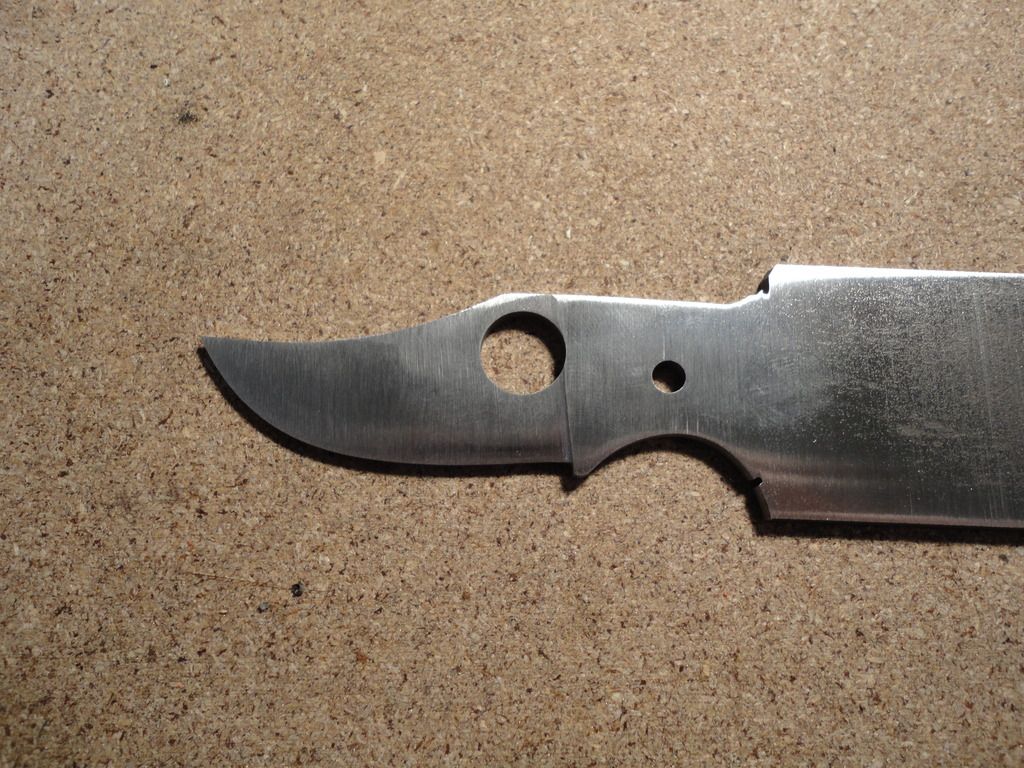
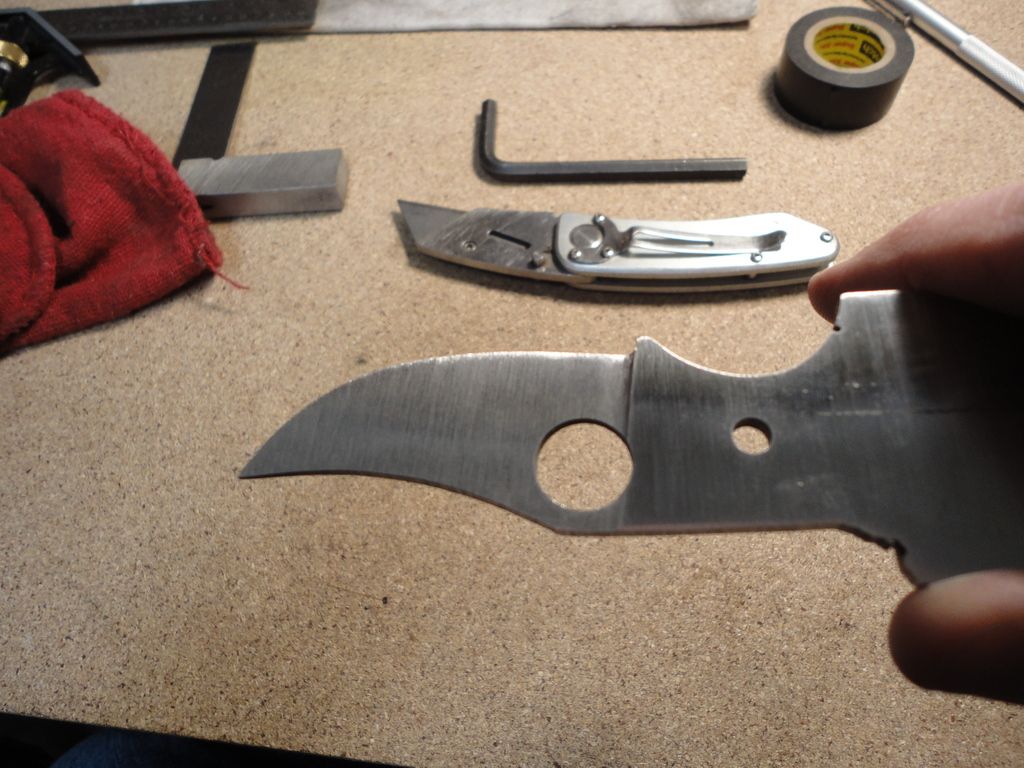
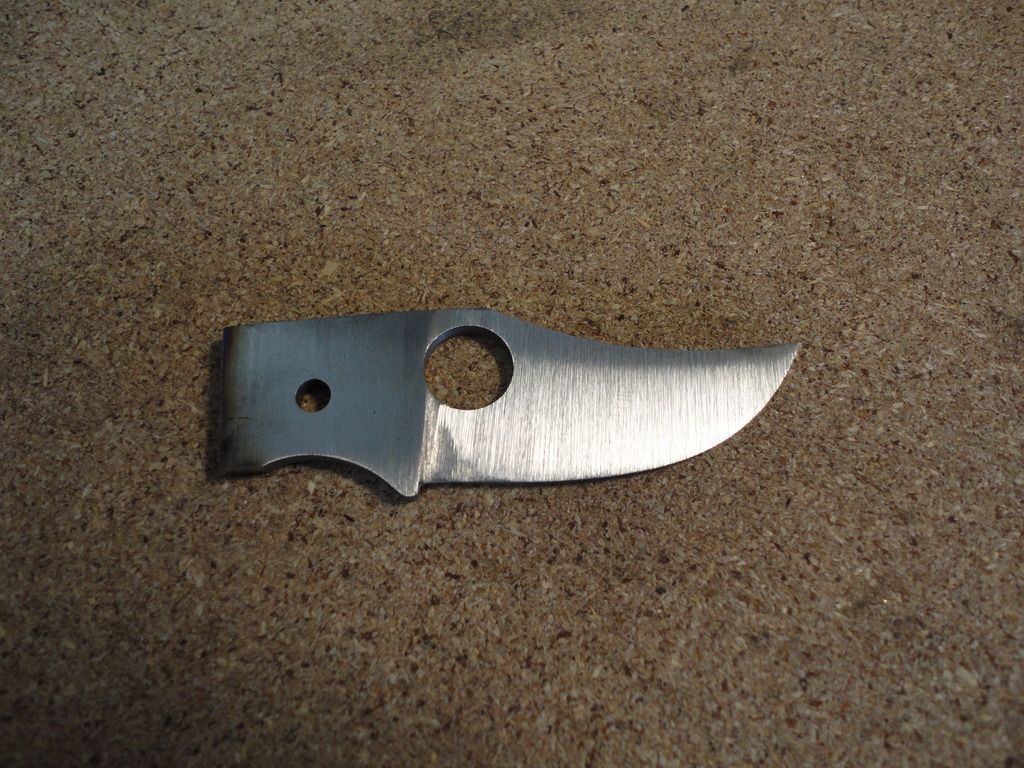
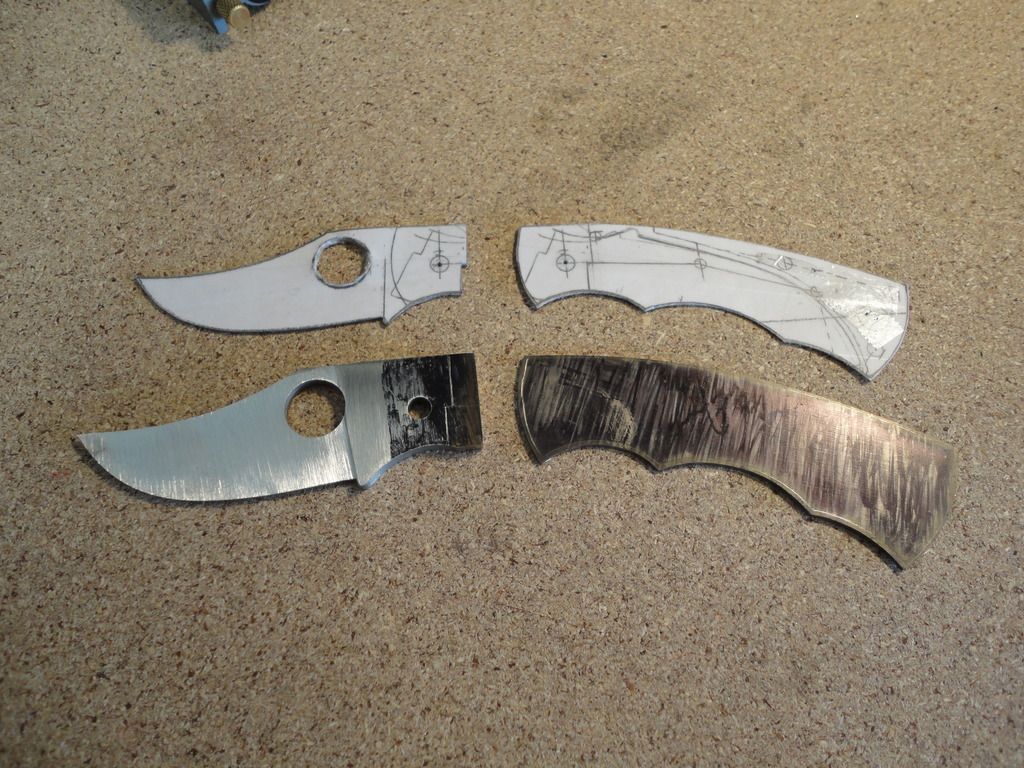
After the initial grinding is finished, the blade is cut free:
 To Be Continued...
Re: Rhino
Posted: Sun Jun 12, 2016 6:48 am
by Liquid Cobra
I'd like to see the knives your making now but this is so much better! Can't wait for part 2! Very interesting how you went about cutting out the blade shape.
Re: Rhino
Posted: Sun Jun 12, 2016 8:28 am
by SpyderNut
Liquid Cobra wrote:I'd like to see the knives your making now but this is so much better! Can't wait for part 2! Very interesting how you went about cutting out the blade shape.
Thanks, man. :) Cutting and shaping the blade is always fun (unless it is S90V :o ). More to come soon!
Re: Rhino
Posted: Sun Jun 12, 2016 9:06 pm
by SpyderNut
Chapter 2: The Liner
The next step is to create the liner used for the lock. To begin, the liner template is drawn onto the titanium liner as shown in the second picture from the top. (Note: On the first Rhino, I opted to use a single liner to help reduce weight and to keep the overall handle from becoming too thick. Also, the first Rhino featured a Walker Liner Lock):
After the liner is cut from the sheet, the rough edges are sanded smooth:
At this point, both the blade and liner have been rough cut and are ready to be set up for fitting the lock:
The pivot hole is then drilled into the liner:
Setting up for the lock-fitting:
The locking tab is drawn onto the liner:
The lock is ready to be cut:
Jig for cutting the locking tab free:
The lock has been cut. The blade and lock have been fitted together so that the locking tab perfectly engages the tang of the blade. (The goal is to have about .090" of engagement between the tang and locking tab):
 To Be Continued...
Re: Rhino
Posted: Sun Jun 12, 2016 9:21 pm
by clovisc
Fantastic photos, Michael. Keep 'em coming! The Rhino is one of the top knives on my wish list! Hope to see this one in a supersteel or two!
Re: Rhino
Posted: Sun Jun 12, 2016 10:16 pm
by Sharp Guy
This is really interesting!! Looking forward to part 3!
Re: Rhino
Posted: Sun Jun 12, 2016 10:48 pm
by murphjd25
Thanks for sharing Michael! This is neat stuff. Can't wait for the 3rd chapter! Congratulations on everything again!
Re: Rhino
Posted: Mon Jun 13, 2016 7:52 am
by i am travvy
Love the step by step process. If this knife could hurry up and come out that would be great! I need a new spydie in my life.
Re: Rhino
Posted: Mon Jun 13, 2016 2:01 pm
by sparky2016
Fascinating. Thank you.
Re: Rhino
Posted: Mon Jun 13, 2016 2:27 pm
by SpyderNut
clovisc wrote:Fantastic photos, Michael. Keep 'em coming! The Rhino is one of the top knives on my wish list! Hope to see this one in a supersteel or two!
Thank you, sir. I appreciate that. :D I'm just glad I had the presence of mind to take photos along the way of building that knife. (I guess my obsessive-compulsive tendencies are actually good for something after all.

)
Sharp Guy wrote:This is really interesting!! Looking forward to part 3!
Thank you! I'm glad you're enjoying this.
murphjd25 wrote:Thanks for sharing Michael! This is neat stuff. Can't wait for the 3rd chapter! Congratulations on everything again!
Greatly appreciate that, Murph. Thanks for the kind words.
i am travvy wrote:Love the step by step process. If this knife could hurry up and come out that would be great! I need a new spydie in my life.
Thanks Travvy. I enjoy trying different methods on each knife I make--kind of like an ongoing "CQI" of sorts. This step-by-step photo journal also allows me to go back and see how things were done so I don't make the same mistakes twice. :o
sparky2016 wrote:Fascinating. Thank you.
Thanks for watching! I'm hoping to get more pictures posted soon.
Re: Rhino
Posted: Mon Jun 13, 2016 6:26 pm
by bh49
SpyderNut wrote:
this is very good looking blade. Probably you should start making customs. S35Vn + dark green micarta and I am in
Re: Rhino
Posted: Mon Jun 13, 2016 6:50 pm
by SpyderNut
Thank you, Roman. S35Vn and dark green canvas Micarta sounds good to me too. :D I'll hopefully be able to start on my M4 model later this summer/early fall, if all goes to plan.
Re: Rhino
Posted: Mon Jun 13, 2016 7:35 pm
by SpyderNut
Chapter 3: The Back-spacer and Handle
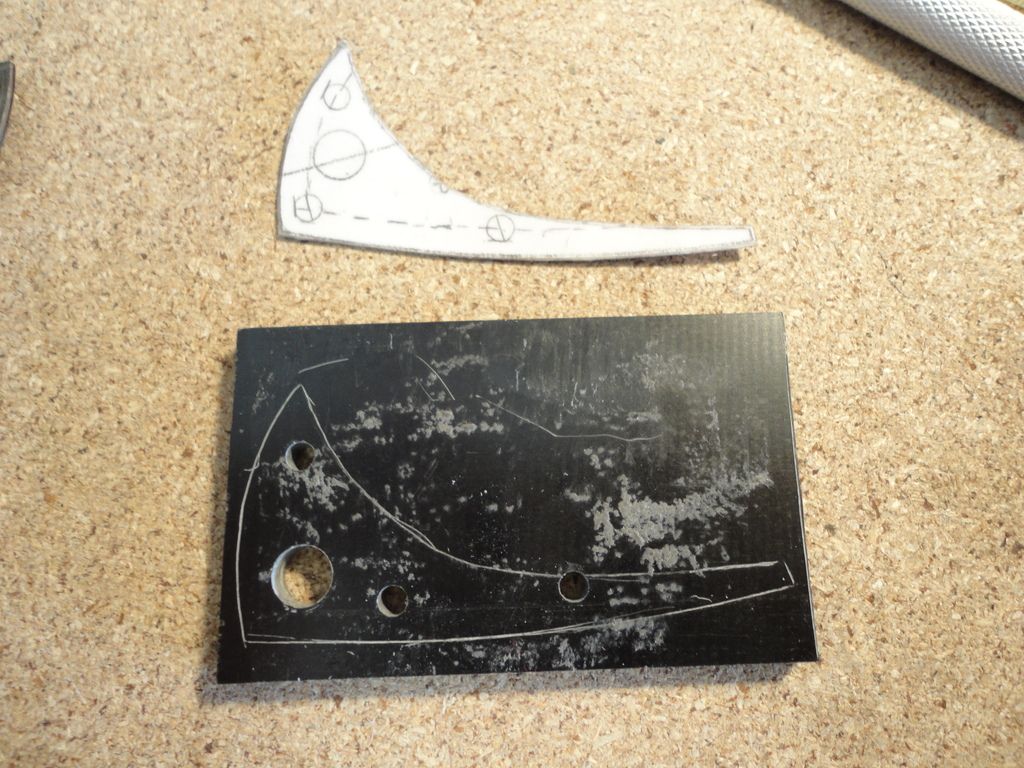
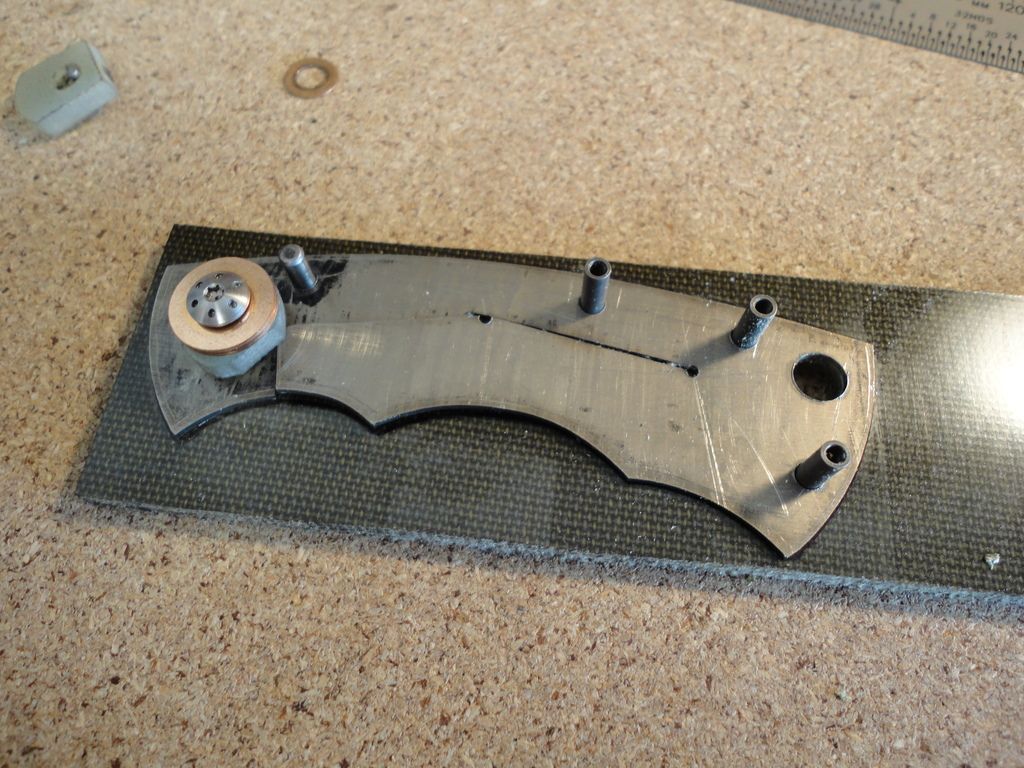
After the blade and liner have been created and the lock has been fitted, the next step is to create the back-spacer. The back-spacer is an important part of the knife in that it provides a measure of stability and support to the handle housing--similar to a backbone or spine. The back-spacer (or stand-offs) must exactly equal the thickness of the blade plus two washers. (Therefore, if the blade is .120" and the washers are .010" each, the back-spacer should be .140"). I prefer to use back-spacers on my custom folders, but some folks also like to use steel stand-offs in lieu of a solid back-spacer. For this particular knife, I used .250" black G-10 for the spacer material. The desired thickness of the material will be achieved at a later step. The first step is to drill out all of the holes for the threaded barrel bolts and lanyard tubing (as shown below). Please note the addition of the stop-pin in this first picture. I didn't have any pictures showing this particular step, but basically the stop-pin was added prior to making the back-spacer for this particular knife. This can be a stressful step in the knifemaking process. The placement of the stop-pin must be accurate--otherwise, the lock will not function appropriately:
The results should look like this. (Note the outline of the spacer has been sketched onto the G-10. This will be key when fitting the blade into the handle later on):
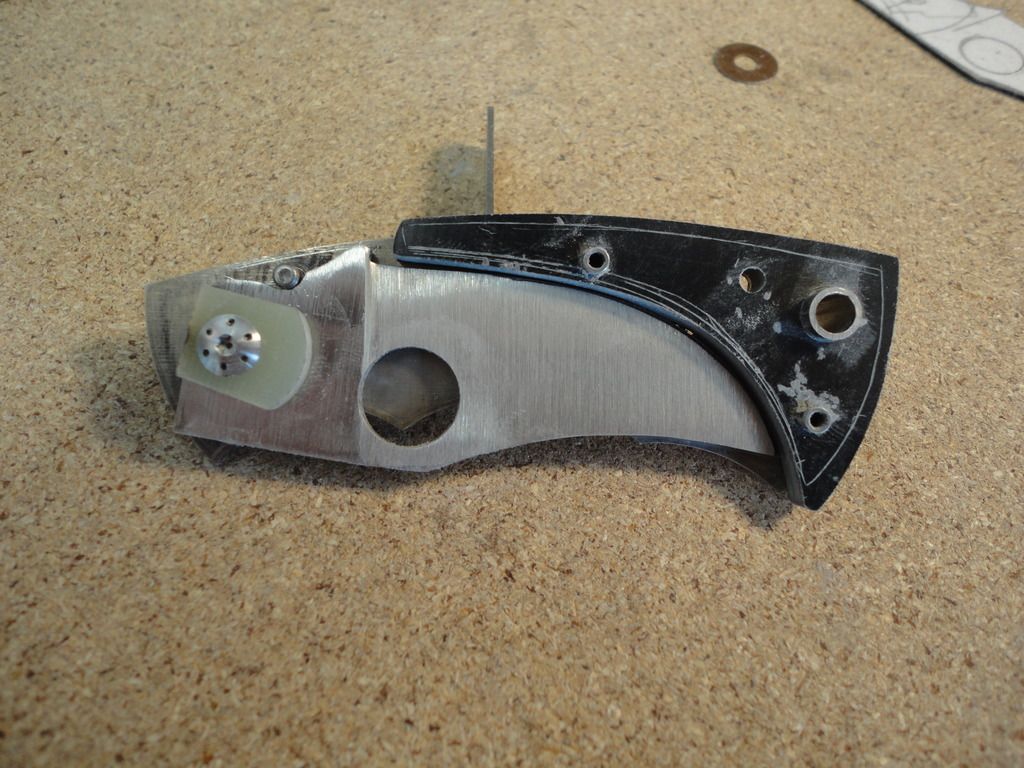
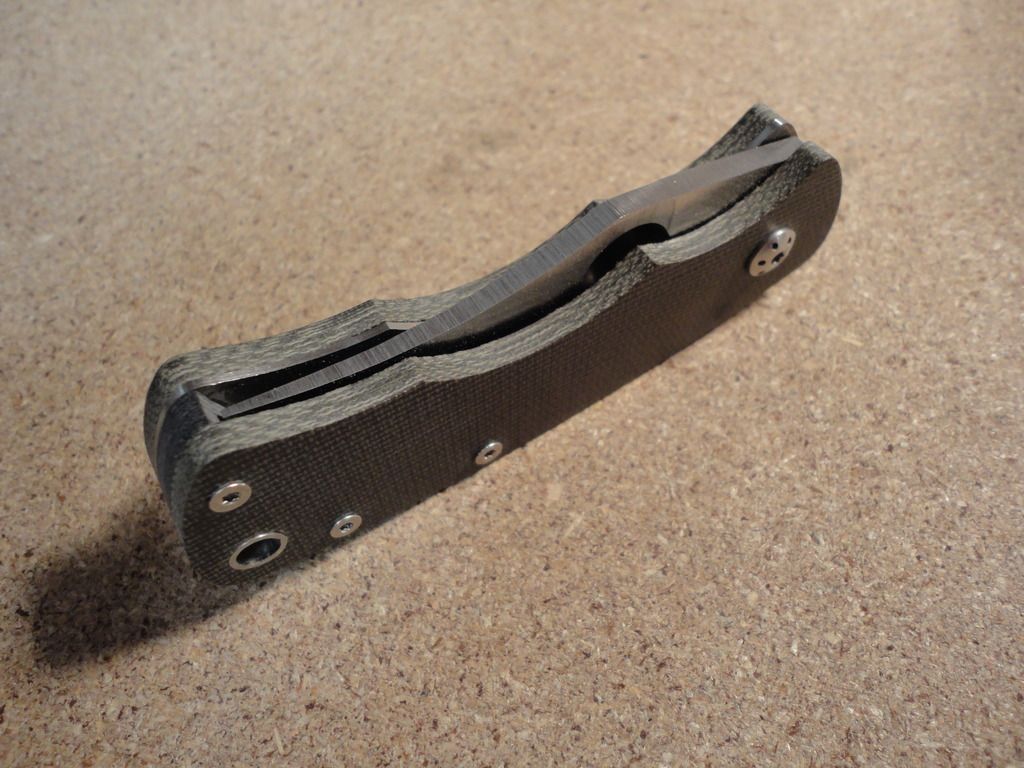
Here is an inside view of the blade and the back-spacer. Notice how the blade compliments the back-spacer. There should be approximately .030" to .040" clearance between the blade's edge and the back-spacer:
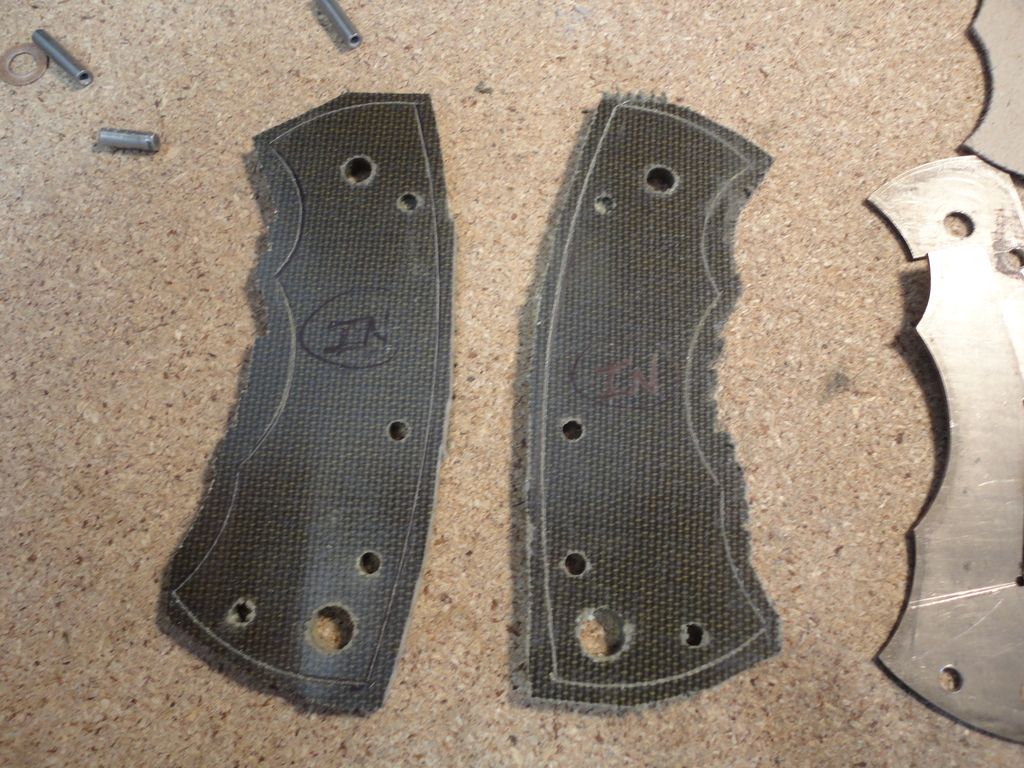
Next, the liner is used to form a template on the Micarta scale material. The outline of the liner is etched onto each Micarta scale. It is important to pay close attention to which side is right and which is left. The scales are now ready to be cut and shaped:
Here, the scales have been rough-cut on the saber saw:
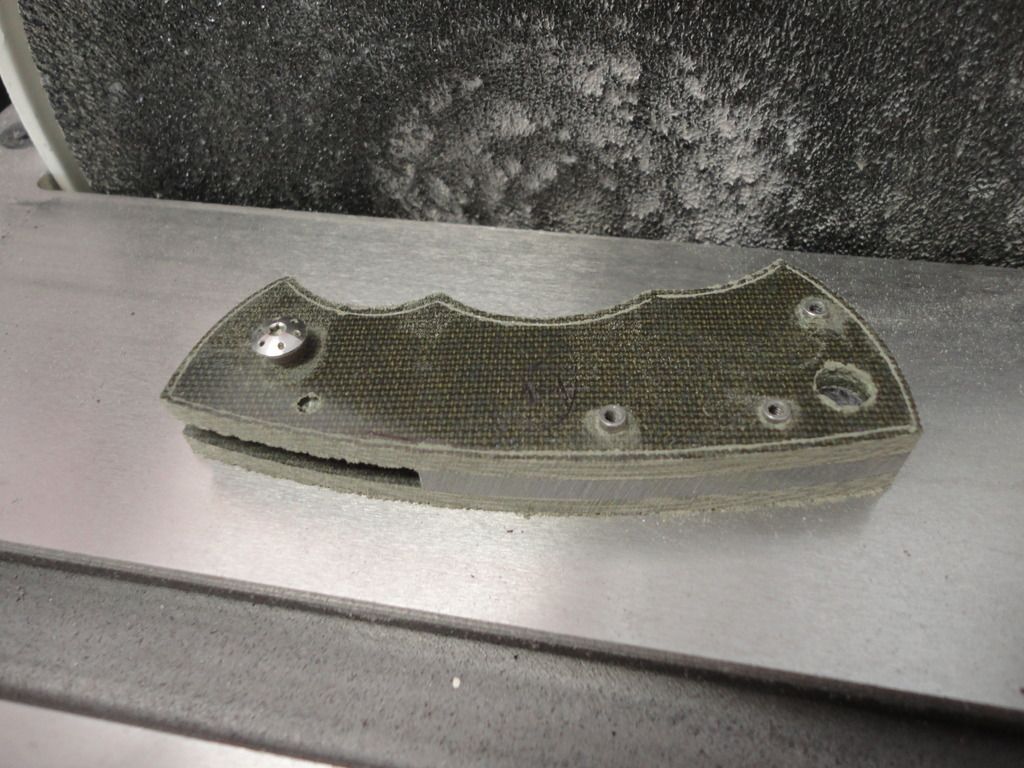
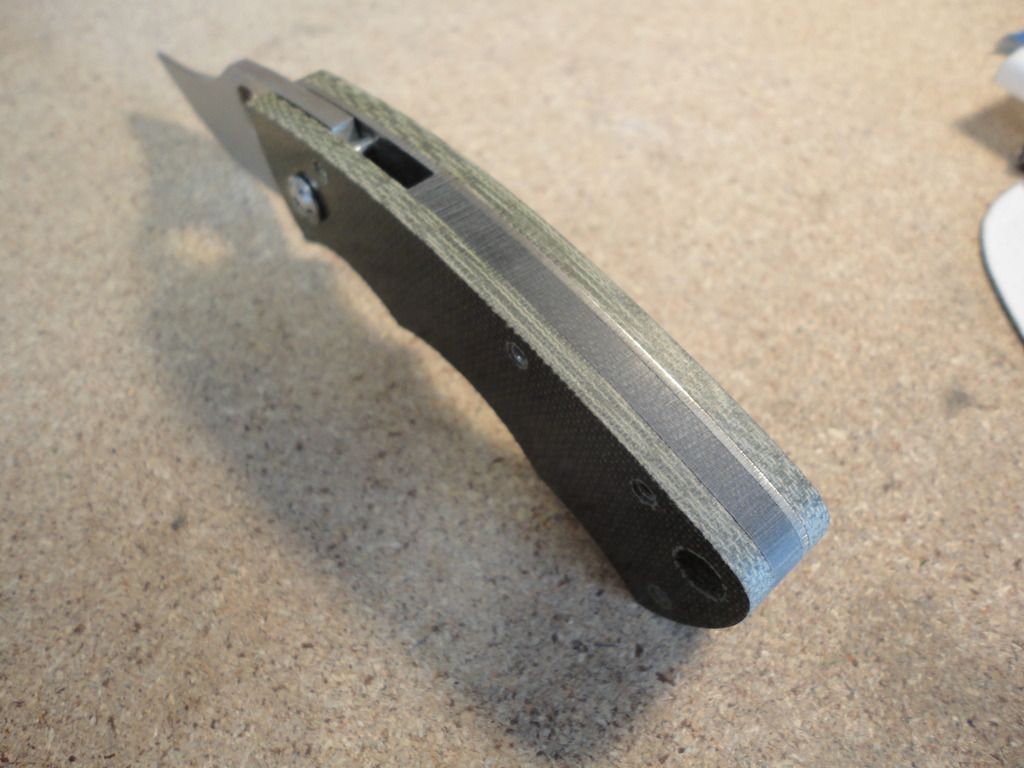
The scales, liner, and back-spacer are sanded flush at a perfect 90 degrees. (This is one of my favorite steps):
The finger grooves are formed using the barrel sander:
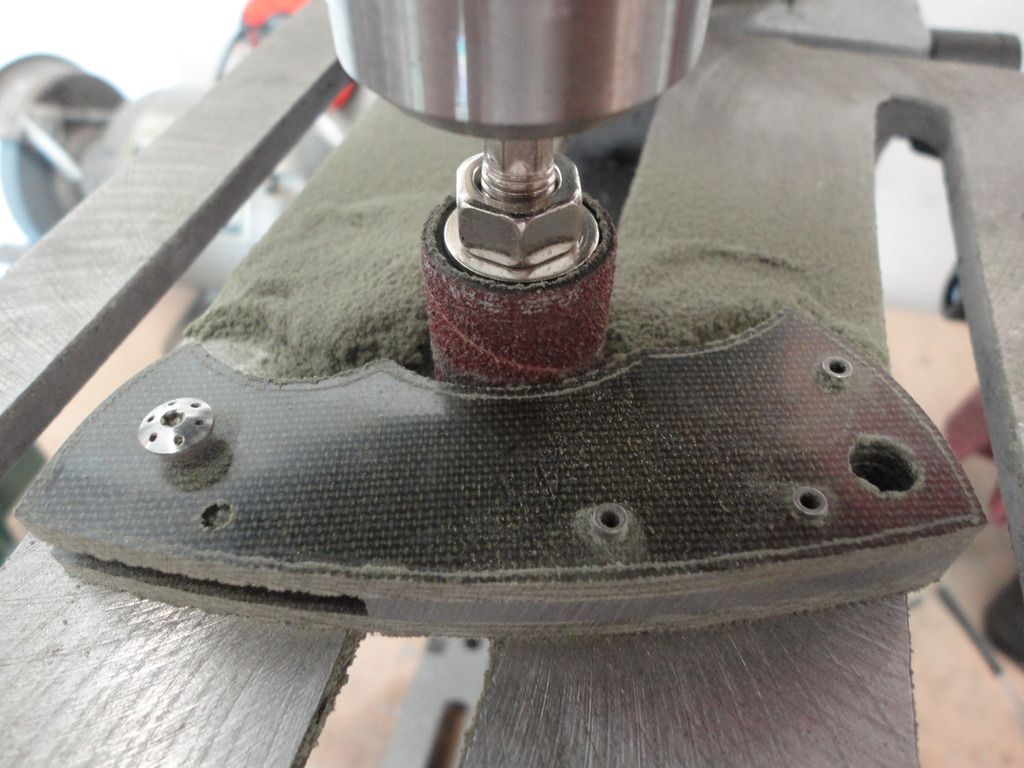
And the results should look something like this:
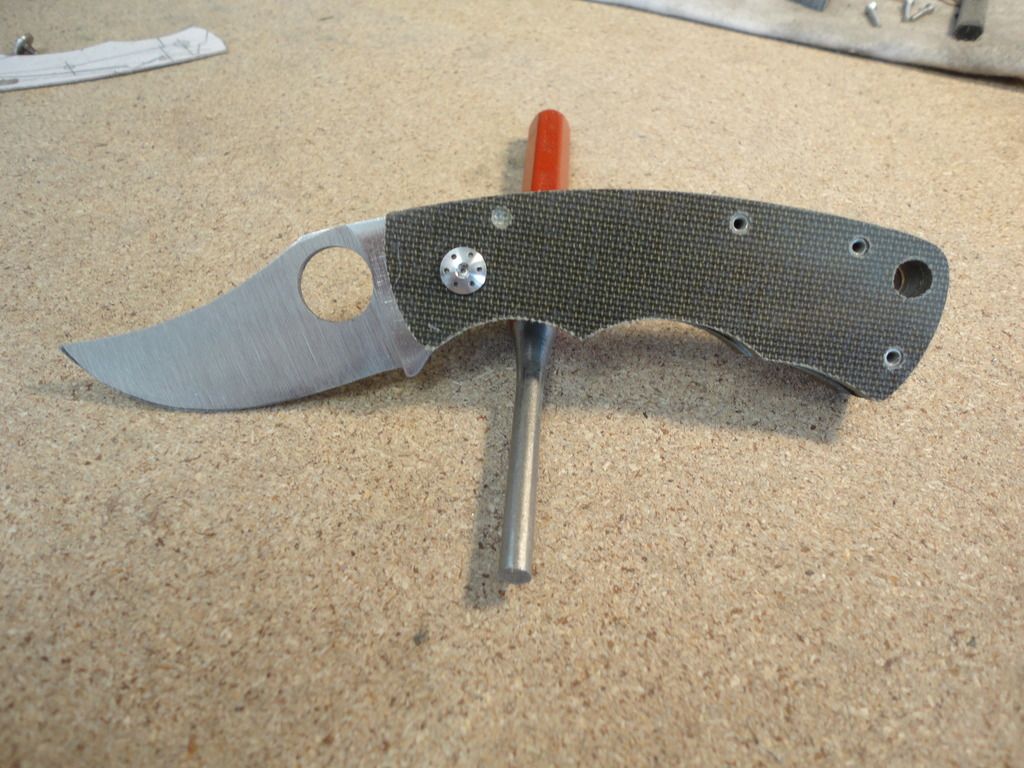
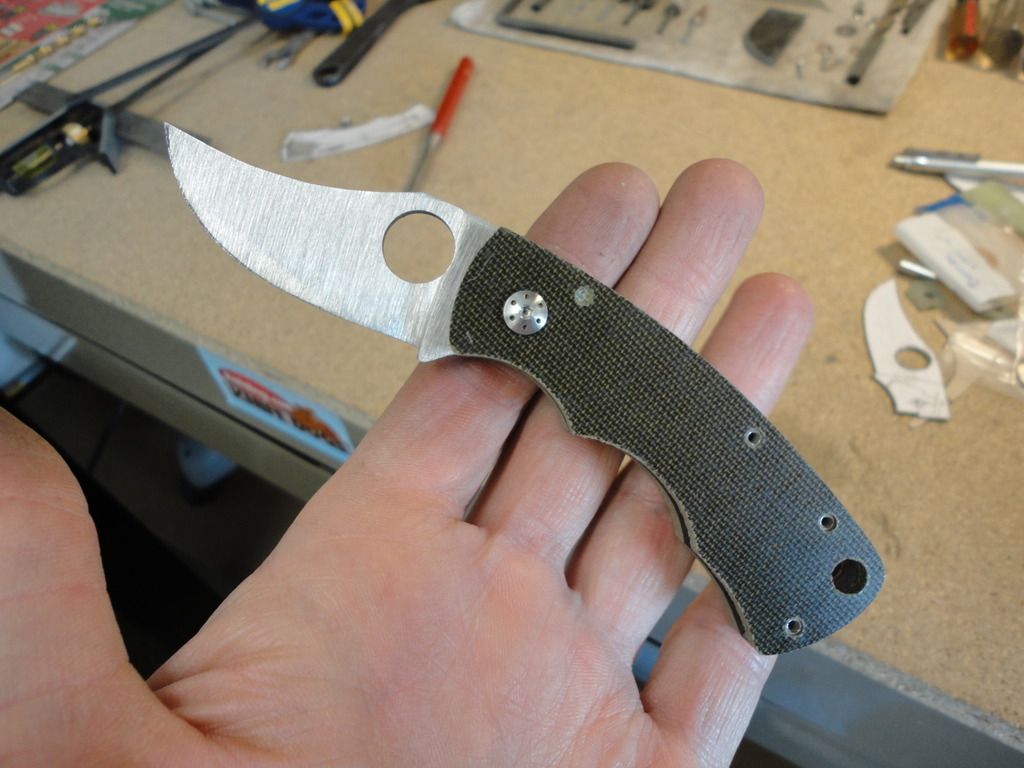
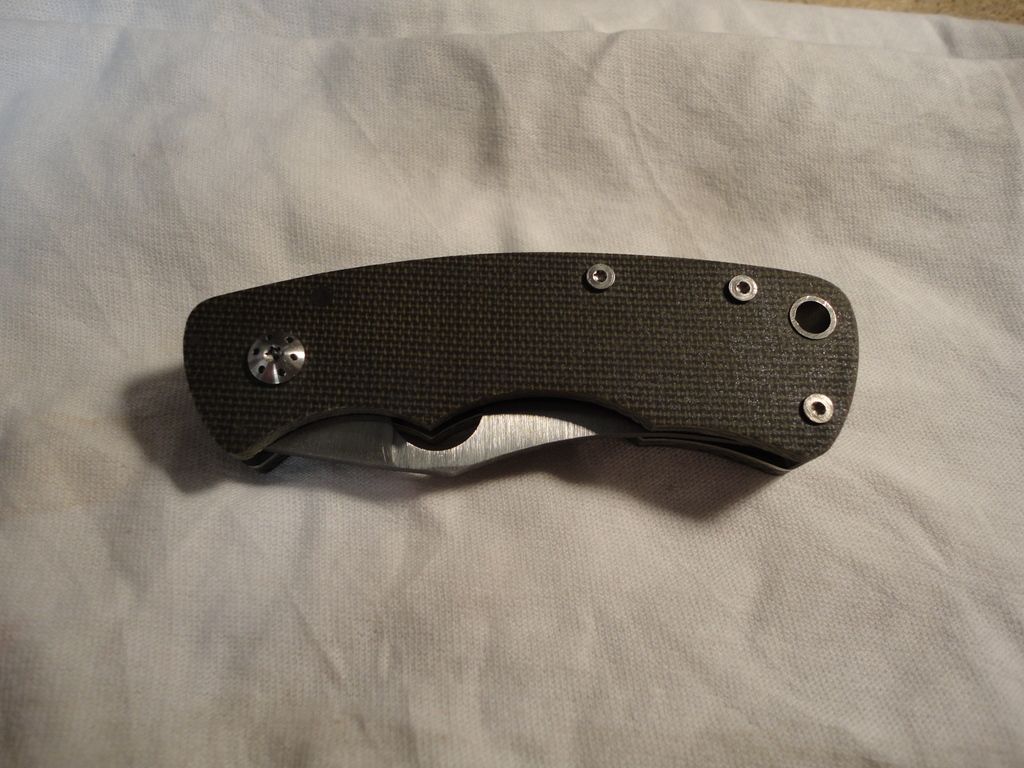
At this point, the grunt work is done. Now comes the fun part: finish work! I also like to call this the "elbow grease" stage, because most of the work from this point forward is done by hand. Specifically, the lock will be fine-tuned, the handle will need to be contoured and buffed, the edges of the handles softened (this includes cutting a recessed area into the top scale to allow for clearance to the Round Hole), the hardware holes will need to be countersunk/counterbored, the machining marks will need to be ground/sanded out of the blade and liner, the lanyard tube will be buffed, chamferred, and fitted, the pocket clip will need to be added (this means drilling and tapping the titanium liner), and the blade will need to be ground thinner and sent out for the heat-treat. Depending on the steel type, I usually grind my blades only to about .040" to .050" at the edge to prevent warping during the heat-treat.
To Be Continued...
Re: Rhino
Posted: Mon Jun 13, 2016 7:49 pm
by abbazaba
Excellent posts Michael. Thank you for taking the time to write this up!
Rhino on pre-order (obviously :D)
Re: Rhino
Posted: Mon Jun 13, 2016 8:33 pm
by bearfacedkiller
Enjoying the write up my man! You are a good knife maker and a good salesman.
I really want one. Thanks for sharing this with us. It is inspiring.
Re: Rhino
Posted: Mon Jun 13, 2016 9:17 pm
by SG89
Great write up look forward to each update


