Project: Snakewood Dragonfly - Work in Progress Thread

Discuss Spyderco's products and history.
User avatar
DCDesigns
Member
Posts: 1015
Joined: Fri Aug 05, 2011 5:50 pm
Location: ATL, Ga.
Contact:

Project: Snakewood Dragonfly - Work in Progress Thread

#1

Post by DCDesigns »

Whats up yall? So Ive had my G10 Dragonfly for a while now, and I have grown tired of the green G10 scales. They havent worn too well, and are getting dirty. I decided I'd like to dress it up a bit, and make it my dedicated gentlemen s knife. I actually bought the g10 'fly with the intention of re-scaling it from the get go. I was originally planning to use some Afzelia Xlay Lace, but I no longer have enough to spare for this project. I decided to go with snakewood, well, because I have a couple hundred pounds of the stuff :) . This snakewood is the same stock that is inlayed into Chris Reeve's Sebenza's and Mnandi's as of last month (CRK Buys it from me. :) :) :) )

I went ahead and broke the knife down, dissasembly was pie. One thing I noticed though, I only have a phosphor bronze bushing on ONE side. I thought I had lost the other, but I looked all around the floor and where I was working, and didnt find anything. (I always dissasemble knives on my kitchen counter, on a napkin, over hardwood floors) I assume this is an oversight, do yall think spyderco would be able to send me out another? If not, where might I source one myself? It seemed to work fine with just the one, but Im sort of OCD about this kind of thing, so Id really like to get it sorted with another bushing.

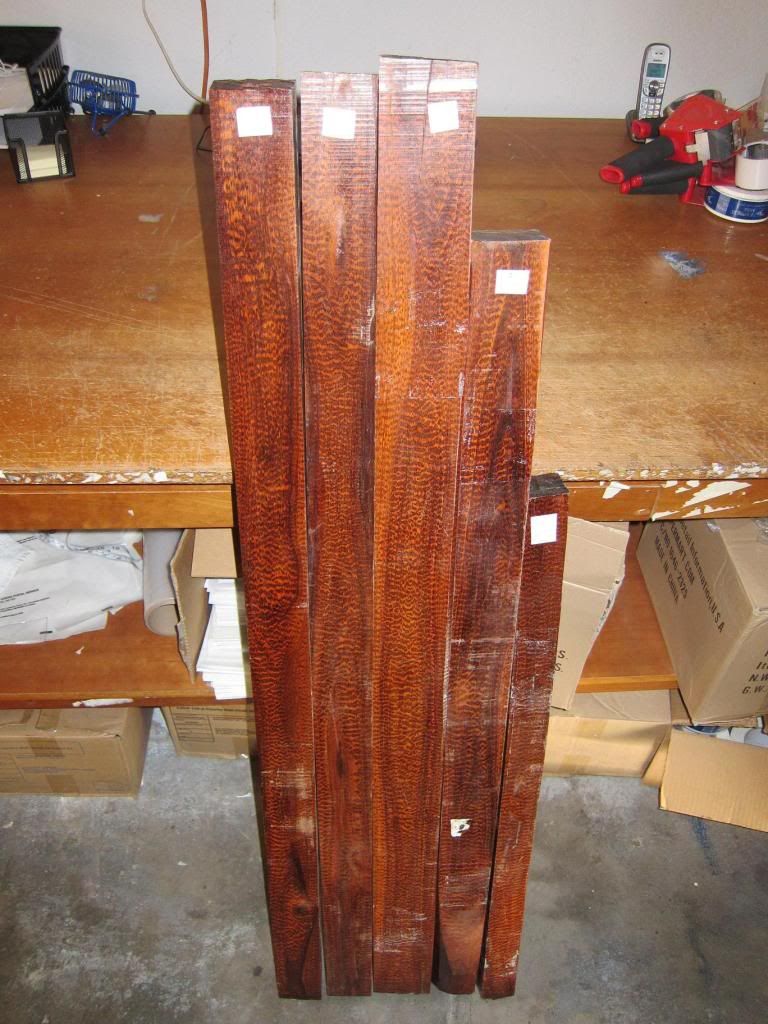
Anyways, I went ahead and selected some of my finest stock, cut a block off, and started cutting thin pieces for the scales. The stock g10 scales are .082". Im starting with slightly thicker as I know it will get worked down. The pieces i cut are .095".

Image
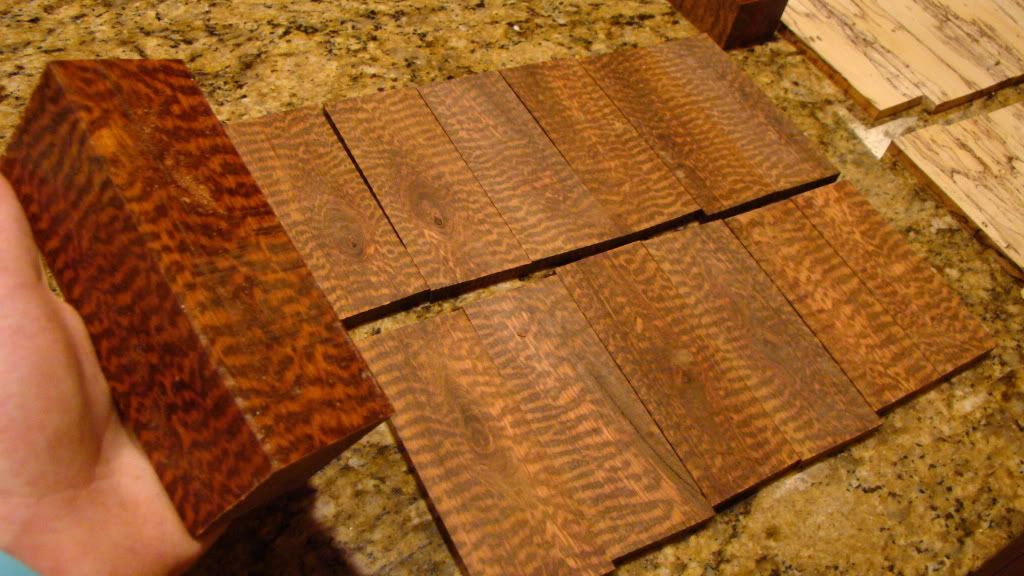
Pic: The block the D'flys scales came from over some gorgeous pre-cut snakewood knife scale sets (Im tempted to keep them all for myself!)

Image - 
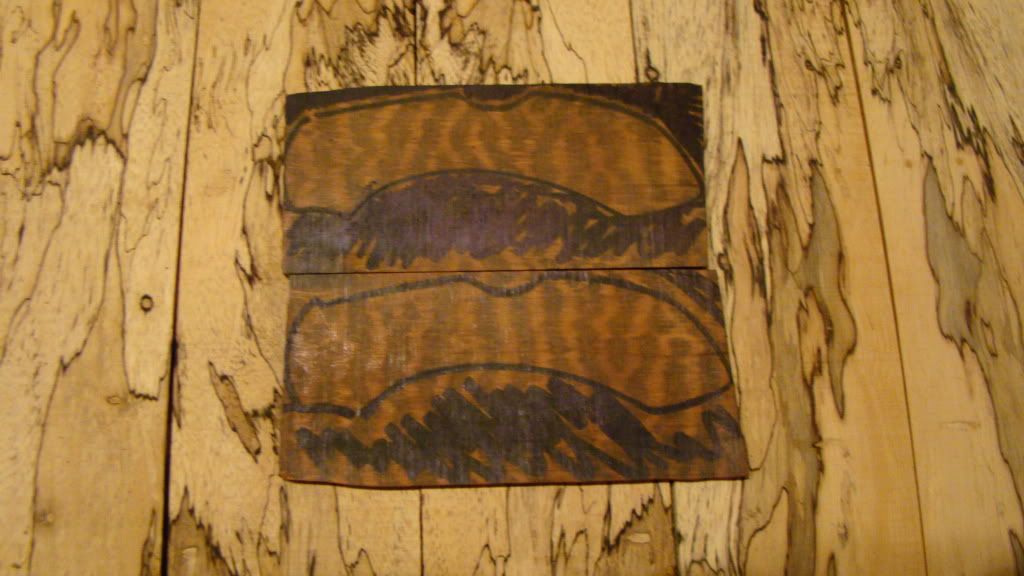
The pieces cut for scales (non-bookmatched) sitting on some Spalted Tamarind. I colored out the negative space for some pre-visualization.

Image 
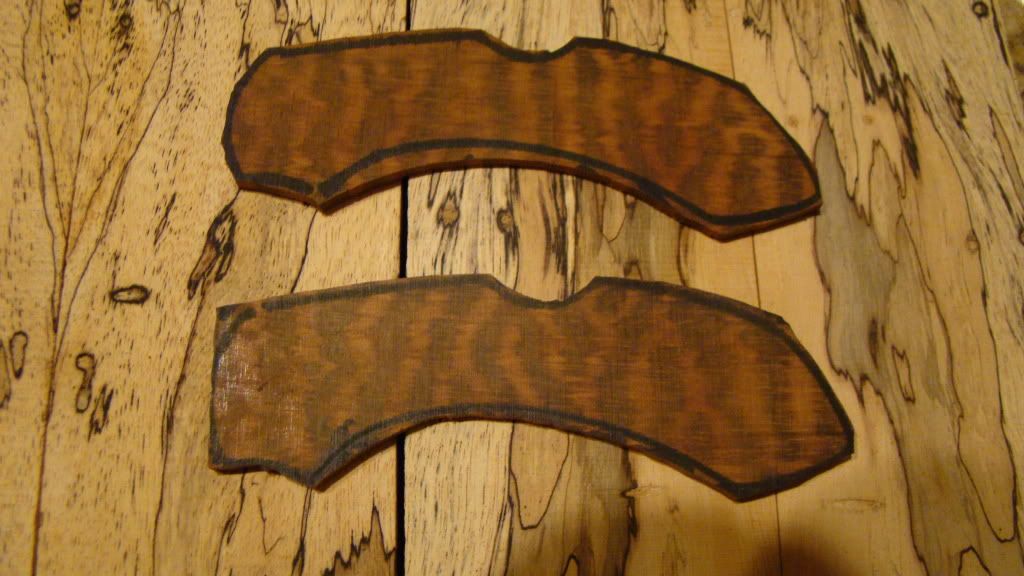
Here they are rough-cut, ready to be drilled and shaped.


-This is as far as I have gotten tonight. I will keep updating with pics as I have more time to work on it. Thanks for looking!
krislacy
Member
Posts: 183
Joined: Mon Sep 27, 2010 8:42 pm
Location: Union County Indiana

#2

Post by krislacy »

Thanks for the post. Can't wait to see more.
User avatar
jackknifeh
Member
Posts: 8412
Joined: Fri Jul 09, 2010 6:01 am
Location: Florida panhandle

#3

Post by jackknifeh »

Keep us posted. I've made a few sets for my knives and enjoy it. I've been wanting a D'fly for a long time and have decided to get the G-10 model when I do get one to make scales. I'd like to see what you come up with.

Jack
User avatar
Blerv
Member
Posts: 11833
Joined: Mon May 04, 2009 11:24 am

#4

Post by Blerv »

Cool :) . Thx for sharing.
User avatar
phillipsted
Member
Posts: 3674
Joined: Tue Oct 05, 2010 11:30 am
Location: North Virginia

#5

Post by phillipsted »

Nice, DC! This will look fantastic when you are finished.

Were you planning to offer some of the thin stock Zebrawood for sale? I'm sure there are a few folks who would like to attempt a similar project!

TedP
Worry less - Breathe more...

Spydie Fanatic #185
jackthedog
Member
Posts: 602
Joined: Sat Aug 07, 2010 5:48 am

#6

Post by jackthedog »

Looks great. Snakewood is a beautiful looking wood.
User avatar
DCDesigns
Member
Posts: 1015
Joined: Fri Aug 05, 2011 5:50 pm
Location: ATL, Ga.
Contact:

#7

Post by DCDesigns »

Thanks yall, Im really looking forward to finishing this one out. Might be my dad's christmas present. (I can finaly get that **** kershaw out of his pocket). I will probably end up etching and stonewashing the blade as well now that I have it apart. This is a fun project!
User avatar
cosmo7809
Member
Posts: 1762
Joined: Sun Jul 19, 2009 8:56 am
Location: New York City

#8

Post by cosmo7809 »

Wow, those are going to look great once all completed!


Cant wait to see more.
Come Join Us Click Here
wquiles
Member
Posts: 270
Joined: Fri Aug 12, 2011 10:30 pm

#9

Post by wquiles »

Nice project - looking forward to future pictures/updates ;)

Will
User avatar
toomzz
Member
Posts: 1355
Joined: Mon Aug 23, 2010 3:31 am
Location: Netherlands Earth

#10

Post by toomzz »

Cool, that is the best looking and most expensive wood I know. Give it time to get used to your climate; snakewood is sensitive for cracking. You have a good piece of snakewood there my friend. Not every part of that wood has that fine striped pattern. Show use more!

Tomas
Tom
User avatar
hunterseeker5
Member
Posts: 530
Joined: Wed Nov 03, 2010 4:23 pm
Location: Usually somewhere on the east coast

#11

Post by hunterseeker5 »

Let me offer a word of advice/caution. You might want to back those pieces before you apply them because in my experience working snakewood the stuff LOVES to split along its length. Then again you probably don't need me to tell you this...... food for thought anyway. A hint of a black behind your snakewood might look gorgeous no? :P
User avatar
defenestrate
Member
Posts: 2656
Joined: Fri Sep 24, 2004 10:33 am
Location: RTP NC area
Contact:

#12

Post by defenestrate »

DCD this should make for one beautiful handle.. looking forward to more pics.
-
Happy, Happy, Happy! Peel, Peel, Peel!
User avatar
pmbspyder
Member
Posts: 535
Joined: Fri Feb 18, 2011 10:11 am

#13

Post by pmbspyder »

Eagerly awaiting more pics!

Also, do you just do this as a hobby, or are your services available for procurement?
Latest :spyder:: Yojimbo 2
User avatar
DCDesigns
Member
Posts: 1015
Joined: Fri Aug 05, 2011 5:50 pm
Location: ATL, Ga.
Contact:

#14

Post by DCDesigns »

toomzz wrote:Cool, that is the best looking and most expensive wood I know. Give it time to get used to your climate; snakewood is sensitive for cracking. You have a good piece of snakewood there my friend. Not every part of that wood has that fine striped pattern. Show use more!

Tomas
Ok:
Image

The tight banding, IS on every side of these pieces. Here is a couple grand worth (80lbs or so). Chris Reeve bought the big one in this picture. I love working with this stuff, I find I only have problems with cracking if I turn it, or i there is already a weakness. According to many, this is the rarest wood in the world. The only thing I know of that sells for more is some really primo Desert Ironwood Burl, and maybe some Afzelia Xlay (IF the pattern is perfect)
User avatar
DCDesigns
Member
Posts: 1015
Joined: Fri Aug 05, 2011 5:50 pm
Location: ATL, Ga.
Contact:

#15

Post by DCDesigns »

hunterseeker5 wrote:Let me offer a word of advice/caution. You might want to back those pieces before you apply them because in my experience working snakewood the stuff LOVES to split along its length. Then again you probably don't need me to tell you this...... food for thought anyway. A hint of a black behind your snakewood might look gorgeous no? :P
If it ends up being a problem I might do that. Know of where I can get some g10 liners that are .02"?

Atleast I have enough to keep trying if it does split :p
User avatar
hunterseeker5
Member
Posts: 530
Joined: Wed Nov 03, 2010 4:23 pm
Location: Usually somewhere on the east coast

#16

Post by hunterseeker5 »

DCDesigns wrote:If it ends up being a problem I might do that. Know of where I can get some g10 liners that are .02"?

Atleast I have enough to keep trying if it does split :p
If it were me, and I readily admit its not, I'd just do it up myself. You can laminate it directly onto the scales (and with proper surface prep you can actually get amazing adhesion to steel, but thats another discussion) or you can just press it onto the piece and convert that into your blank, which is what I'd do. You don't need much to hold it together.

Maybe I'm going to far in telling you what to do here, but this is what I'd do:
Get whatever material you want, black construction paper will probably do nicely although other black papers or cloth will work, surface prep the inside of your scale and wipe some resin on it. Coat the inside and outside face of the paper in resin and then clam the whole thing against a flat smooth non-stick surface. (prepped glass is a delicate but very flat and smooth option) Make sure your scales are larger than they need be, so then when you actually cut and sand them to final shape your edges look nice and just like that you have a thin black backing which will hold the wood together and makes a beautiful accent line. It'll probably also be stronger than a piece of super thin micarta you just added to the piece because that will have a tendency to fail at the glue joint. Of course if you wanted to get crazy you could add layers of black and red paper, or all kinds of crap, just don't get too carried away. :P
User avatar
DCDesigns
Member
Posts: 1015
Joined: Fri Aug 05, 2011 5:50 pm
Location: ATL, Ga.
Contact:

#17

Post by DCDesigns »

hunterseeker5 wrote:If it were me, and I readily admit its not, I'd just do it up myself. You can laminate it directly onto the scales (and with proper surface prep you can actually get amazing adhesion to steel, but thats another discussion) or you can just press it onto the piece and convert that into your blank, which is what I'd do. You don't need much to hold it together.

Maybe I'm going to far in telling you what to do here, but this is what I'd do:
Get whatever material you want, black construction paper will probably do nicely although other black papers or cloth will work, surface prep the inside of your scale and wipe some resin on it. Coat the inside and outside face of the paper in resin and then clam the whole thing against a flat smooth non-stick surface. (prepped glass is a delicate but very flat and smooth option) Make sure your scales are larger than they need be, so then when you actually cut and sand them to final shape your edges look nice and just like that you have a thin black backing which will hold the wood together and makes a beautiful accent line. It'll probably also be stronger than a piece of super thin micarta you just added to the piece because that will have a tendency to fail at the glue joint. Of course if you wanted to get crazy you could add layers of black and red paper, or all kinds of crap, just don't get too carried away. :P
Thats actually a really good idea. I might try it if I can get some thin cotton cloth. My only concern is, I only have one set of liners, so I dont want to glue anything to them in case I screw up.
User avatar
Dr. Snubnose
Member
Posts: 8799
Joined: Sat Mar 05, 2005 10:54 pm
Location: NewYork

#18

Post by Dr. Snubnose »

So where is the finished product already!....Enough Talk get to work DC...LOL...Doc :p :D
"Always Judge a man by the way he treats someone who could be of no possible use to him"

*Custom Avatar with the Help of Daywalker*
User avatar
hunterseeker5
Member
Posts: 530
Joined: Wed Nov 03, 2010 4:23 pm
Location: Usually somewhere on the east coast

#19

Post by hunterseeker5 »

DCDesigns wrote:Thats actually a really good idea. I might try it if I can get some thin cotton cloth. My only concern is, I only have one set of liners, so I dont want to glue anything to them in case I screw up.
Then don't glue it to the liners. Just prep a plate (by prep I mean applying mold release, or if you're cheap buffed paste wax or car wax even can work) and laminate directly to that. Take a plane of old glass from a broken old window and use that to laminate just make sure to back it so you don't crack it. And also it sounds stupid but seriously even construction paper will work exceedingly well. Any fiber materials like that change completely when you laminate them. The cellulose in paper is incredibly strong, the fibers just aren't bound together well which is why paper is super easy to tear but actually relatively difficult to cut. Try it on some scrap if you don't believe me. **** try the whole process on a piece of scrap so that you don't make any mistakes on your snakewood. (yes I work with composites, I'm not just pulling all this out of my a**. Something like a knife handle is peanuts compared to making a composite spring)
User avatar
Rwb1500
Member
Posts: 1140
Joined: Fri Jun 24, 2011 11:44 pm
Location: Pennsylvania

#20

Post by Rwb1500 »

Dr. Snubnose wrote:So where is the finished product already!....Enough Talk get to work DC...LOL...Doc :p :D
I'm with the Doc, back to the shop! The people want more pics! :D
Post Reply